
Using a Microscope to Check Trichome Ripeness
Cannabis harvesting can be a tricky business, especially for novice growers. It can be challenging to determine the optimal time for cutting your plants, but getting this right can make all the difference in the quality of your yield. One tool that can be particularly useful for ensuring the optimal timing of harvest is a microscope. By using a microscope to check the trichomes on your cannabis plants, you can get a clear picture of their ripeness and quality. In this article, we’ll explore how to use a microscope to check trichome ripeness and offer tips for harvesting and curing your cannabis.
Why Use a Microscope to Check Trichomes?
Contents
Examining trichomes is one of the most critical steps in harvesting cannabis. It allows growers to determine the ideal period for harvesting and ensure optimum potency, flavor, and aroma. By visually checking trichomes under a magnifying tool like a microscope, you can accurately observe the harvest time of your cannabis plants. But why use a microscope to check trichomes when you can use your naked eyes? Let’s find out the benefits of using a microscope for trichome examination.
What are Trichomes?
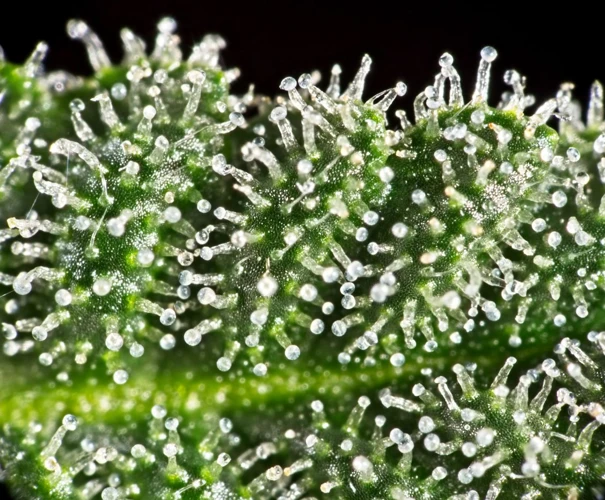
Trichomes are small resinous glands that develop on cannabis flowers and leaves during the plant’s growth cycle. These tiny structures contain the highest concentration of cannabinoids such as THC and CBD as well as terpenes. Trichomes also provide an extra layer of protection against pests and other external factors that can affect the plant’s survival.
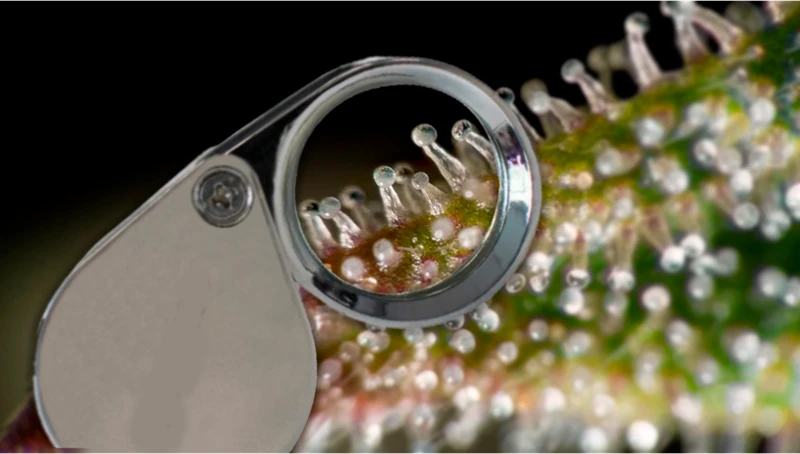
To the naked eye, trichomes look like tiny hairs on the surface of the buds. However, using a magnifying tool like a microscope or a jeweler’s loupe, you can see the trichomes more clearly. Trichomes come in different shapes and sizes as well as colors, which can indicate the plant’s maturity level.
Types of trichomes include:
- Bulbous trichomes – the smallest type of trichomes, located on the surface of the entire plant
- Capitate-sessile trichomes – somewhat larger than bulbous trichomes, these have a mushroom-shaped head and are short-stalked
- Capitate-stalked trichomes – the largest type of trichomes, with a long stalk and a mushroom-shaped head that contains the highest concentration of cannabinoids and terpenes
Understanding the different types of trichomes and their characteristics is essential in determining the ideal time to harvest cannabis. The quality of the buds greatly depends on the maturity level of the trichomes, as well as other factors like the plant’s genetics and environmental conditions.
To learn more about the harvesting process for cannabis, check out our comprehensive guide to harvesting cannabis buds or our article on harvesting cannabis seeds.
When to Harvest?
Knowing when to harvest your cannabis plants is crucial in order to achieve the desired potency, flavor, and aroma. Harvesting too early or too late can have a negative impact on the final product, so it’s important to be aware of the signs that indicate peak ripeness. Here are some factors to consider when determining when to harvest:
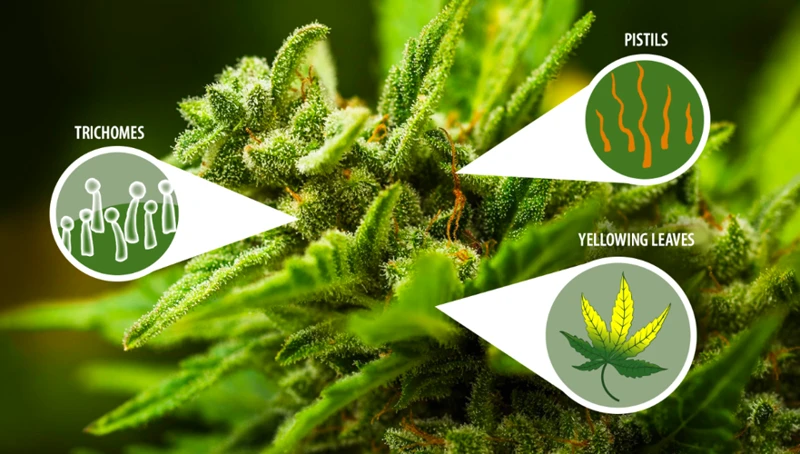
- Flower maturation: The most reliable way to determine if your cannabis plant is ready for harvest is by examining the trichomes with a microscope, as discussed in this guide. However, you can also use the “flower maturation” method, which involves observing the pistils (the hair-like structures on the flowers) to determine when they have changed color. When about 70-90% of the pistils have turned brown and curled inwards, the plant is likely ready for harvest.
- Strain: Different strains have different growing times and may mature at different rates. Some strains may be ready for harvest after 7-8 weeks, while others may take up to 12-14 weeks.
- Environment: The growing environment, including factors such as temperature, humidity, and lighting, can also affect the plant’s maturation time. Plants grown in colder or more humid environments may take longer to mature, while those grown in warmer and drier conditions may mature more quickly.
- Desired potency: The level of THC and CBD in the plant peaks at a certain point during its life cycle. If you’re looking for a more potent product, you may want to wait until the trichomes have turned amber in color, indicating peak ripeness. However, if you prefer a milder, more balanced effect, you may want to harvest when the trichomes are mostly cloudy or milky in color.
- Desired flavor and aroma: The terpene profiles and flavors of the plant will also change over time, so it’s important to pay attention to your preferences. If you’re looking for a certain flavor or aroma, you may want to harvest the plant at a certain point to achieve the desired result.
These factors, combined with the trichome observations using a microscope, will help you determine the best time to harvest your cannabis plants. Taking the time to carefully observe and assess these factors will ensure that you harvest a high-quality, potent product that meets your desired effects and tastes.
How to Use a Microscope?
If you’re new to using a microscope to check trichome ripeness, the process might seem daunting. However, with the right tools and knowledge, it can be a simple and efficient way to ensure that your cannabis plants are harvested at the optimal time. In this section, we will guide you through the steps of how to use a microscope for this purpose. So, let’s delve into the world of trichomes and learn how to check their ripeness with ease.
What Type of Microscope to Use?
Choosing the right microscope for checking trichome ripeness is crucial to getting accurate results. A handheld digital microscope is a popular choice for growers because of its convenience and affordability. These microscopes allow you to easily take pictures and videos of your trichomes, which is ideal for documenting the progression of your plants.
Compound microscopes are another option that provides high magnification and clarity, making it easier to see the different types of trichomes present on your cannabis plant. These microscopes are ideal for growers who want to get more in-depth information about the trichomes, such as their shape and size.
Stereomicroscopes, also known as dissecting microscopes, are a good choice for growers who want to check the trichomes’ color and maturity level. They provide a three-dimensional view, making it easier to assess the trichomes’ color changes.
Below is a table summarizing the different types of microscopes available to check trichome ripeness.
| Microscope Type | Advantages | Disadvantages |
|---|---|---|
| Handheld Digital Microscope | Convenient and affordable; allows you to easily take pictures and videos | Lower magnification than other types of microscopes |
| Compound Microscope | High magnification and clarity; ideal for assessing trichome shape and size | More expensive than handheld digital microscopes |
| Stereomicroscope | Provides a three-dimensional view; ideal for assessing trichome color changes | Less magnification than compound microscopes |
Remember, the type of microscope you choose will depend on your personal preference and the level of detail you want to see. It’s important to choose a microscope that is easy to use and provides accurate results.
Steps in Checking Trichome Ripeness
To check the trichome ripeness, follow the steps mentioned below:
| Step 1: | Clip a small piece of the bud from the larger plant. |
| Step 2: | Hold the bud with sterile tweezers. |
| Step 3: | Hold the bud under the microscope. |
| Step 4: | Adjust the magnification of the microscope to about 60-100x. |
| Step 5: | Focus the microscope on the trichomes of the bud. |
| Step 6: | Examine the trichomes closely and note their color and size. |
| Step 7: | Repeat the process on a few different buds to confirm the results. |
Make sure to sterilize the equipment beforehand to avoid any contamination of the buds. Also, it is recommended to check the trichomes at least twice to be sure of the results. Following this process will help you determine the optimal time to harvest your cannabis plants.
What Should You Look for While Checking Trichomes?
When using a microscope to check trichome ripeness, it’s important to know what to look for. Trichomes are small, hair-like structures on cannabis buds that contain the plant’s cannabinoids and terpenes. By examining their color, shape, and size, growers can determine when the buds are ready to be harvested. In this section, we’ll explore the key features to look for when checking trichomes, ensuring that you harvest your cannabis at the optimal time for potency and flavor.
Trichome Color
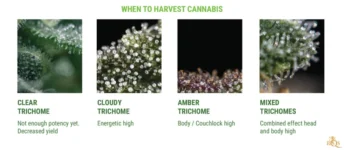
When checking trichomes with a microscope, one of the key things to look for is the color of the trichomes. This is because the color of the trichomes can tell you a lot about the ripeness of the cannabis plant.
Here are some things to keep in mind when looking at trichome color:
- Clear trichomes: When trichomes are clear, it means that the plant is not yet ready for harvest. This is because the clear trichomes indicate that the plant is still in its early stages of growth and has not yet reached its peak potency.
- Cloudy trichomes: Cloudy trichomes are a sign that the plant is nearing its peak potency. At this stage, the trichomes will be milky white in color and will have a cloudy appearance. This is the optimal time to harvest for a balanced head and body high.
- Amber trichomes: When trichomes turn amber in color, it means that the plant has passed its peak potency and is now in the beginning stages of degradation. This is the optimal time to harvest for a more relaxing and calming effect.
It’s important to note that the ideal trichome color can vary depending on the strain of cannabis being grown and the desired effect. Some strains may have a shorter window of peak potency, while others may have a longer window.
In addition to color, it’s also important to pay attention to the shape and size of the trichomes when determining harvest time. By using a microscope to closely examine the trichomes, growers can ensure that they are harvesting at the optimal time for the desired effect.
Trichome Shape and Size
When checking trichome ripeness, it’s important to inspect both the color and shape/size of the trichomes. Paying attention to the shape and size of the trichomes can help you determine the stage of ripeness.
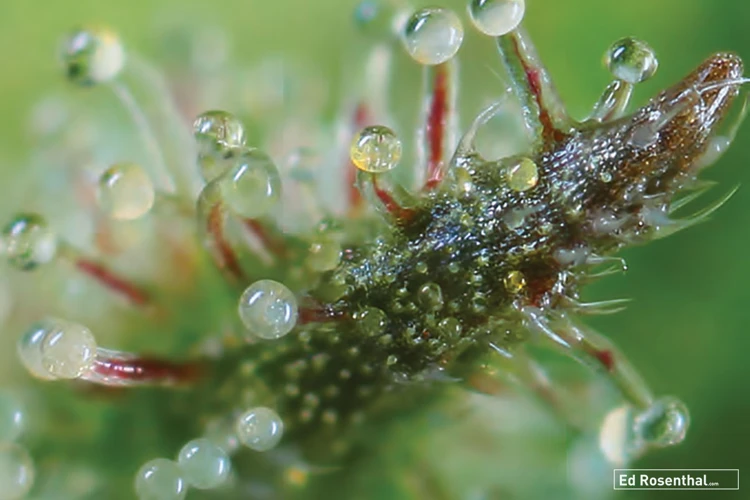
Trichome Shape: Trichomes come in a variety of shapes, including bulbous, capitate-sessile, and capitate-stalked. The bulbous trichome is the smallest of the three and looks like a tiny mushroom with a small head and short stalk. Capitate-sessile, or “sitting trichomes,” have a short stalk and a rounded head, while the capitate-stalked trichome has a longer stalk and a more elongated head.
Trichome Size: The size of the trichomes is also an important factor to consider when determining ripeness. Generally, trichomes will increase in size as the plant matures. However, as the plant reaches peak ripeness, the trichomes will start to shrink and degrade.
To better understand the different shapes and sizes of trichomes, refer to the table below:
| Trichome type | Shape | Size |
|---|---|---|
| Bulbous | Small mushroom shape | 10-15 microns |
| Capitate-sessile | Short stalk with a rounded head | 25-50 microns |
| Capitate-stalked | Long stalk with an elongated head | 150-500 microns |
By using a microscope to closely inspect the trichomes, you can determine the overall stage of ripeness based on both the color and the shape/size of the trichomes. Understanding what you’re looking for will help you achieve the highest quality harvest possible.
Equipment Needed to Check Trichomes
When it comes to checking trichome ripeness, there are a few key pieces of equipment that you will need.
Microscope: The most important piece of equipment needed to check trichomes is a microscope. You’ll want to use a microscope with at least 60x magnification to get a clear picture of the trichomes. There are several types of microscopes to choose from, including handheld, pocket, and USB digital microscopes.
Light source: In order to properly view the trichomes, a light source is necessary. A small LED flashlight is a great option, as it can easily be maneuvered to shine light on the specific bud you’re looking at.
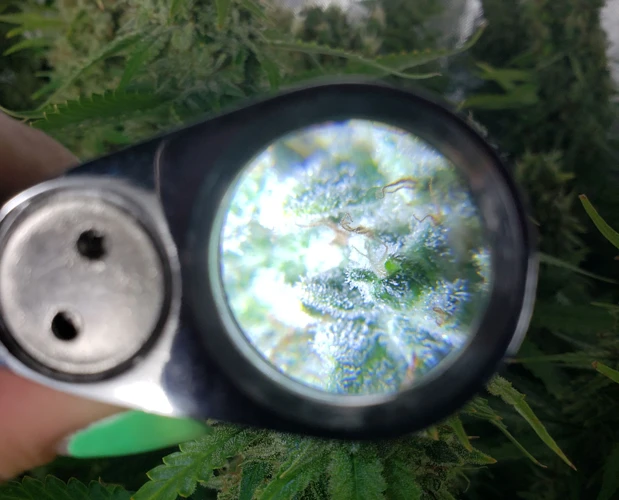
Magnifying glass: If you don’t have access to a microscope, a magnifying glass can still be used to get a better view of the trichomes. A 30x or 60x magnifying glass can be used in place of a microscope.
Clean surface: In order to properly view the trichomes, you’ll want to place a small bud on a clean surface. This will help eliminate any distractions or debris that could make it difficult to see the trichomes clearly.
Sharp scissors: If you plan on harvesting your cannabis soon after checking the trichomes, it’s important to have a pair of sharp scissors on hand for the trimming process. Dull scissors can make the trimming process more difficult and can damage the buds.
Container or baggie: Once you’ve harvested your cannabis, you’ll need a container or baggie to store it in during the curing process. Airtight mason jars are a popular choice for storing cannabis during the curing process, as they help maintain humidity levels.
Having these essential pieces of equipment on hand will ensure that you are able to accurately determine the ripeness of your trichomes and harvest your cannabis at the optimal time.
When to Harvest
Knowing when to harvest your cannabis plants is crucial for achieving the desired potency, flavor, and yield. Harvesting your cannabis plants at the right time will ensure that your flowers have the maximum levels of cannabinoids and terpenes, which are responsible for the plant’s effects and flavors.
There are several signs you can look for to know when your cannabis plants are ready for harvesting. The most reliable method is to use a microscope to examine the trichomes on the flowers. However, there are other signs you can observe as well.
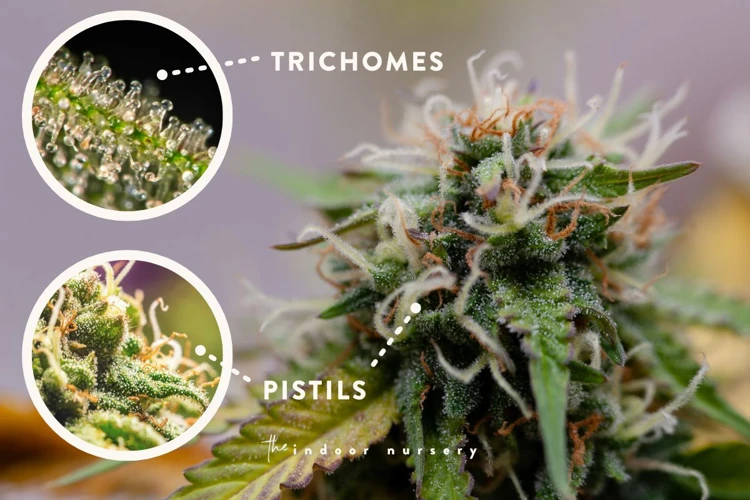
One of the primary indicators of harvesting time is the pistils (hairs). At the beginning of the flowering stage, the pistils are white and upright. As the plant matures, the pistils will start to turn red or brown, and they will curl inwards. Once about 70% of the pistils have turned color, the plant is ready for harvesting.
Another way to know if your plant is ready for harvesting is by observing the leaves. The leaves of a healthy cannabis plant should be green and full. As the plant matures, the leaves will start to change color and become yellow, indicating that the plant is almost ready for harvesting.
However, the most reliable way to determine the best time to harvest your cannabis plants is by examining the trichomes under a microscope. Waiting for trichomes to ripen will give you a more accurate result, as they will show when the plant has reached its peak potency.
When observing trichomes, you will notice a change in color. They will initially be clear or transparent, but as the plant matures, they will turn to opaque, milky white or amber. Clear trichomes indicate a premature plant while amber or overly milky trichomes indicate an overripe plant. The ideal time to harvest is when the trichomes are milky white, which signifies peak THC potency.
Harvesting your cannabis plants at the right time will provide you with the best possible yield and flavor. Conversely, harvesting too late can result in low-grade cannabis that will not be as potent or flavorful. Thus trichome observation under a microscope is an important tool for achieving success in harvesting cannabis plants.
Tips for Harvesting Cannabis
Once you have determined that your cannabis plant is ready for harvesting, it’s essential to handle each step with care to ensure that the buds are of high quality. The harvesting process involves a few critical steps that shouldn’t be skipped, such as preparing your workspace, trimming the buds, and curing them properly. These tips will help you produce high-quality buds with the right potency and flavor. So, let’s dive into the essential tips that will make your harvest a success!
Prepare Your Space
Before beginning the harvesting process, it is important to prepare your space to ensure a smooth and efficient experience. Here are some tips to keep in mind:
- Clean your space: Firstly, you should clean your space meticulously. Cannabis is a sensitive plant that can easily attract mold and mildew, so a sterile environment is essential. Use a disinfectant to clean floors, shelves, and all work areas. Additionally, wear gloves and use clean tools to avoid contaminating your harvest.
- Set up your workstation: Make sure you have enough space to work. You should have a clean workspace where you can hang your buds to dry. You’ll also want to have a comfortable chair and a good light source. Keep your tools, gloves, and sterilizing equipment nearby so you can easily access them. Remember to also check that your microscope is in working condition.
- Prepare for odor control: The strong-smelling odor of cannabis can travel throughout your home, so it’s important to take measures to control the smell. Close any windows and doors to the room where you’ll be working. You can also use a fan to keep the air moving, or invest in an air filter to keep the air clean.
- Get your equipment ready: You’ll need a set of sharp scissors, a clean bowl for your trimmed buds, and a clean container for your trimmings. Additionally, you’ll need a drying rack or a hanger to hang your buds. Make sure all of your equipment is clean and sterile to avoid contaminating your harvest.
- Set aside enough time: Finally, make sure you have enough time set aside to complete the entire harvesting process. Depending on the size of your crop, harvesting can take several hours or even days.
By following these tips for preparing your space, your harvesting process will be much more efficient and successful.
Harvesting Process
Harvesting Process:
When it comes time to harvest your cannabis plants, it is important to follow the proper steps to ensure the best yield and quality of buds. Here is a step-by-step guide on harvesting your cannabis:
- Inspect: Inspect the plants thoroughly to ensure that the buds are ripe and ready for harvest. The trichomes should be fully mature and have turned cloudy or amber in color, depending on your preference.
- Prepare: Have all of your tools and supplies ready before you begin the harvest. This includes scissors or pruning shears, gloves, bags or containers for holding the buds, and a workspace with plenty of ventilation.
- Harvest: Begin harvesting by cutting off the branches or individual buds from the plant using your scissors or pruning shears. Be careful not to damage the buds in the process.
- Trim: After harvest, you will need to trim away any excess leaves or stems from the buds. This will give your buds a cleaner appearance and help to enhance their potency.
- Cure: Once the buds have been trimmed, they will need to be cured in order to improve their flavor and potency. Curing involves drying the buds slowly over a period of several days to several weeks, depending on the humidity level in your area.
- Store: Once the buds have been cured, you can store them in airtight containers in a cool, dark place until you are ready to use them.
Following these steps will help ensure that your cannabis plants are harvested properly and that you are able to enjoy the full benefits of your hard work.
Trimming
After harvesting your cannabis buds, you need to trim them to remove any excess leaves or stems. Trimming is an important process that helps to improve the quality, potency, and flavor of your buds. Here’s a step-by-step guide to trimming your cannabis buds:
- Prepare your trimming space: Ensure that your trimming space is clean and well-lit. You’ll need a flat surface to work on, as well as a pair of sterile trimming shears or scissors.
- Separate your buds: Separate your buds from the stems before you begin trimming. This will make it easier to see which leaves need to be removed.
- Trim the sugar leaves: Use your trimming shears to carefully remove any larger fan leaves that are still attached to your buds. Pay close attention to the sugar leaves that surround your buds because they will have a lot of trichomes on them. You want to leave as many trichomes on your buds as possible, so be careful not to trim them away.
- Manicure your buds: After removing the larger sugar leaves, it’s time to manicure your buds. Use your trimming shears to carefully trim away any smaller leaves or stems that are still attached to your buds. Take your time and be gentle to avoid damaging the buds.
- Cure your buds: Once you’ve finished trimming your buds, it’s time to cure them. Curing is an important process that helps to improve the flavor, aroma, and potency of your buds. To cure your buds, you’ll need to place them in a sealed container and store them in a cool, dark place for at least two weeks.
By following these simple steps, you can ensure that your cannabis buds are properly trimmed and ready for consumption. Remember to take your time while trimming and be gentle to avoid damaging your buds.
Curing
Curing is an essential process of post-harvesting that helps to enhance the potency, aroma, and flavor of your cannabis buds. During this process, the buds are dried, trimmed, and then cured to break down the remaining chlorophyll, improve the smoothness of smoke, and develop a more potent effect.
Here are the steps you need to follow to properly cure your cannabis buds:
- Step 1: Drying – After harvesting your cannabis buds, hang them in a cool, dark, and dry place to dry out. You can either choose to hang the entire plant or cut off the individual branches and then hang them to dry. Make sure to keep the buds well-spaced to avoid mold growth. This process may take up to two weeks.
- Step 2: Trimming – Once your buds have dried out, trim the excess leaves closely to the buds to improve their appearance and potency. You can use trimming scissors to carefully cut away the leaves and stems.
- Step 3: Curing – Place your trimmed buds in an airtight container, such as a mason jar, and store them in a cool, dark, and dry place. Open the jar once a day to allow air to circulate and check for any signs of mold or mildew. You can also add humidity packs to maintain an optimal moisture level. The curing process can take up to several weeks, and the longer you cure your buds, the better the quality will be.
- Step 4: Testing – Once your cannabis buds have been cured, you can test them to ensure that they are dry enough for consumption. The buds should feel slightly sticky but not wet or moist. You can also check for the potency and flavor of your buds to ensure that they are well-cured.
Remember, curing your cannabis buds is just as important as growing them properly. By following these steps, you can ensure that you’ll end up with high-quality cannabis that will provide the best possible experience.
Avoiding Common Mistakes
As important as it is to properly inspect trichomes and meticulously harvest cannabis, it’s equally crucial to avoid common mistakes that can ruin the quality of the final product. Unfortunately, many cultivators make missteps that can be detrimental to the yield, flavor, and potency of their cannabis. It’s essential to be aware of these errors and learn how to steer clear of them when harvesting cannabis. Here are some tips to avoid common mistakes and ensure that you’re harvesting the finest quality crop possible.
Harvesting Too Early or Too Late
Harvesting at the right time is crucial for achieving the best possible results. Harvesting too early or too late can have a negative impact on the yield and potency of your harvest. Here are some common mistakes to avoid when it comes to harvesting cannabis:
- Harvesting too early: Many new growers make the mistake of harvesting too early, thinking that they will get a higher yield. However, harvesting too early can result in lower potency and less flavor. When harvesting too early, the trichomes have not yet reached their full potential, resulting in a suboptimal harvest. Make sure you have checked the trichomes using a microscope and wait for the right time to harvest.
- Harvesting too late: On the other hand, if you wait too long to harvest, the trichomes will start to degrade and break down. This means that the potency and flavor of your cannabis will decrease, which is not ideal. Waiting too long to harvest can also result in lower yields, as the plant will start to use its energy for seed production instead of resin production. Again, make sure you regularly check the trichomes so you can harvest at the right time.
To avoid these mistakes, make sure to regularly check your plants using a microscope and harvest when the trichomes have reached their optimal ripeness.
Not Using Sterilized Equipment
One common mistake that many novice cannabis growers make when harvesting their plants is not using sterilized equipment. This can lead to contamination of the plant material, affecting the taste and quality of the final product. If you are using dirty or unclean tools, you risk introducing bacteria, fungi, or other microorganisms to your cannabis plants. When harvesting, it’s essential to take necessary precautions to ensure that your tools and equipment are thoroughly washed and sterilized.
Here are some tips to help you avoid this mistake:
- Clean your equipment: Before each use, ensure that all tools are clean and free from any residue or contaminants. Use warm water, soap, and a scrub brush to clean all surfaces thoroughly.
- Sterilize your equipment: After cleaning, sterilize your tools using alcohol, hydrogen peroxide, or a sterilization solution, such as a bleach solution or a vinegar solution. Allow them to dry completely before using.
- Avoid cross-contamination: Use separate tools for each plant to avoid spreading any powdery mildews, molds or other plant diseases. Don’t forget to wash your hands or use gloves to prevent leaving any bacteria or oils from your skin on the plant material.
By taking these simple steps, you can ensure that your cannabis plants remain healthy and free from contaminants. It will result in high-quality, flavorful, and potent cannabis buds that you can enjoy for months to come.
Skipping Curing Process
One of the most common mistakes that cultivators make after harvesting their cannabis plants is skipping the curing process. The curing process is an essential step in preparing your cannabis buds for consumption.
During the curing process, excess moisture is removed from the buds over a period of several weeks. If you skip this process and go straight to drying or smoking the buds, you risk ending up with overly harsh and unpleasant smoke that could even cause headaches.
Curing also allows the trichomes to develop their full flavor and potency potential. Skipping this step means that you’ll be missing out on one of the most important aspects of enjoying your cannabis – the taste and aroma.
To avoid this mistake, make sure that you allocate enough time for the curing process. Invest in high-quality storage containers that will help you create the ideal environment for your buds to cure. Mason jars or any other airtight container are perfect for this purpose.
Table:
| Mistake | Consequence | Prevention |
|---|---|---|
| Skipping the curing process | Harsh and unpleasant smoke | Allocate enough time for curing, invest in high-quality storage containers |
Conclusion
The process of harvesting cannabis can be a complex and detailed undertaking, but with the help of a microscope to check trichome ripeness, it becomes much easier to determine the right time to harvest. By monitoring the trichomes carefully and making sure that they are ripe before harvesting, you can ensure a higher quality yield.
One of the most important things to keep in mind is that the process of harvesting cannabis can be time-consuming and requires careful attention to detail. From preparing your space to trimming the buds and curing them properly, every step in the process is important.
By using a microscope to check trichome ripeness, you’ll be able to identify the right time to harvest your cannabis plants and ensure that you get the most out of your yield. Whether you’re a seasoned grower or just getting started, using a microscope is an essential tool that can help you improve the quality of your harvest.
It’s important to remember that while checking trichomes can provide valuable insights into when to harvest, it’s not the only factor to consider. Other factors like the plant’s overall health, environmental conditions, and genetics also play a role.
Nevertheless, by following the tips outlined in this guide, you can take the guesswork out of harvesting cannabis and achieve a higher quality yield. With careful attention to detail and the right equipment, you’ll be well on your way to harvesting robust and potent buds that are sure to delight your senses. So, invest in a good microscope, keep a watchful eye on those trichomes, and get ready to enjoy the fruits of your labor.
Frequently Asked Questions
Can I use a magnifying glass instead of a microscope to check trichomes?
A magnifying glass can be used, but a microscope will provide a much better view of the trichomes for more accurate results.
Can I harvest my cannabis without checking trichome ripeness?
Yes, but it may result in lower quality and potency of the final product.
Do trichomes continue to develop after harvesting?
No, trichomes do not continue to develop after harvesting.
Will checking trichomes affect the overall yield of my cannabis plant?
No, checking trichomes will not affect the overall yield of your cannabis plant.
Should I check trichomes on the sugar leaves or the buds?
It is recommended to check the trichomes on the buds, but checking the sugar leaves can also provide some insight.
What should I do if I accidentally harvest too early?
If you harvest too early, you can still dry and cure your cannabis, but the potency and overall quality may be lower than if you had waited for full trichome ripeness.
How long does the curing process take?
The curing process typically takes 2-4 weeks, but can be longer depending on personal preference.
Can I use the same microscope to check trichomes on different plants?
Yes, as long as the microscope is cleaned and sterilized between uses to prevent contamination or cross-contamination.
What should I use to sterilize my equipment?
Isopropyl alcohol can be used to sterilize equipment, but make sure to rinse and dry thoroughly before use.
Is it necessary to trim the buds before curing?
Yes, trimming the buds before curing will help ensure proper airflow and prevent mold or mildew growth during the curing process.

