
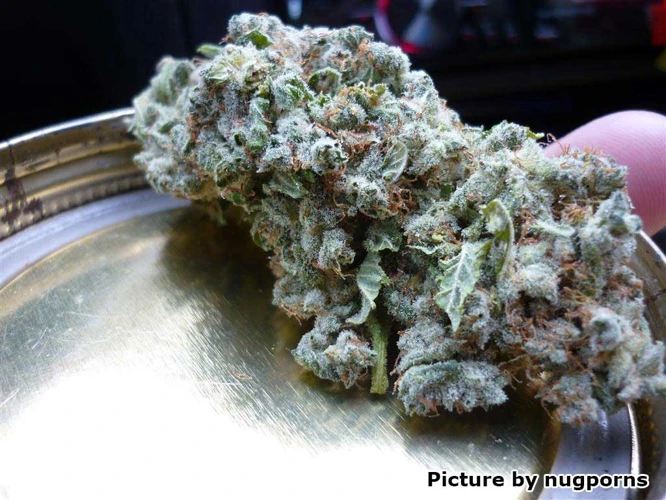
How to Properly Dry and Cure Cannabis Buds
As a cannabis grower, you’ve invested time, effort, and resources into producing high-quality buds. Now that it’s time to harvest, what’s the next step? Drying and curing your cannabis buds is just as important as growing them in the first place. But where do you start, and what are the best techniques to use? In this comprehensive guide, we’ll walk you through the tips and techniques for drying and curing your cannabis buds step-by-step, so that you can achieve the highest potency, flavor, and quality possible.
Why is Drying and Curing Important?
Contents
After all the time and effort put into growing your cannabis plants, it would be a shame to not properly dry and cure your buds. Many novice growers underestimate the importance of this process, but experienced cultivators know that it is essential to achieve the desired potency, flavor, and aroma of the final product. In fact, the drying and curing stages can make or break the quality of your buds. So, why exactly is drying and curing so important? Let’s explore two key reasons in detail: preserving the quality of your buds and maximizing potency and flavor.
Preserve the Quality of Your Buds
Preserving the quality of your buds during the drying and curing process is essential for producing a high-quality product. Here are some tips for preserving the quality of your buds:
| Tip | Description |
| Trimming | Removing all excess leaves and stems before drying can help preserve the quality of your buds during the curing process. This will allow for a smoother and more even drying process. |
| Avoiding Mold | Proper drying conditions and air circulation are crucial to avoid mold growth which can ruin the quality of your buds. |
| Slow Drying | Slow drying of your buds will allow for a more even drying process which can help preserve the flavor and potency of your buds. |
| Burping | Burping your curing containers regularly will allow excess moisture to escape and prevent mold growth which can affect the quality of your buds. |
| Proper Storage | Storing your cured buds in the proper containers and conditions can help maintain their quality and prevent degradation over time. |
By following these tips and techniques, you can help ensure that your buds are of the highest quality possible. Proper preservation of your buds will not only make for a better smoking experience, but it can also increase the overall value of your product.
Maximize Potency and Flavor
Proper drying and curing techniques do more than just preserve the quality of your buds – they can also maximize potency and flavor. When cannabis plants are first harvested, they contain high levels of cannabinoids and terpenes, which are responsible for the plant’s aroma and effects.
However, if buds are not dried and cured properly, those compounds can break down or evaporate, resulting in weaker potency and flavor.
That’s why it’s crucial to follow best practices when it comes to drying and curing your cannabis buds:
| Technique | Description |
|---|---|
| Slow Drying and Curing | Curing buds by slowly drying them over a period of time (typically 1-3 weeks) allows the cannabinoids and terpenes to develop and mature, resulting in a more potent and flavorful final product. |
| Proper Humidity Control | Maintaining proper humidity levels during the drying and curing process is critical. If the air is too dry, the buds will dry out too quickly and lose potency and flavor. If the air is too humid, the buds can develop mold or mildew. |
| Adequate Airflow | Adequate airflow during the drying and curing process helps prevent mold and mildew from developing on the buds. It also helps ensure that the cannabinoids and terpenes are distributed evenly throughout the buds. |
By following these techniques, you can help ensure that your cannabis buds are as potent and flavorful as possible.
When to Harvest
One of the most critical aspects of cultivating cannabis is knowing when to harvest your plants. Harvesting too soon or too late can significantly impact the potency and quality of your final product. The ideal harvest time depends on several factors, including trichome and pistil color and whether the plant is grown indoors or outdoors. In this section, we will explore the various indicators of ideal harvest time to help you achieve the best yield possible.
Trichome Color
Observing trichome color is one of the best ways to determine when it’s time to harvest your cannabis buds. Trichomes are small, hair-like structures that cover the buds and hold the plant’s cannabinoids and terpenes. By monitoring their color, you can tell when your buds have reached their maximum potency.
Here’s a breakdown of trichome colors to watch for:
| Color | Description |
|---|---|
| Clear | Trichomes are still maturing and contain little to no THC. |
| Cloudy | Trichomes are nearing their peak THC content and offer a more balanced high with both head and body effects. |
| Amber | Trichomes have started to degrade, indicating a higher THC content with more of a sedative effect. If you prefer a more uplifting effect, harvest before many of the trichomes turn amber. |
It’s important to note that different strains may have different optimal trichome colors. By observing the trichomes on your specific strain, you can determine the best time to harvest for that particular plant. It’s also helpful to use a microscope or magnifying glass to get a closer look at the trichomes.
Pistil Color
One of the factors to consider when determining the optimal time to harvest your cannabis buds is the color of the pistils. Pistils are the hair-like structures that protrude from the buds of female cannabis plants. At the beginning of the flowering stage, these pistils are white and stick straight out from the buds.
As the buds mature, the pistils will start to change color. The first change is that they will start to curl in on themselves. This is a sign that the plant is nearing maturity. In addition to curling, the pistils will also change color.
When the pistils change color to:
| Color | What it Means |
|---|---|
| White | Too early to harvest, buds are not yet mature. |
| Yellow or Orange | Buds are ready to harvest, but may not be at peak potency. |
| Brown or Red | Buds are past their prime and may have started to degrade. |
It’s important to pay attention to the pistil color, but not rely on it solely to determine when to harvest. Trichome color and overall plant health are also important factors to consider. Some growers also prefer to harvest slightly earlier or later based on their personal preferences for the effects their cannabis provides. Experimentation and experience are key in determining the perfect time to harvest your cannabis buds.
Indoor vs Outdoor Harvest Time
When it comes to determining the ideal time to harvest cannabis plants, whether grown indoors or outdoors, there are several factors to consider. Let’s take a closer look:
- Light Cycle: Indoor growers have complete control over the light cycle, allowing them to force their plants into flowering whenever they choose. Outdoor growers, on the other hand, are at the mercy of the natural daylight hours, which can vary depending on the latitude and season.
- Climate: The weather and temperature conditions can also affect the time of harvest, particularly for outdoor growers. Wet and humid conditions increase the risk of mold and mildew, while hot and dry conditions can cause the buds to dry out too quickly.
- Genetics: Different cannabis strains have different flowering times and maturation rates. It’s important to research the specific strain being grown and take note of its estimated flowering time.
- Trichomes: As mentioned earlier, trichomes are a key indicator of the plant’s readiness for harvest. Pay close attention to their color and density to determine when the ideal time is to harvest.
- Pistils: Pistils, or the small, hair-like structures on the buds, can also provide a clue to the plant’s maturity. When they start to turn from white to a darker color, it’s a sign that the buds are ripe and ready for harvest.
- Desired Effect: The desired effect of the final product also plays a role in determining the optimal harvest time. Those seeking a more uplifting or energetic effect may choose to harvest earlier, while those seeking a more relaxing or sedative effect may wait until later in the plant’s cycle.
It’s important to carefully observe and monitor the plants throughout their growth cycle, taking all of these factors into consideration, in order to determine the optimal time for harvest.
Drying Your Buds
After the long process of nurturing and growing your cannabis plants, it’s finally time to harvest your buds. But before you can start enjoying your hard-earned product, you need to properly dry and cure your buds. This crucial step is what sets apart subpar cannabis from top-quality flower. Without proper drying and curing techniques, your buds can lose potency and their overall quality. In this section, we will guide you through the steps of drying your buds, including pre-drying trim, hanging and drying, and drying time and conditions. Get ready to unlock the full potential of your cannabis harvest!
Pre-Drying Trim
Before you hang your buds to dry, it’s important to prepare them by giving them a pre-drying trim. This entails removing unnecessary foliage and excess leaves that could hinder the drying process or contribute to mold growth. Here’s how to do it:
1. Gather Your Tools
Before you begin, make sure you have the appropriate tools for the job. You’ll need a pair of sharp, clean trimming scissors and a pair of pruning shears. Ensure that the blades are sharp and free from any debris to make the trimming process easier and to avoid damaging your buds.
2. Cut Away Large Fan Leaves
Using your pruning shears, cut away any large fan leaves that are still attached to the plant. These leaves contain minimal cannabinoids and are best discarded as they may take longer to dry and could attract mold.
3. Remove Any Diseased or Damaged Material
Inspect your buds and remove any diseased or damaged material with your trimming scissors. These sections should be discarded as they could attract mold and ruin the overall quality of your harvest.
4. Trim the Smaller Sugar Leaves
Using your trimming scissors, carefully trim away any smaller sugar leaves that surround the buds. These leaves contain cannabinoids and other beneficial compounds, so be sure not to cut too much. Leave behind the trichome-rich areas but remove any excess foliage to improve airflow and promote even drying.
5. Hang the Buds
Once your buds are trimmed, it’s time to hang them to dry. Be sure to leave enough stem to hang them comfortably without damaging the buds. The pre-drying trim will ensure that your buds are ready to dry properly, which is a crucial step in ensuring the highest quality and potency.
Hang and Dry
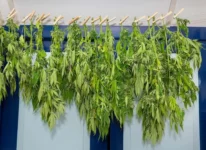
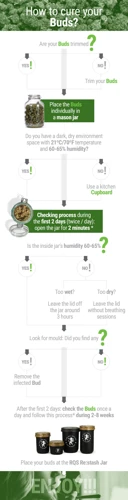
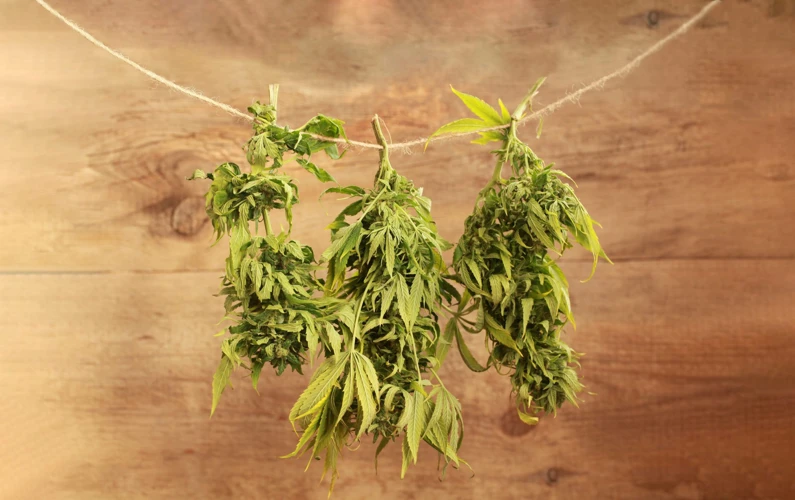
Once you have trimmed your buds, it’s time to hang them up to dry. Here’s how to do it properly:
- Prepare the Space: Find a cool, dark, and well-ventilated space to dry your buds. You can hang them in a closet, a tent, or a grow room. Make sure it’s a place where you can control the temperature and humidity levels.
- Hang the Buds: Take a piece of string or twine and tie it around the stem of a bud. Hang the bud upside down from a wire or string that’s attached to the ceiling. Make sure there’s enough space between the buds for air to flow through freely.
- Check on the Buds: Check on your buds every day to make sure they’re drying evenly. If any buds feel moist or sticky, separate them from the rest of the batch and leave them to dry separately for a day or two more.
- Avoid Direct Light: Keep your buds out of direct sunlight. UV light can degrade the quality of your buds and reduce the potency of the THC.
- Control the Temperature and Humidity: The ideal temperature for drying cannabis buds is between 60-70°F. Humidity should be between 45-55%. If it’s too humid, the buds may rot. If it’s too dry, they may dry out too quickly and lose their potency.
- Check for Mold: Keep an eye out for any signs of mold. If you see any white or gray spots on your buds, it’s time to take action. Remove any moldy buds immediately and increase air circulation and ventilation in the drying space.
Hang drying your buds takes time and patience, but it’s worth it to preserve the quality and potency of your cannabis.
Drying Time and Conditions
After harvesting your cannabis buds, the next step is to properly dry them. Proper drying is crucial to ensure that your buds retain their quality, potency, and flavor. Here are some tips on drying time and conditions to help you achieve the best results:
- Air Circulation: Good air circulation is essential for drying your buds. Make sure that your drying area has proper ventilation to facilitate the drying process. A small fan can help improve air circulation and prevent mold growth.
- Temperature: Optimal drying temperature ranges between 60-70°F (15-21°C). Temperatures above or below this can lead to problems such as mold growth, loss of potency, or loss of flavor. Also, avoid drying your buds in direct sunlight as it can cause rapid drying and damage to the trichomes.
- Humidity: Maintaining the correct humidity level during drying is important. Ideal relative humidity is between 45-55%, which can be achieved using humidity packs. Avoid humidity levels above 60%, as this can lead to mold growth. Low humidity levels (<30%) can cause buds to become too dry and brittle.
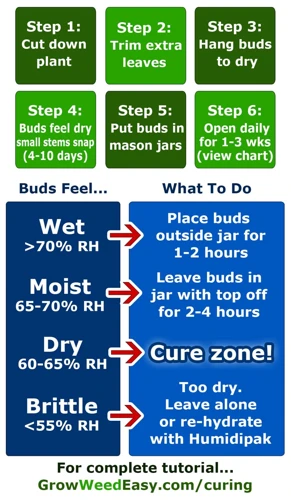
- Drying Time: The ideal drying time for your buds is around 7-10 days, but this can vary depending on various factors such as temperature, humidity, and airflow. Buds should be dry to the touch and stems should snap instead of bending.
Be patient during this process, as rushing it can lead to poor results. Properly dried buds will provide a smoother smoking experience with maximum potency and flavor.
Curing Your Buds
Now that your buds are dried, it’s time to move onto the next crucial step in the process: curing. Curing is the process of storing your buds in a specific way to bring out their fullest potential. It involves exposing your buds to just the right amount of air and moisture to allow them to fully develop their flavor and aroma, while also increasing their potency. Curing your buds is an important step that shouldn’t be overlooked, as it can make a big difference in the quality of your final product. Let’s take a closer look at how to properly cure your buds.
Why Curing Matters
Curing is an essential step in producing high-quality cannabis buds that are potent, flavorful, and smooth to smoke. Properly curing your buds can take them from good to exceptional. Here are some reasons why curing matters:
- Reduces Harshness: When cannabis is freshly harvested, it contains excess moisture and other compounds that can make it harsh to inhale. Curing removes this excess moisture, allowing for a smoother smoking experience.
- Improves Flavor: As cannabis plants mature, their flavors and aromas develop. Curing allows those flavors to fully develop, resulting in a more enjoyable smoking experience.
- Preserves Potency: Properly cured cannabis can preserve its potency for a longer time. This means you can store it for longer periods without sacrificing its quality or potency.
- Enhances Appearance: Curing can enhance the appearance of buds, making them more attractive and appealing to the eye.
Curing is critical to producing high-quality cannabis buds that are smooth, flavorful, and potent. Without proper curing, your buds may lack the desired characteristics and may not be as enjoyable to smoke.
Preparing Your Curing Containers
One important step in the curing process is preparing your containers correctly. First, choose airtight glass jars with rubber sealing lids. These jars will protect your buds from moisture and light while allowing for air flow. Second, sterilize your jars by washing them with hot water and soap or using a solution of half water and half vinegar. Third, dry your jars completely before filling them with your dried buds. Any residual moisture could lead to mold growth.
Next, consider the size of your curing containers. Large jars may seem like a good idea for big harvests, but small jars can be more practical. They allow you to separate strains and control humidity levels more easily. It’s important to fill the jars to the top without compacting the buds. This will create an even moisture distribution throughout.
Another tip is to use humidity packs or desiccant packs to help maintain consistent humidity levels during the curing process. These packs can be added to the jars with your buds to control moisture content.
Lastly, label your jars with the strain name and date. This will help with organization and allow you to keep track of the curing time. Place your jars in a cool, dark place and burp them daily for the first few weeks to release any excess moisture.
Curing Time and Conditions
During the curing process, proper time and conditions are crucial to achieve high-quality buds. Here are some tips to help you achieve the best results:
- Patience is key: Curing cannabis buds takes time, and it’s important not to rush the process. The ideal curing time is around two to four weeks, but some strains may require more time to fully develop their flavor and potency.
- Humidity: Buds should be kept in a container with a humidity level of 58-62% to prevent mold growth. This can be achieved with the use of humidity control packets or by checking the moisture levels with a hygrometer.
- Airflow: While humidity is important, you also want to make sure there is enough airflow to prevent stagnant air within the curing container. This can be achieved by burping the container a few times a day, which involves opening it up for a few minutes to allow fresh air to circulate.
- No light: Store the curing containers in a dark place to prevent light from degrading the buds’ THC content.
- Frequent monitoring: During the curing process, it’s important to check the buds for any signs of mold, mildew, or rot. Remove any affected buds immediately to prevent it from spreading to the rest of the stash.
By following these tips, you can ensure a successful curing process and achieve the best possible flavor and potency from your buds. Remember, proper curing is just as important as the growing and harvesting process, so it’s worth taking the time and effort to do it right.
Post-Curing Trim
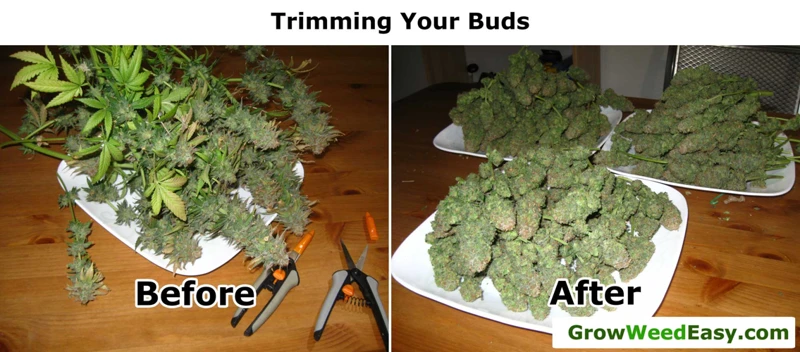
Once the buds have been dried and cured, it’s time to address the post-curing trim. This part of the process involves inspecting and grooming the buds to make them look their best. Achieving a professional-looking trim is important not just for aesthetic purposes, but also for improving the smoking experience. The right trim can help reduce harshness and enhance the overall flavor of the buds. But how do you go about achieving that perfect trim? In this section, we’ll discuss some tips and techniques for post-curing trim that will leave you with buds that are not only potent and flavorful, but also visually appealing.
The Importance of a Smooth Trim
A key step in the post-curing process is trimming your buds. Trimming refers to the process of removing any excess foliage or leaves from your buds to create a smooth, uniform appearance. A smooth trim can improve the overall quality and appearance of your cannabis buds.
When trimming, it’s important to use sharp, sterile scissors to avoid damaging the buds or introducing any contaminants. It’s also important to trim carefully and selectively, focusing on removing only the undesired parts of the bud.
Aim to leave behind as much of the trichome-rich outer layer of the bud as possible, as this is where much of the plant’s potency and flavor reside. However, be sure to remove any leaves that may produce a harsh taste or negatively impact the smoking experience.
Additionally, taking the time to properly trim your buds can improve their burnability, helping to ensure a smooth and consistent smoking experience. A well-trimmed bud should be uniform in shape and size, with a minimal amount of excess plant matter.
While trimming may be a somewhat tedious process, it’s an essential step in creating a high-quality finished product. With a bit of patience and attention to detail, you can create buds that not only look great but also deliver an excellent smoking experience.
| Important Tips for Trimming |
|---|
| 1. Use sharp, sterile scissors to avoid damaging the bud or introducing contaminants. |
| 2. Trim carefully and selectively, focusing on removing only the undesired parts of the bud. |
| 3. Aim to leave behind as much of the trichome-rich outer layer of the bud as possible. |
| 4. Remove leaves that may produce a harsh taste or negatively impact the smoking experience. |
| 5. Properly trimmed buds can improve burnability and smoking experience. |
Removing Sugars Leaves
During the post-curing trim, it is important to remove the sugar leaves from the buds. These leaves do not have high levels of cannabinoids and terpenes and can negatively affect the taste and texture of your buds. Here are some tips for removing sugar leaves:
| Tip | Description |
|---|---|
| Use sharp scissors | Sharp scissors will make it easier to get a clean cut and avoid damaging the buds. |
| Start from the bottom | Start at the bottom of the buds and work your way up to avoid removing too much from the top. |
| Focus on the large leaves | Focus on removing the large sugar leaves that are directly attached to the buds. These leaves are the most visible and have the least trichomes. |
| Leave some small leaves | Leave some small sugar leaves that are directly attached to the buds. These leaves provide a protective covering for the buds and can help preserve the natural flavor. |
| Trim over a screen | Trim your sugar leaves over a screen to collect any trichomes that may have fallen off. You can use these trichomes to make concentrates or sprinkle them on top of your bowl. |
By removing the sugar leaves, you can improve the overall appearance and flavor of your buds while also preserving their potency.
Leave some buds with the stems on
When getting ready to dry and cure your cannabis buds, it’s important to leave some buds with the stems on. This practice is overlooked by some growers, but it can actually make a difference in the curing process.
Leaving stems on your buds during drying and curing can actually help to slow down the process. This is a good thing, as it allows the buds to develop more fully and ultimately results in a better final product. Additionally, buds with stems on are easier to handle than those without, which can help prevent damaging the buds during the curing process.
The stems also act as a natural handle for your buds, which can come in handy when moving them between containers. Having stems during curing means that the buds won’t stick together, which can be a problem if you’re storing them in airtight containers.
However, it’s important to note that you shouldn’t leave all of the stems on your buds. Too many stems can make it difficult for air to circulate properly during the curing process, which can result in mold or mildew growth. A good rule of thumb is to leave small stems on around 50% of your buds and remove the stems on the other half.
To summarize, leaving some buds with the stems on during the drying and curing process can help to preserve your buds and make them easier to handle. However, you should be careful not to leave too many stems, or you risk compromising the quality of your final product.
Storage
Once you have successfully dried and cured your cannabis buds, the next step is storing them properly. Proper storage is crucial to maintain the quality, potency, and flavor of your buds. This step is often overlooked by many growers, but it is just as important as any other step in the process. In the following sections, we will discuss why proper storage matters, the best storage containers, and how to store your buds for long-term use.
Why Proper Storage Matters
Proper storage is crucial for maintaining the quality of your cannabis buds. Inadequate storage can cause a loss of potency, flavor, and aroma, as well as potential mold growth and contamination. It’s important to understand the importance of proper storage and the best ways to preserve your buds.
One of the biggest factors that affects the quality of your cannabis buds is exposure to air and light. When buds are exposed to these elements, the cannabinoids begin to break down, leading to a loss of potency. Exposure to oxygen and light can cause the terpenes that give cannabis its flavor and aroma to evaporate. This can result in a less enjoyable smoking or vaping experience.
Another important factor to consider is humidity. Cannabis that is too dry can become brittle and lose its flavor and potency, while buds that are too moist can develop mold and rot. A proper storage container can help regulate humidity and prevent these issues.
To illustrate the importance of proper storage, here is a table highlighting some of the potential problems that can occur when cannabis is stored improperly:
| Issue | Cause | Solution |
|---|---|---|
| Loss of potency | Exposure to air and light | Store in airtight container in a cool, dark place |
| Loss of flavor and aroma | Exposure to air and light | Store in airtight container in a cool, dark place |
| Mold growth and contamination | Excessive moisture | Store in a container with proper humidity control |
| Brittleness and loss of flavor/potency | Insufficient moisture | Store in a container with proper humidity control |
By understanding the potential problems that can arise from improper storage, you can take steps to ensure that your cannabis buds remain fresh, potent, and enjoyable over the long-term.
Best Storage Containers
When it comes to storing your precious cannabis buds, it’s important to choose the right containers to preserve their quality and potency. Here are some of the best storage containers for your buds:
| Container Type | Benefits |
|---|---|
| Glass Jars | Glass jars are a popular choice for storing buds as they are airtight, protect against light damage, and don’t affect the taste or smell of buds. They’re also reusable and easy to clean. |
| Metal Tins | Metal tins are great for portable storage as they are small and durable. They’re also airtight, light-protective, and don’t affect the taste or smell of buds. However, they may get dented or scratched over time. |
| Vacuum-Sealed Bags | Vacuum-sealed bags are useful for long-term storage as they prevent oxygen from penetrating the bag and oxidizing THC, which can degrade the potency of buds over time. However, they can be difficult to reuse and may affect the taste and smell of buds. They also don’t protect against light damage. |
| Boveda Packs | Boveda packs are small packets of salt and water that can regulate the humidity inside your storage container. They help maintain the optimal humidity level for your buds, which can keep them fresh and prevent mold growth. They’re also reusable and can last for months. |
No matter what type of container you choose, make sure it’s clean and dry before storing your buds. Store your containers in a cool, dark, and dry place to further protect your buds from spoilage. Remember, proper storage is key to maintaining the quality and potency of your cannabis buds over time.
Storing for Long Term
For those looking to store their cannabis buds for long periods of time, it’s important to take extra care to ensure the buds remain fresh and potent. Here are some tips for storing buds long-term:
- Use Air-Tight Containers: The key to storing buds long-term is to minimize their exposure to air. Use air-tight containers such as mason jars or vacuum-sealed bags to keep buds fresh.
- Keep Buds in a Cool, Dark Place: Light and heat can degrade the quality of your buds over time, so it’s important to keep them in a cool, dark place such as a cupboard or a basement.
- Consider Using Desiccants: Desiccants such as silica gel packets can help absorb excess moisture in your storage container, which can prevent mold from developing on your buds.
- Avoid Freezing Buds: While freezing can be an effective way to store certain types of food, it’s not recommended for cannabis buds. Freezing can damage the delicate trichomes on your buds and affect their potency and flavor.
- Check on Your Buds Regularly: Even when stored properly, buds can still degrade over time. Check on your buds every few weeks and remove any buds that have become moldy or have lost their potency.
By following these tips for long-term storage, you can ensure that your buds remain fresh and potent for months or even years to come.
Conclusion
In conclusion, drying and curing your cannabis buds is a crucial process that should not be overlooked. It not only helps to preserve the quality of your buds, but it also maximizes potency and flavor. Knowing when to harvest, how to dry, and how to cure your buds is essential in obtaining the best possible end product.
When harvesting your buds, pay close attention to the trichomes and pistil color to ensure peak potency. Once harvested, it’s important to properly dry the buds by pre-drying the trim, hanging the buds to dry, and controlling the drying time and conditions to avoid mold or other issues.
After the buds are dry, curing is the next step. This process allows for the development of the flavor and aroma of your buds. By using the right curing containers and controlling the time and conditions, you can achieve the desired taste and aroma.
Post-curing trim is also crucial in maintaining the quality and appearance of your buds. A smooth trim, removal of sugar leaves, and leaving some buds with the stems on are all important steps in creating an exceptional end product.
Finally, proper storage of your dried and cured buds is essential for long-term preservation. Choosing the right storage containers and controlling temperature and humidity can help maintain potency and flavor.
In conclusion, by following the tips and techniques outlined in this article for drying and curing cannabis buds, you can achieve a high-quality end product that will be enjoyable to consume.
Frequently Asked Questions
How long should I dry my cannabis buds?
Drying time can vary depending on humidity, temperature, and moisture content. Generally, it takes anywhere from 5 to 15 days to dry properly.
What temperature should I keep my drying room?
The optimal drying temperature is around 60-70°F (15-21°C), with humidity levels around 50%. Avoid temperatures above 80°F (27°C), as this can cause buds to dry too quickly and lose potency/flavor.
How many times do I need to burp my curing jars?
You should aim to burp your curing jars at least once a day for the first week, then gradually decrease to once every few days. This helps to release excess moisture and prevent mold growth.
Can I dry my buds in a refrigerator or freezer?
No, drying or storing your buds in a refrigerator or freezer can damage the delicate trichomes and affect potency and flavor. Opt for a cool, dry and dark space instead.
What are some signs that my buds are dry enough to cure?
A properly dried bud will feel crisp and dry to the touch, the stems will snap instead of bend, and the smaller buds should easily break off the stems when handled.
How long should I cure my buds for?
While it varies, curing for at least 2 weeks to a month is ideal. The longer you cure, the smoother and more flavorful your buds will become.
Can I speed up the drying process?
It’s not recommended as it can cause the buds to lose potency and flavor. However, if you find it necessary, you can increase airflow and lower the humidity in your drying room.
What is the best way to store my buds?
Airtight glass jars, preferably with airtight lids, are the best way to store your buds. Avoid plastic bags or containers, as they can trap moisture and affect the flavor and potency of your buds.
Should I trim my buds before drying or after curing?
It’s recommended to trim your buds both before pre-drying and post-curing. Pre-drying trimming removes excess foliage that can trap moisture, while post-curing trimming helps to remove any remaining leaves and achieve a smooth appearance.
What are terpenes and why are they important?
Terpenes are essential oils that give cannabis its signature aroma and flavor, and play a role in the overall experience of smoking or ingesting it. Proper drying and curing helps to preserve these valuable components, enhancing the potency and quality of your buds.

