
Harvesting Outdoor Cannabis Plants: A Comprehensive Guide
As the legalization of cannabis continues to spread globally, the art of growing and harvesting the plant has become a more popular topic of discussion. However, for those seeking to cultivate outdoor cannabis, the process can seem overwhelming. Knowing when to harvest, how to do it properly, and the post-harvest care required can all feel like daunting tasks. Yet, with the right knowledge and tools, harvesting fresh, potent cannabis from your outdoor garden is an achievable goal. In this article, we will guide you through each step of the harvesting process, from determining when to harvest to properly drying and storing your finished product. So let’s dive into the world of outdoor cannabis harvesting and unlock the secrets to a successful harvest.
Why is Harvesting Important?
Contents
Harvesting cannabis plants is a crucial step in the cultivation process. It involves cutting and gathering mature buds with the right THC levels and terpene profiles. While it may seem like a simple task, there are several reasons why it’s essential to harvest at the right time using proper techniques. In this section, we will explore the reasons why harvesting is important and how it can impact the quality and quantity of your yield. To learn more about harvesting cannabis buds, check out our guide on the subject. If you’re interested in harvesting cannabis seeds, we recommend reading our article on seed harvest.
1. Determines the Potency of the Plant
Determining the right time to harvest outdoor cannabis plants is crucial in order to ensure maximum potency. The potency of the plant is influenced by the level of cannabinoids, particularly THC, present in the buds. During the maturation process, the cannabinoid levels increase steadily, and they reach their peak just before the plant begins to decline.
Factors affecting potency
There are several factors that can affect the potency of a cannabis plant, including genetics, environmental conditions, and the harvesting process. Genetics are one of the most important factors, as the strain will determine the baseline level of cannabinoids that the plant is capable of producing. Environmental conditions, such as temperature, humidity, and light exposure, can also have an impact on the final potency of the plant.
Importance of harvesting at the right time
If harvested too early, cannabis plants may not have reached their full potency potential. Conversely, if harvested too late, the plant may have already started to decline, leading to a decrease in potency. The goal is to harvest at the peak of the plant’s potency, when the cannabinoid levels are highest.
How to determine the right time to harvest
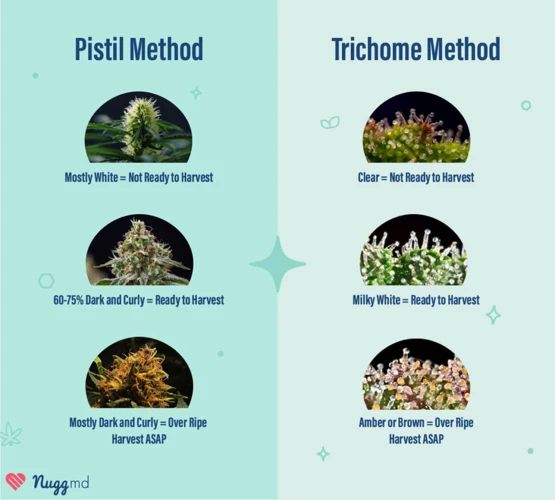
Observing the trichomes, examining the pistils, and tracking the growing season are some of the ways to determine the ideal time for harvesting outdoor cannabis plants. The trichomes, which are the small mushroom-shaped structures that cover the buds, change color as the plant matures. Initially, the trichomes are clear, but they gradually become cloudy, and then amber-colored. The ideal time to harvest is when the trichomes are mostly cloudy and have just begun to turn amber.
Conclusion
Timing is key when it comes to harvesting outdoor cannabis plants. Determining the right time to harvest will not only ensure maximum potency, but it will also prevent over-maturity and eliminate pests and diseases. Observing the trichomes, tracking the growing season, and examining the pistils are reliable methods for determining the optimal time for harvesting.
2. Prevents Over-Maturity
Harvesting your outdoor cannabis plants at the right time is crucial to prevent over-maturity which can negatively impact the quality of your buds. Over-mature cannabis plants have lower potency, fewer trichomes, and a harsher taste. To prevent over-maturity, consider the following:
- Monitor the flowering stage: Keep a close eye on the flowering stage of your cannabis plants. Once the flowers have fully developed, they will start to die down, which signals the plant’s readiness for harvest.
- Check the color of the pistils: Monitor the color of the pistils (hair-like strands on the flowers) as they can also give you an idea of the maturity of the bud. Harvest the cannabis plant when the pistils start to turn amber or brown from their original white color.
- Monitor the trichomes: Trichomes are the small resin glands found on the cannabis plant that contain THC, CBD, and other cannabinoids. A magnifying glass or loupe can be used to observe the color of the trichome heads. The trichomes are ready for harvest when the majority (60-70%) of their heads have turned from clear to cloudy white or amber.
- Consider the strain’s growing time: Not all strains mature at the same rate. Some strains may take longer to reach maturity, while others may be ready for harvest earlier. Research the average growing time of your strain to help determine the ideal harvesting time.
- Avoid waiting too long: Waiting too long to harvest can lead to over-maturity and a significant reduction in both quality and potency.
By following the above tips, you can prevent over-maturity in your cannabis plants and ensure that you have a high-quality and potent harvest.
3. Eliminates Pests and Diseases
One of the main reasons why harvesting outdoor cannabis plants is important is because it eliminates pests and diseases that can harm the plant. Outdoor cannabis plants are more vulnerable to pests and diseases than indoor plants since they are exposed to the natural environment, making them prone to various types of damages.
Here is a table that outlines some common pests and diseases that can affect outdoor cannabis plants:
| Pest/Disease | Description |
|---|---|
| Spider mites | These pests are tiny and can be difficult to spot until they have caused significant damage. They survive by sucking the sap from the leaves, which results in damaged and discolored foliage. |
| Mold and mildew | Mold and mildew thrive in damp and humid conditions. They can cause the development of moldy spots and a musty odor, which not only affects the visual appeal but also poses health risks. |
| Caterpillars and other insects | These pests feed on cannabis plants, leading to holes in leaves and other forms of damage. They can also cause damage to the buds once they form, which significantly affects the potency and visual appeal. |
| Bud rot | This disease affects the buds of the plant, leading to the development of mold and fungus inside the flowers. It can spread quickly and cause significant damage to the plant’s overall yield. |
Harvesting the plant helps in eliminating these pests and diseases since you can identify them and take necessary action before they cause any significant damage. Additionally, by removing the plant, you can prevent the growth of any spores or pests that could remain in the soil and affect future plants.
When to Harvest?
One of the trickiest parts of growing cannabis plants is determining the right time to harvest. Knowing the right time to harvest can make the difference between a rich, potent yield and a mere mediocre crop. But how do you know when your cannabis plant is at its prime for harvesting? There are different methods that growers use, each with its pros and cons. So, in this section, we’ll explore three different factors to help you determine the best time for harvesting your outdoor cannabis plants.
1. Observe Trichomes
One way to determine the optimal time to harvest outdoor cannabis plants is to observe the trichomes. Trichomes are tiny, mushroom-shaped structures on the surface of the cannabis plant that contain the majority of its cannabinoids and terpenes.
To observe the trichomes, you’ll need a magnifying glass or jeweler’s loupe with a magnification of at least 60x. Take a close look at the trichomes on the buds using the magnifying tool.
What to Look For:
| Trichome Color | Status |
|---|---|
| Milky White | The plant is at its peak potency and ready to harvest. |
| Clear | The plant is still developing and not yet ready for harvest. Wait until the trichomes turn milky white. |
| Amber | The plant is overripe and has started to degrade. Harvest immediately to prevent a decrease in potency and negative changes in the flavor and smell of the cannabis. |
It’s important to note that different strains have different ideal levels of trichome development. Some strains may have a higher level of THC when the trichomes are cloudy, while others may be more potent when the trichomes have turned amber. Understanding the ideal trichome development for the particular strain you are growing is essential for accurate harvest timing.
2. Track the Growing Season
Another way to determine when to harvest your outdoor cannabis plants is to track the growing season. This option requires you to keep track of the planting and growing date and determine the expected harvest time based on the strain and the typical outdoor growing season in your area.
To do this, you can follow these steps:
- Step 1: Find out the planting date of your cannabis plants. You can do this by checking your records or asking the dispensary or grower from whom you obtained the plants.
- Step 2: Identify the strain of your cannabis plants. Different strains have different growing requirements and harvest times. Consult strain-specific information to learn the expected harvest time.
- Step 3: Determine the length of the outdoor growing season in your area. This refers to the time between the last frost in the spring and the first frost in the fall. You can find out this information by checking with local gardening stores or going online to research your region.
- Step 4: Calculate the expected harvest time based on the strain’s flowering time and the length of the outdoor growing season. For example, if a strain has a flowering time of eight weeks, and your region has a 16-week growing season, count eight weeks after the beginning of the growing season to determine the expected harvest time.
- Step 5: Keep an eye on your plants as they approach the expected harvest time. Check the trichomes and pistils to ensure they have reached the desired level of maturity.
- Step 6: Prepare to harvest your plants by gathering the necessary tools and materials and following the appropriate safety precautions.
- Step 7: Once harvested, dry and cure your plants appropriately to preserve their potency and flavor.
Tracking the growing season can be an effective way to determine when to harvest your outdoor cannabis plants. However, it’s important to remember that the exact timing may vary slightly based on individual plant growth and weather conditions. Be sure to monitor your plants closely and harvest them when they’ve reached the desired level of maturity.
3. Check the Pistils
Checking the pistils of your cannabis plants is another way to determine if it’s time for harvest. Pistils are the small, hair-like strands that grow out of the buds. They are usually white when the plant is young and turn into a darker color as the plant matures. Here’s how to check the pistils:
- Observe the color: When the pistils are mostly white, it means that the plant is not yet ready for harvest. However, when the pistils start turning a darker color such as yellow, orange, or even brown, it indicates that the plant is reaching maturity and you should start preparing for harvest.
- Check the pistil’s shape: Another way to determine the maturity of the plant is by examining the shape of the pistils. If the pistils are sticking straight out, it means the plant is still not yet ready for harvest. On the other hand, if the pistils start to curl inwards towards the buds, it means the plant is getting closer to maturity.
- Observe the density: If the buds are still looking thin and wispy with few pistils, then it’s still too early for harvest. But if the buds are starting to fill out and become dense with a good amount of pistils, then it’s time to prepare for harvesting.
Keep in mind that checking the pistils alone may not be the most accurate method to determine the optimum time for harvesting. It’s always best to use a combination of methods such as observing trichomes and tracking the growing season to make sure that your cannabis plants are harvested at their peak potency.
How to Harvest?
The harvest is the most crucial stage in the cannabis growing process, as it determines the quality and potency of the final product. To ensure a successful harvest, you need to have the right tools and methods in place. In this section, we will guide you through the necessary steps of harvesting your outdoor cannabis plants, from the tools you need to the most effective techniques for trimming and drying your plants. So, grab your gloves and let’s get started!
1. Tools and Materials
To harvest outdoor cannabis plants, you’ll need a few tools and materials to ensure a smooth and efficient process. Here are some of the most important items you should have on hand:
- Sharp Pruning Shears: These will help you to cut through the thick stems and branches of the cannabis plant with ease. Make sure they are sharp to avoid any damage to the plant and to promote quick healing.
- Gloves: Protect your hands from the sticky resin and any potential irritants or allergens that could be in the plant. A sturdy pair of gloves will also improve your grip on the pruning shears.
- Protective Clothing: Long sleeves, pants, and closed-toe shoes will protect your skin from irritation and scratches when harvesting the cannabis plant. Consider wearing an apron or an old shirt to keep your clothes clean.
- Buckets: Use these to collect the cut branches and foliage. Having two buckets will help keep the trimmed branches separate from the discarded foliage.
- String or Twine: Use to hang the harvested cannabis plants for drying. Natural materials like twine or hemp rope are preferred since they won’t stick to the buds like synthetic materials might.
- Scissors: You’ll need a pair of small, sharp scissors to trim any excess leaves after harvesting.
- Containers: Glass jars or airtight plastic containers are the best options to store the dried and cured cannabis buds.
- Labels and Markers: Keeping your harvest organized and accurately labeled is essential for tracking the plants’ growth and potency. Use labels and markers to identify the strain, harvest date, and other relevant information.
Having these tools and materials on hand will significantly streamline the harvesting process and ensure that your outdoor cannabis plant is harvested to perfection.
2. Wear Protective Gear
Protective gear is an essential part of a safe and successful outdoor cannabis plant harvest. It’s important to wear the proper attire to prevent any injuries and protect your health. Here are some items that should be considered as part of your protective gear:
- Gloves: Wear gloves to prevent cuts and scrapes on your hands while handling the sharp cutters.
- Eye Protection: Wearing safety glasses or goggles can prevent debris from getting into your eyes and causing damage.
- Long Sleeves and Pants: Long-sleeved shirts and pants can protect your skin from being scratched by the branches or exposed to any chemicals that are used in the process.
- Respirator: Wearing a respirator can prevent you from inhaling any harmful chemicals or mold spores while harvesting the plant.
Keep in mind that different tasks require different types of protective gear. For example, when handling the freshly cut plant, gloves are essential. However, when using chemical solutions for cleaning or treating the plant, a respirator may be necessary. It’s important to assess the potential risks associated with each task and wear the appropriate protective gear to ensure a safe and efficient harvest.
3. Cut the Cannabis Plant Using a Sharp Cutter
One of the most crucial steps in harvesting outdoor cannabis plants is cutting them using a sharp cutter. The cutting process should be done with precision to avoid damaging the bud and reducing its potency.
Before you start cutting the plant, you must ensure that you have all the necessary tools and materials. These include a sharp cutter, gloves, protective eyewear, and containers to hold the trimmed buds.
We recommend using a sharp, clean cutter to avoid damaging the plant. Avoid using scissors or other cutting tools that may crush the buds or leave jagged edges. A clean cutter also reduces the risk of introducing harmful bacteria or other contaminants into the buds.
It is essential to start cutting the plant at the base of the stem. Cut the stalk at a slight angle to allow for better water drainage and airflow. This will help prevent moisture buildup and the growth of mold and mildew.
Trimming should be done carefully to avoid damaging the buds. Remove any leaves that are covering the buds, being careful not to touch the buds themselves. Use a gentle, twisting motion to remove the leaves or branches without pulling too hard on the plant.
Once you have removed the fan leaves, it’s time to trim off any dangling leaves and extra branches. Use the cutter to remove any excess leaves or branches that are not required. This helps promote airflow and prevents moisture buildup, which can damage the buds.
When cutting, make sure that the buds are clean and free from any dirt or debris. Avoid touching the buds with your hands, as this can cause them to lose their potency. Instead, carefully place the trimmed buds into containers for further processing.
Cutting outdoor cannabis plants using a sharp cutter is a critical step in the harvesting process. It requires precision, care, and attention to detail to ensure that the buds retain their potency and are not damaged during the process. By following these steps, you can harvest high-quality cannabis that you can enjoy for months to come.
4. Remove the Fan Leaves
After cutting the cannabis plant, the next step in harvesting outdoor cannabis is to remove the fan leaves. Fan leaves are the large, protruding leaves that grow from the main stem of the plant. Although they contain some cannabinoids, they don’t have nearly as much as the flower buds. It’s important to remove them to increase the potency of the buds.
To remove the fan leaves, you will need a sharp cutter or scissors. Using a dull blade can damage the plant and cause it to lose potency. It’s recommended to use a tool that’s specifically designed for harvesting cannabis, such as a trimming shear.
Table:
| Tools Needed | Action |
|---|---|
| Sharp cutter or scissors | Cut the fan leaves from the plant |
| Trimming shear | Recommended tool for harvesting cannabis |
When removing the fan leaves, it’s important to leave the sugar leaves intact. Sugar leaves are the small leaves that grow around the buds and are coated with trichomes, which contain most of the plant’s cannabinoids. Removing the sugar leaves can reduce the potency of the buds.
Once you have removed the fan leaves, you can move on to trimming off any dangling leaves or extra branches. This helps to create a more compact bud and can improve the overall quality of the harvest.
5. Trim Off Dangling Leaves and Extra Branches
After the initial cutting, it’s important to trim off any excess foliage and branches from the cannabis plant, including those that are hanging or dangling. This is usually done to ensure the harvested plant is more manageable and to focus on the main colas, which are the parts of the plant that produce the most desirable buds. To do this, you’ll need a pair of sharp trimming scissors, also referred to as pruning shears.
When trimming cannabis plants, it’s important to keep in mind that you should only be removing excess leaves and small branches, not the large, mature fan leaves that are closest to the main stem. These leaves are important for photosynthesis and help the plant recover after being cut.
To begin, locate any branches that aren’t needed or those that are too small to produce buds. These will usually be located towards the bottom of the plant. Once identified, use the trimming scissors to carefully remove them. Be careful not to cut too close to the main stem, as this could damage the plant.
When it comes to trimming the foliage, cut off any excess or damaged leaves, while leaving the ones that are still healthy attached to the buds. It’s important to remove the leaves that cover the buds because they can obstruct the light and prevent proper airflow. Additionally, these leaves may contain a lower concentration of cannabinoids, making them less desirable.
As you separate the buds from the foliage and branches, remember to place them in a separate container that has been designated for each individual plant. This will help you keep track of what belongs to each plant and allow you to enjoy the fruits of your labor later on.
6. Dry the Harvested Plant
After you have harvested your cannabis plant, the next step is to dry it properly. Drying is a crucial process in preparing the plant for consumption, and it involves removing moisture from the plant to prevent mold growth and enhance its flavor and aroma.
Tools and Materials: You will need the following tools and materials to dry your harvested plant:
|
|
|
|
|
|
|
|
|
|
|
Wear Protective Gear: Before handling the harvested plant, make sure to wear gloves to protect your hands from dirt, bacteria or other contaminants.
Cut the Cannabis Plant Using a Sharp Cutter: Start the drying process by cutting the branches from the cannabis plant using a sharp cutter or a pair of scissors. Cut the branches with care to prevent damaging the buds. Also, make sure to cut only the branches that have mature buds.
Remove the Fan Leaves: Remove the fan leaves from the branches by gently pulling them off. If the leaves are too difficult to remove, you can use scissors to cut them. Fan leaves do not contain as many cannabinoids and terpenes as the buds, and they can affect the quality of the dried cannabis if left on.
Trim Off Dangling Leaves and Extra Branches: Trim off the smaller branches and leaves that are not close to the buds. Use your scissors or pruners to trim off any extra leaves that are still attached to the buds. This will improve the airflow around the buds and prevent molding.
Hang the Cut Branches: Using hangers or drying racks, hang the cut branches upside down in a well-ventilated room. Make sure the room has a consistent temperature and humidity level to avoid mold and mildew. Use bungee cords or strings to fasten the branches securely to the hangers or racks.
Dry the Harvested Plant: Leave the branches hanging for about 7 to 14 days, depending on their thickness and humidity level. The buds will become dry and brittle when ready. You can check the humidity level of the room using a hygrometer. If the humidity level is too high, use a dehumidifier to reduce it. If it is too low, use a humidifier to increase it.
Cure the Dried Cannabis: Once the buds are dry, store them in large paper bags or glass jars to cure. Label the bags or jars with the strain name and the date of harvesting. Store the bags or jars in a cool and dark place for about 2 to 4 weeks, opening them occasionally to release any moisture. Curing enhances the flavor and aroma of the cannabis, making it more enjoyable to consume.
Proper drying and curing are critical steps in the process of preparing cannabis for use. By following these steps carefully, you can enjoy high-quality cannabis with excellent flavor and aroma.
7. Cure the Dried Cannabis
After the cannabis plant has been harvested, it’s important to properly cure the dried buds so they can be stored and consumed at their highest quality. Below are the steps to follow for curing dried cannabis:
| Step | Description |
|---|---|
| Step 1 | Trim the buds: Use a pair of scissors to trim off any excess leaves or stems from the buds. This will help the buds dry more evenly and prevent mold from forming. |
| Step 2 | Place the buds: Place the trimmed buds in a glass jar. Fill the jar about 3/4 of the way full, leaving some space at the top for air. |
| Step 3 | Store at the right temperature: The jars should be stored in a cool, dark place with a temperature between 60-70°F (15-21°C). Avoid storing the jars in a place with too much humidity or moisture, as this can cause mold growth. |
| Step 4 | Burp the jars: To prevent mold growth and ensure proper curing, the jars should be opened once a day for the first week to release any built-up moisture. This is called burping the jars. After the first week, the jars can be opened once every few days. |
| Step 5 | Cure for at least two weeks: The buds should be stored in the jars for at least two weeks to allow the moisture to evenly distribute throughout the buds. Some cannabis enthusiasts prefer to cure their buds for longer, up to 6 months, to enhance the flavor and aroma of the buds. |
| Step 6 | Check for mold: During the curing process, it’s important to regularly check the buds for mold growth. If any mold is found, remove the affected buds and adjust the environment or technique being used to prevent further mold growth. |
By properly curing dried cannabis, you can ensure that the buds have the best possible flavor, aroma, and potency. It may be tempting to skip this step, but taking the time to cure your buds will ultimately result in a more enjoyable and higher quality cannabis experience.
Post-Harvest Care
Now that you have successfully harvested your cannabis plant, it’s time to focus on what comes after. The post-harvest care of your cannabis flowers is just as important as the harvesting process itself, as it ensures the quality and potency of your final product. Proper post-harvest care involves proper storage, cleaning of tools, and disposal of the plant waste. In this section, we will guide you through the necessary steps to take care of your harvested cannabis plant.
1. Store the Cannabis Properly
Storing harvested cannabis properly is crucial to maintain its quality and potency. Here are some guidelines for proper storage:
| Step | Description |
| Step 1 | Use airtight glass jars to store the buds as they can protect the buds from moisture, light, and air. Using plastic containers should be avoided as they can cause the buds to sweat and ruin the quality. |
| Step 2 | Keep the jars in a dark and cool place to prevent exposure to light and heat, and maintain the potency of the buds. It is recommended to store the jars in a cupboard or a closet. |
| Step 3 | During the first few days of storage, open the jars once a day for 15-30 minutes to allow fresh air in and remove any excess moisture. If the buds still feel wet or moist, leave the lid off for a few hours. |
| Step 4 | Make sure to label the jars correctly with the strain names and the date of harvest. This can help keep track of the age of the buds and make sure to consume them within their optimal freshness. |
Taking these steps can ensure that the harvested cannabis stays potent and fresh for a longer period of time. Remember to handle the buds with care while storing them as any rough handling can cause the trichomes to fall off and affect the quality.
2. Clean the Tools
Properly cleaning and maintaining the tools used for harvesting cannabis plants is essential for ensuring future successful harvests. When harvesting cannabis plants, a variety of tools are used to effectively cut, trim and handle the plants, and it is important to regularly clean and disinfect these tools to prevent the spread of harmful pathogens and bacteria.
Cleaning Materials
The cleaning materials required for cleaning tools after cannabis plant harvest are simple and easily accessible. Tools can be cleaned using a combination of soap and water, rubbing alcohol, hydrogen peroxide or a professional cleaning solution.
Cleaning Process
To clean the tools, begin by removing any plant residue or debris using a stiff brush or cloth. Next, use soap and water or rubbing alcohol to clean the tools, thoroughly wiping down each part. Pay special attention to the cutting edges and other hard-to-reach areas, ensuring that they are completely clean and free of residue.
For tougher grime and stubborn residue, a mixture of hydrogen peroxide and baking soda can effectively remove any build-up. Simply mix the two together to create a paste, apply the mixture to the affected areas, and let it sit for a few minutes before wiping the area clean with a cloth.
After cleaning with soap and water, it is highly recommended to fully disinfect the tools using rubbing alcohol or a professional cleaning solution. Spray the solution onto the tools and wipe down with a cloth, ensuring full coverage to protect against any residual bacteria or pathogens.
Storage
Once the tools are completely dry, store them in a cool, dry place to prevent rust and other forms of deterioration. It is recommended to store them in a toolbox or other enclosed container to keep them organized and protected.
Benefits of Cleaning Tools
Regularly cleaning and disinfecting the tools used for harvesting cannabis plants not only helps to protect against the spread of harmful pathogens and bacteria, but also helps to maintain the integrity and quality of the tools themselves. Proper cleaning can help to deflect rust and corrosion, reducing the risk of contamination during future harvests and ensuring a longer lifespan for the tools.
3. Dispose of the Plant Waste
After completing the harvest and curing process, it is important to properly dispose of the plant waste. This not only ensures a clean and organized growing space but also prevents any potential health hazards.
Why is disposing of plant waste important?
Leaving plant waste lying around can attract unwanted pests and insects, which can harm future crops. Excess plant material can create a breeding ground for bacteria and mold. It is also important to consider the environmental impact of plant waste disposal, as improper disposal can negatively affect soil and water quality.
How to properly dispose of plant waste?
There are several ways to safely dispose of plant waste, including composting and landfill disposal. Composting is the preferred method for many growers, as it allows for organic matter to return to the soil and benefit future crops.
To compost plant waste, gather all the excess leaves or branches and place them in a designated compost bin. Make sure that the bin is in a secure location and away from any potential sources of contamination. Turn the compost regularly to ensure that it decomposes evenly and avoid the buildup of heat that can damage the plant matter.
If composting is not an option, landfill disposal is the next best solution. However, it is important to ensure that the plant waste is properly bagged and labeled as yard waste to avoid any potential fines. check with local ordinances to determine proper disposal methods.
Conclusion
Proper disposal of plant waste is an important part of the growing process that should not be overlooked. Composting and landfill disposal are both viable options to ensure that the plant waste does not attract unwanted pests or create an environmental hazard. By following these simple procedures, growers can maintain a safe and healthy growing environment and ensure the future success of their crops.
| Dispose of Plant Waste |
|---|
| Leaving plant waste lying around can attract unwanted pests and insects, which can harm future crops. Excess plant material can create a breeding ground for bacteria and mold. It is also important to consider the environmental impact of plant waste disposal, as improper disposal can negatively affect soil and water quality. |
| Composting is the preferred method for many growers, as it allows for organic matter to return to the soil and benefit future crops. To compost plant waste, gather all the excess leaves or branches and place them in a designated compost bin. If composting is not an option, landfill disposal is the next best solution. |
Conclusion
In conclusion, harvesting outdoor cannabis plants is a crucial step in the cultivation process. It is essential to ensure that the plant is harvested at the right time to achieve the best possible potency and quality. To determine the ideal harvest time, growers must observe trichomes, track the growing season, and check the pistils regularly.
When harvesting, it is important to use the right tools and wear protective gear to avoid any accidents or injuries. Growers should use sharp cutters to cut the plant and remove fan leaves, dangling leaves, and extra branches carefully. Proper drying and curing of the harvested plant are also critical for maintaining the quality of the cannabis.
Post-harvest care is also essential in ensuring that the cannabis is stored correctly, tools are cleaned, and plant waste is disposed of properly. Storing cannabis in an airtight container in a cool, dark place ensures that it stays fresh and potent for a long time.
In summary, harvesting outdoor cannabis plants is a process that requires patience and attention to detail. By following the right steps and taking necessary precautions, growers can maintain the quality of their cannabis and ensure a successful harvest.
Frequently Asked Questions
What is the optimal time to harvest outdoor cannabis plants?
The optimal time to harvest outdoor cannabis plants is when the trichomes have turned nearly half amber in color.
Why does harvesting at the right time determine the potency of the plant?
Harvesting at the right time determines the potency of the plant because it ensures that the plant’s THC levels have reached their peak.
What is over-maturity and how does it affect the cannabis plant?
Over-maturity is when the cannabis plant has reached its peak and begins to deteriorate in quality. It affects the plant by causing a decrease in potency and an increase in unpleasant effects such as anxiety, paranoia and dizziness.
What should be done in case of pest infestation or disease?
If the plant is infested with pests or has a disease, harvesting should be done immediately to prevent the spread of the disease and to ensure the harvested cannabis is free of pests and contaminants.
What are the signs that indicate the plant is ready for harvesting?
The signs that indicate the plant is ready for harvesting include observing trichomes, tracking the growing season and checking the pistils.
What tools do I need for harvesting outdoor cannabis plants?
For harvesting outdoor cannabis plants, you will need a sharp cutter, gloves, protective gear and drying and curing equipment.
What kind of protective gear should I wear while harvesting?
You should wear gloves, a mask, protective glasses and clothing to prevent any potential hazards and injuries.
What is the best way to dry the harvested cannabis?
The best way to dry the harvested cannabis is by hanging the buds upside down in a cool, dry and dark place with good ventilation to prevent mold and mildew development.
Why is it important to properly store the harvested cannabis?
It is important to properly store the harvested cannabis to maintain its quality, potency and freshness. Improperly stored cannabis can lose its flavor, potency and can become contaminated with harmful bacteria or mold.
What should be done with the leftover plant waste after harvesting?
The leftover plant waste after harvesting should be disposed of properly to prevent it from being a source of pests and disease. It can be composted or disposed of in a landfill.

