
Harvesting Cannabis: Tips for Perfect Drying and Curing
As the legalization of cannabis continues to spread, more people are beginning to grow their own plants at home. However, harvesting cannabis is not as simple as plucking the buds off the plant and smoking them. Proper drying and curing techniques are vital to obtaining the desired potency, flavor, and aroma. But with so many methods and tips available online, it can be overwhelming to choose the best approach. So, what are the most effective ways to dry and cure cannabis? Let’s take a closer look at the best practices and techniques to help you achieve the perfect harvest.
Why Proper Drying and Curing is Important
Contents

When it comes to harvesting cannabis, there are several crucial steps that must be taken to ensure the quality of the final product. Proper drying and curing techniques are top priorities for any cannabis grower who wants their buds to taste, smell, and feel as potent as possible. The process of drying and curing cannabis involves more than just letting it sit out in the open air, as it requires careful attention to details like temperature and humidity control. So why is proper drying and curing so important? Let’s explore some of the reasons in more detail.
Preserve Flavor and Aroma
Proper drying and curing techniques are crucial steps in preserving the flavor and aroma of your cannabis buds. When cannabis is harvested, it contains moisture and chlorophyll, which can give the buds a harsh, “green” taste and odor. Drying the buds slowly at a controlled temperature and humidity helps to remove the excess moisture and chlorophyll, allowing the natural flavors and aromas to come through.
If cannabis is dried too quickly, it can become brittle and lose its essential oils and flavors. On the other hand, if the buds are not dried enough, they can develop mold, which can ruin the entire harvest. Proper drying and curing also help to “cure” the buds, which is a process that breaks down the remaining chlorophyll, making the smoke smoother and less harsh.
Curing further enhances the flavor and aroma of the buds. This process involves placing the dried buds in airtight jars and allowing them to “sweat” for several weeks. During this time, the buds release moisture and are able to develop their full flavor and aroma profile.
Properly dried and cured cannabis has a much more pleasant taste and smell than cannabis that has not been treated correctly. It is worth taking the extra time and effort to ensure that your cannabis is dried and cured properly to preserve its quality and maximize its potential.
Improve Potency
Proper cannabis drying and curing techniques can greatly improve the potency of your buds. During the drying process, enzymes break down chlorophyll and other compounds that can cause a harsh taste and make it difficult to achieve a smooth smoke. This results in a smoother and more enjoyable smoking experience.
Further, curing also plays a vital role in improving potency. During the curing process, terpenes and cannabinoids continue to develop and mature, creating a more potent and flavorful end product. This happens due to the interaction between the moisture content of buds and the air inside the curing containers. Proper curing helps to ensure that each bud is at the peak of its potency, delivering the maximum effects.
Additionally, improper drying and curing techniques can actually decrease potency by allowing mold and mildew to grow or causing terpenes and cannabinoids to degrade. To prevent this, it’s important to control temperature and humidity levels during both drying and curing phases.
The following table summarizes the important aspects of improving potency:
| Factors | Effect on Potency |
|---|---|
| Proper drying | Breakdown of compounds that cause harsh taste and smooth smoke |
| Proper curing | Development of terpenes and cannabinoids, leading to a more potent and flavorful end product |
| Improper techniques | Decrease potency by allowing mold and mildew to grow or causing terpenes and cannabinoids to degrade |
| Temperature and humidity control | Essential to prevent mold and mildew growth and preserve potency |
By following proper drying and curing techniques and monitoring temperature and humidity levels, growers can ensure that their cannabis buds are potent, flavorful, and of high quality.
Eliminate Microbes and Mold
Proper drying and curing techniques are crucial for eliminating potentially harmful microbes and mold, which can negatively impact the quality and safety of your cannabis. By reducing moisture levels in your buds, you can create an environment that is hostile to the growth of these undesirable microorganisms.
However, if the drying and curing process is not done correctly, mold and microbes can still develop. To ensure that your buds stay free of harmful contaminants, here are some tips to keep in mind:
- Sanitize your drying area: Before drying your cannabis, make sure to thoroughly clean and sanitize your drying area. Use a disinfectant spray or wipes to eliminate any microbes or mold that may be present.
- Check for mold: Inspect your buds regularly during the drying process for signs of mold or mildew. If you see any, promptly remove these buds to prevent the mold from spreading to other buds.
- Avoid overcrowding: Be careful not to overcrowd your drying area or drying racks, as this can create an environment that is ideal for mold growth. Leave enough space between buds to allow for proper airflow.
- Use a dehumidifier: Consider using a dehumidifier to keep humidity levels low during the drying process. High humidity can make it difficult to eliminate moisture, leading to a greater risk of mold growth.
- Monitor temperature: Keep track of the temperature in your drying area, as temperatures that are too high can also contribute to mold growth.
By following these simple tips, you can help ensure that your cannabis is free of harmful microbes and mold, and that it is safe to consume.
Best Practices for Cannabis Drying
As any experienced cannabis cultivator can attest, drying is a crucial step in the harvesting process. This is when the plants are prepared for the curing stage, and ultimately, consumption. With that said, there is a lot of debate over the best way to dry cannabis. Some swear by one method, while others prefer an entirely different approach. For those who are new to cannabis cultivation or simply looking to improve their drying technique, it can be overwhelming to sift through all the conflicting advice. Fear not, as we have compiled the best practices for cannabis drying to help you achieve the perfect cure for your plants.
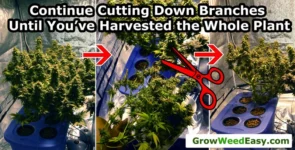
Trimming the Buds
Trimming the buds is an essential part of the cannabis drying process. It involves removing any excess leaves, stems, and other plant matter that can negatively impact the quality of the final product. Proper trimming can improve the flavor, aroma, and appearance of the buds. Here are some tips for trimming cannabis buds:
| TIP | DESCRIPTION |
|---|---|
| Use sharp scissors | Dull scissors can bruise the buds and cause damage to the trichomes. Use sharp, precision scissors to ensure a clean cut. |
| Trim when buds are dry | Trimming wet buds can be difficult and can cause the buds to lose their shape. Wait until the buds are dry to begin the trimming process. |
| Trim away sugar leaves | Sugar leaves are the small leaves that are covered in trichomes. While they can be used for making edibles or concentrates, they can also be trimmed away to improve the appearance of the buds. |
| Leave enough stem for hanging | Leaving a small stem on the buds can make them easier to hang during the drying process. Aim to leave about 1-2 inches of stem on each bud. |
| Trim away fan leaves | Fan leaves are the large leaves that grow near the buds. They do not contain many trichomes and can be trimmed away to help the buds dry faster. |
| Trim over a catch tray | Trimming can be messy, so it’s best to do it over a catch tray or container. This will make it easier to collect any excess plant matter. |
By following these tips, you can ensure that your cannabis buds are properly trimmed and ready for the drying process. Proper trimming can improve the quality of the final product, so take the time to do it right.
Temperature and Humidity Control
Proper temperature and humidity control is crucial for achieving the best results when drying cannabis. The ideal temperature range for drying cannabis is between 60-70°F (15-21°C), with a relative humidity (RH) level of about 50%. To maintain the appropriate temperature and humidity levels, consider using equipment such as dehumidifiers or air conditioners.
It’s important to note that if the temperature is too hot or the humidity is too high, the buds may dry too quickly, resulting in a harsh and unpleasant smoke. On the other hand, if the temperature is too low or the humidity is too low, the buds may develop mold or become too dry, which can also result in harsh smoke.
To ensure the ideal humidity level, use a hygrometer to monitor the humidity levels in the drying area. If the humidity level is too high, use a dehumidifier or air conditioner to reduce the humidity. If the humidity level is too low, consider using a humidifier or placing damp towels around the drying area to increase the humidity.
Maintaining the correct temperature and humidity levels is especially important in the hang drying process, as it can take up to two weeks for the buds to dry fully. If you’re using a drying rack, be sure to rotate the buds regularly to ensure even drying.
| Temperature | Humidity |
|---|---|
| 60°F (15°C) | 50% |
| 70°F (21°C) | 50% |
Proper temperature and humidity control is crucial not only for the drying process but also for the curing process. During the initial stages of curing, it’s recommended to maintain a temperature of 70-75°F (21-24°C) with a humidity level of 60-65%. As the curing process continues, it’s best to gradually reduce the humidity level to about 55-60%.
By paying close attention to the temperature and humidity levels during the drying and curing process, you’ll be able to achieve the best flavor, aroma, and potency from your cannabis.
Hang Drying vs. Drying Racks
When it comes to drying cannabis, there are two main methods to choose from: hang drying and using drying racks. While both are effective, there are pros and cons to each. Here are some important factors to consider when deciding which method to use:
Hang Drying:
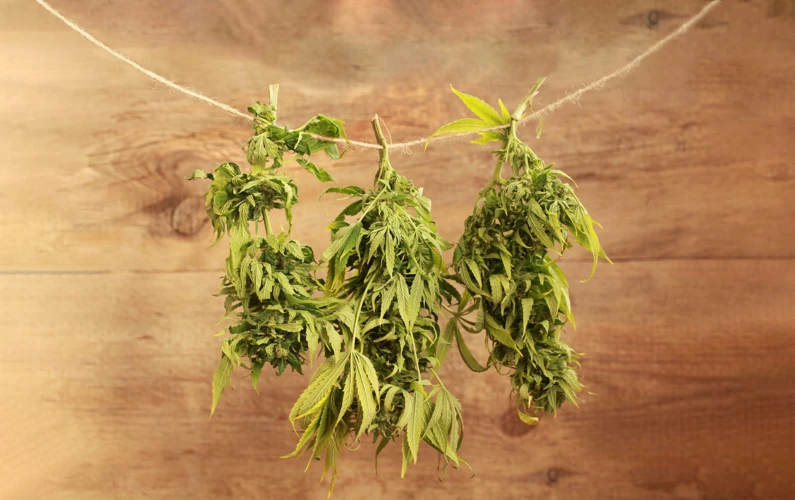
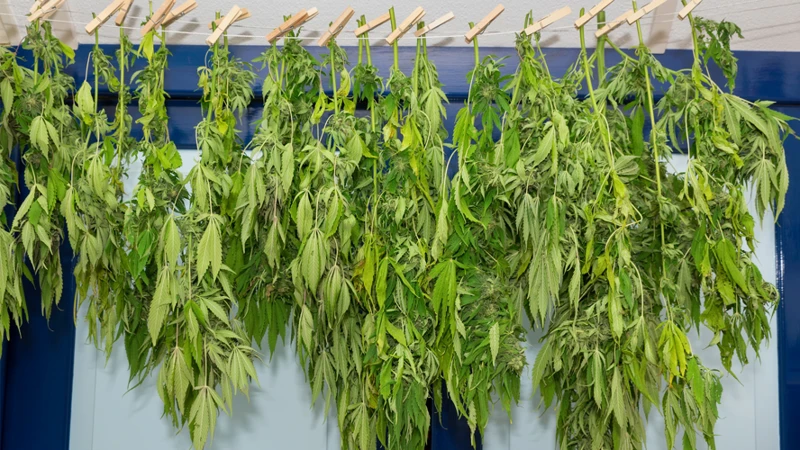
- Hang drying involves suspending the buds from a line or wire in a dark, dry room with good ventilation. This allows for maximum air circulation and even drying.
- One advantage of hang drying is that it requires minimal equipment and setup. All you need are some lines or wires and a designated drying space.
- Another advantage is that the buds remain separate from each other, which can help prevent mold and mildew from developing.
- However, hang drying can be a bit more time-consuming than using drying racks, as you must individually trim and hang each bud.
- Additionally, hang drying may not be as space-efficient as using drying racks, as you need enough space to hang all of your buds without them touching or overlapping.
Drying Racks:
- Drying racks consist of trays or screens that allow air to flow around the buds. They can be stacked on top of each other, which makes them more space-efficient than hang drying.
- Another advantage of drying racks is that they allow for more efficient trimming, as you can trim multiple buds at once before placing them on the rack.
- However, drying racks may be more prone to mold and mildew development if the buds are too close to each other or if the air circulation is poor.
- Additionally, drying racks may require more equipment and setup than hang drying, as you need to purchase or create enough racks to accommodate all of your buds.
Ultimately, the choice between hang drying and drying racks depends on your personal preference, available space, and the size of your harvest. Regardless of which method you choose, make sure to monitor the temperature and humidity levels in your drying space to ensure optimal drying conditions.
Drying Time
Properly drying cannabis is a crucial step in the harvesting process that can affect the quality and potency of your crop. Drying time will vary depending on factors such as humidity levels, temperature, and the size of the buds. Here are some general guidelines for drying cannabis:
| Stage | Time | Conditions |
|---|---|---|
| Initial Drying | 3-7 days | Air temperature between 60-70°F with humidity levels between 45-55% |
| Final Drying | 2-4 days | Air temperature between 70-80°F with humidity levels between 30-40% |
During the initial drying phase, buds should be trimmed and hung upside down to dry. The buds should feel slightly crisp to the touch, but not brittle. It’s important to maintain proper air circulation and avoid overcrowding to prevent mold or mildew growth.
Once the initial drying phase is complete, move the buds to a cooler and less humid location for the final drying phase. This will help to reduce moisture content and further enhance the potency and flavor of the buds.
Always remember to monitor the buds carefully during the drying process to ensure that the conditions are optimal. Improper drying can lead to complications during the curing process, and may result in a lower-quality end product.
Cannabis Curing Techniques
After the cannabis buds have been dried, the curing process begins. This is a crucial step in ensuring the quality and potency of the final product. Curing allows the flowers to mature, breaks down chlorophyll, and reduces moisture content. It helps to bring out the full flavor, aroma, and effects of the weed. In this section, we will explore some effective techniques for curing cannabis that will help you achieve the best results.
Benefits of Curing
One of the most important steps in the process of harvesting cannabis is the curing stage. This process involves storing harvested buds in a carefully controlled environment for a period of time, usually a few weeks to a few months. While it may be tempting to skip this step, proper cannabis curing provides a number of key benefits that make it essential for producing high-quality, potent cannabis. Some of these benefits include:
- Improved Flavor and Aroma: Properly cured cannabis tends to have a stronger and more complex flavor and aroma. This is because curing allows the plant’s terpenes (the compounds responsible for flavor and aroma) to fully develop and mature over time. These terpenes can be damaged or destroyed if the plant is not cured properly, leaving the final product with a less desirable taste and smell.
- Increased Potency: Curing can also help to increase the potency of the final product. When buds are dried too quickly, they can lose some of their potency due to the breakdown of THC and other cannabinoids. Curing slows down this breakdown process, allowing the THC and other cannabinoids to fully develop and reach their maximum potency.
- Elimination of Microbes and Mold: Curing helps to eliminate any remaining microbes and mold that may be present on the plant material. This is because during the curing process, the humidity level is gradually lowered, which creates an environment that is less hospitable to these types of microorganisms. By curing the buds properly, you can ensure that your final product is safe to consume and free from any harmful contaminants that may have been present during the growing process.
- Improved Smoothness: Finally, curing can help to improve the overall smoothness of the smoke. During the curing process, any remaining chlorophyll (the compound that gives plants their green color) is broken down, which can make the smoke smoother and less harsh on the throat and lungs.
Proper curing is an essential step in the process of harvesting cannabis. By taking the time to cure your buds properly, you can ensure that your final product is potent, flavorful, and safe to consume.
Jar Curing
One of the most popular methods for curing cannabis is jar curing, in which the trimmed buds are placed in airtight glass jars. This method helps to preserve the flavor and aroma of the buds, while also further improving their potency.
Step 1: Preparing the Jars
Before starting the jar curing process, make sure to clean and dry the glass jars thoroughly. The size of the jars used will depend on the amount of cannabis being cured. It’s best to use smaller jars rather than one large one in order to prevent excessive air exposure.
Step 2: Placing Buds in Jars
Once the jars are ready, place the trimmed buds inside, leaving some room at the top of the jar. Make sure not to pack the buds too tightly, as they need space to breathe and release moisture.
Step 3: Storing the Jars
After the buds are in the jars, they need to be stored in a cool, dark place with a humidity level of around 60%. It’s important to check the jars regularly to make sure that no mold or mildew is developing.
Step 4: Burping the Jars
During the curing process, it’s important to “burp” the jars regularly to release any built-up moisture and prevent mold growth. Simply open the jars for a few minutes each day to allow fresh air to enter and excess moisture to escape. Be careful not to leave the jars open for too long, as this can negatively impact the curing process.
Step 5: Length of Curing Time
The length of time required for jar curing will depend on the specific strain and desired effects. Generally, curing should take at least two weeks, but some strains may require up to six weeks or more. It’s important to monitor the buds closely and taste them periodically to ensure that they are properly cured.
Using the jar curing method can result in high-quality, flavorful buds with enhanced potency. However, it’s important to follow the proper procedures and be patient throughout the process.
Burping the Jars
During the curing process, it is important to “burp” the jars to prevent mold and excess moisture from building up. This involves opening the jar for a short period of time to release any built-up gas and moisture before sealing it again. Failure to “burp” the jar can result in the growth of mold, rendering the cannabis unusable.
Burping Frequency
When starting the curing process, it is recommended to “burp” the jars once a day for the first week. After this initial period, the frequency can decrease to once every few days, and eventually once a week. However, it is important to constantly monitor the jars for any signs of mold or excess moisture, and adjust the burping frequency as needed.
Length of Burping
When “burping” the jars, it is important to keep them open for only a brief period of time, typically 10-15 minutes. This allows for proper gas exchange while minimizing the amount of time the cannabis is exposed to oxygen and potentially degrades.
Testing Moisture Levels
Before sealing the jars again, it is important to check the moisture levels of the buds to ensure they are within the appropriate range of 55-65% humidity. This can be done using a hygrometer, which can be purchased at most smoke shops. If the moisture levels are too high or low, adjustments can be made by adding or removing certain elements such as a humidity pack or a slice of apple, respectively.
Other Considerations
It is important to keep the jars sealed and stored in a cool, dark place between burpings. Additionally, it is recommended to rotate the jars during the curing process to ensure equal exposure for all buds. Proper burping techniques can ensure the preservation of the cannabis’ flavor, potency, and overall quality.
Length of Curing Time
The length of curing time for cannabis can vary depending on various factors such as the humidity and temperature levels during the curing process, as well as personal preference for the strength and flavor of the buds.
Generally, the recommended curing time is around 2-4 weeks. During the first week of curing, the buds need to be checked and monitored quite regularly to ensure adequate humidity levels inside the curing jars.
It is important to note that curing time can also have an impact on the effects of the cannabis. Longer curing times can lead to a more potent final product, while shorter curing times may result in a milder flavor and effect.
Some cannabis connoisseurs may choose to cure their buds for an extended period, ranging from a few months to a year or more. This prolonged curing process is known as ‘cellaring,’ and it is thought to enhance the flavor and effects of the cannabis.
However, it is important to note that extended curing times can also increase the risk of mold formation, so it is essential to monitor the buds carefully during this process.
To summarize, the optimal curing time for cannabis can vary depending on factors such as humidity, temperature, and personal preference. It is recommended to cure for a minimum of 2-4 weeks, but some connoisseurs may choose to ‘cellar’ their buds for more extended periods. Careful monitoring during curing can ensure the best final product.
Other Curing Methods
There are alternative ways to cure cannabis aside from using jars. One method involves wrapping the buds in parchment paper and then putting them into a vacuum-sealed bag. This technique helps speed up the curing process by allowing for a more controlled drying and curing environment. Additionally, vacuum sealing helps to eliminate air pockets, minimizing the risk of mold and mildew.
Another method involves curing the cannabis in large food-grade buckets. First, line the buckets with a clean trash bag, then add the trimmed buds. Use a food-grade sealing bag to create a vacuum and seal the bags. The buds will cure over the course of several weeks, with regular burping of the bags to release any built-up moisture.
Some growers prefer to cure their cannabis in small paper bags instead of jars. The buds are placed in the paper bags, which are then sealed and stored in a dark, dry area. The paper bag method tends to be less popular than using jars since it can be more difficult to regulate temperature and humidity levels.
Lastly, some cannabis growers will use a slow-drying or dry-aging process. In this method, buds are hung to dry as usual, but they are left on the stem for a longer period of time. This process can take several weeks, but it helps enhance the flavor and aroma of the final product. Once the buds have dried completely, they can either be consumed or stored in airtight containers as usual.
Ultimately, the curing method chosen will depend on the individual grower’s preferences and resources. It’s worth trying out different methods to discover which one works best for you and your cannabis strains.
Storage Techniques for Cured Cannabis
After the long and patient process of harvesting, drying, and curing your cannabis buds, the time has finally come for storage. Proper storage is imperative to maintain the hard-earned flavor, aroma, and potency of your cannabis. When storing cannabis, it is important to understand the environmental factors that can affect its quality such as light, heat, humidity, and exposure to air. In this section, we will discuss the best storage techniques for cured cannabis in order to preserve and protect the full experience of your crop.
Airtight and Light-Proof Containers
When it comes to storing cured cannabis, it’s important to keep the buds fresh and potent for as long as possible. One of the best ways to do this is by using airtight and light-proof containers. Here are some tips for choosing the right storage container:
- Mason Jars: These glass jars are a popular choice for storing cannabis. They are airtight and protect the buds from both light and moisture. Mason jars also come in a range of sizes, making it easy to store small or large amounts of cannabis.
- Vacuum Sealed Bags: Another option for airtight storage is vacuum-sealed bags. These bags can be purchased in various sizes to accommodate different amounts of cannabis. They are great for long-term storage and keeping the buds fresh.
- Dark Glass Jars: If you prefer a different container than a Mason jar, dark glass jars are another option. These jars protect cannabis from light but aren’t always as airtight as Mason jars or vacuum-sealed bags.
- Food-Safe Plastic Containers: While not as popular as glass containers, food-safe plastic containers can also work for cannabis storage. However, it’s important to make sure the containers are airtight and opaque to prevent light exposure.
Regardless of the container you choose, make sure it’s stored in a cool, dark place to prevent moisture build-up and protect against any potential oxidation. This will help to maintain the potency, flavor and aroma of your prized cannabis buds for months to come.
Temperature and Humidity Control
Maintaining the proper temperature and humidity during the drying process is crucial for ensuring that the cannabis is properly dried and cured. Ideal drying temperatures range from 60 to 70 degrees Fahrenheit (15 to 21 degrees Celsius) with humidity levels between 45 and 55 percent. To achieve and maintain these optimal conditions, there are several options to consider:
| Option | Advantages | Disadvantages |
|---|---|---|
| Using a Dehumidifier | Maintains consistent humidity levels | May be expensive to purchase |
| Using an Air Conditioner | Helps control both temperature and humidity | May be expensive to run for extended periods |
| Using a Humidifier | Helps add moisture to overly dry environments | May not be necessary in areas with naturally high humidity levels |
| Using Fans and Ventilation Systems | Increases airflow and prevents stagnant air | May not provide precise control over temperature and humidity levels |
It is important to regularly monitor the environment during the drying process to ensure that the temperature and humidity remain within the appropriate range. Using a thermometer and hygrometer can help accurately measure and track these conditions. It is also recommended to avoid drying cannabis in areas with fluctuating temperatures or high humidity levels, such as bathrooms or laundry rooms, as this can lead to mold growth on the buds. With proper temperature and humidity control, the drying process can proceed smoothly and result in high-quality, aromatic and flavorful cannabis.
Long-Term Storage Options
When it comes to storing cannabis for the long-term, it’s important to take extra care to ensure the quality of the buds is preserved. Here are some long-term storage options to keep your buds fresh for months to come:
- Freezing: One option for long-term storage is freezing your buds. This can help preserve potency and prevent degradation. However, it’s important to note that freezing can also damage trichomes, so make sure your buds are stored in an airtight container to minimize exposure to air and moisture.
- Vacuum Sealing: Another option is vacuum sealing. This method removes oxygen from the container, which can help preserve color, aroma, and potency. However, it’s important to make sure the buds are fully dried before vacuum sealing to prevent mold growth.
- Silica Gel Packs: Silica gel packs can help absorb excess moisture and prevent mold growth. They can be placed in an airtight container with your buds to help maintain optimal humidity levels.
- Mylar Bags: Mylar bags are another option for long-term storage. These bags are lined with a barrier material to prevent air and moisture from getting in. They are also opaque, which helps block out light and maintain potency.
- Refrigeration: If freezing isn’t an option, storing buds in the refrigerator can also help preserve freshness. However, be sure to use an airtight container to prevent moisture from getting in.
No matter which option you choose, it’s important to properly label your storage containers with the strain, harvest date, and any other relevant information. This will make it easier to keep track of your buds and ensure you use them before they lose their potency.
Conclusion
In conclusion, drying and curing cannabis correctly is crucial for producing a quality final product. By preserving the flavor and aroma, improving potency, and eliminating harmful microbes and mold, proper drying and curing techniques ensure a better experience for consumers.
Trimming the buds before drying and monitoring temperature and humidity during the drying process are important best practices. Whether you choose to hang dry or use drying racks, be patient and allow the buds to dry slowly. Rushing the process can result in a harsh or unpleasant taste.
After the buds are dry, curing them in airtight jars allows for further improvement in flavor and potency. Remember to periodically burp the jars to release excess moisture and gases. The length of the curing process can vary, but it’s worth taking the time to achieve the desired results.
When storing cured cannabis, use airtight and light-proof containers in a controlled environment with proper temperature and humidity levels. For long-term storage, consider freezing or vacuum sealing the cannabis to maintain freshness.
Overall, taking the time to properly dry, cure, and store cannabis can make a significant difference in the quality of the final product. Experimenting with different methods and finding what works best for your specific strains and growing conditions can lead to even better results.
Frequently Asked Questions
How do I know when my cannabis is ready to be harvested?
The trichomes should be mostly cloudy with a few amber-colored ones. The pistils should also start to turn brown or red.
Should I trim my buds before or after drying?
You should trim your buds after drying but before curing.
What temperature and humidity should I maintain during drying?
You should aim for a temperature of 60-70°F and a humidity level of around 50%. Keep in mind that different strains may have slightly different optimal drying conditions.
How long should I hang dry my cannabis?
It should take about 5-10 days to hang dry, but check your buds daily for signs of over-drying or mold.
What is the purpose of curing cannabis?
Curing allows the flavors and aromas to develop fully and the moisture content to even out, resulting in a smoother smoke.
Why do I need to burp my jars during the curing process?
Burping the jars releases the built-up gases inside and allows fresh oxygen to circulate, preventing mold growth.
How long should I cure my cannabis?
Most people find that a curing period of 2-4 weeks is sufficient, but some strains may benefit from longer curing times.
What are some alternative curing methods?
You can try water curing, which involves soaking the buds in water for a few days to remove chlorophyll and improve taste, or dry-ice curing, which involves shaking your buds with dry ice to extract the cannabinoids and terpenes.
Can I store my cannabis in the refrigerator or freezer?
No, moisture can collect in the packaging and compromise the potency and flavor of the buds. Stick to airtight, light-proof containers stored in a cool, dry place.
How long can I store my cured cannabis?
As long as it’s stored properly, your cured buds can last for several months to a year or more.

