
Harvesting Cannabis Plants: A Guide to Maximizing Your Yield
For many cannabis growers, the timing of the harvest can be a source of uncertainty and confusion. Knowing when to harvest your plants is crucial for producing high-quality buds with maximum potency and flavor. However, the process of deciding when to cut your plants can be tricky, as it involves careful observation and consideration of various factors. Getting the timing wrong can have serious consequences, whether it’s reducing the potency of your buds or ruining the entire crop. In this article, we will dive into the science behind harvesting cannabis, outline the risks of doing it too early or too late, and provide you with a step-by-step guide on how to tell when your cannabis is ready for harvest and how to proceed once the time comes.
Why is timing your harvest important?
Contents
Determining the right time to harvest your cannabis plants can be a perplexing task for novice growers. The timing of your harvest is crucial to achieving the desired potency and yields of your buds. In this section, we will explore the significance of timing your harvest and the science behind it. We will also examine the potential risks of harvesting too early or too late. Understanding these factors will equip you with the knowledge needed to become a successful cannabis cultivator.
The science behind it
Understanding the science behind harvesting cannabis plants is essential for any grower who wants to achieve the perfect harvest. As cannabis plants mature, the cannabinoids and terpenes within the buds undergo changes that affect their potency, flavor, and aroma. In this section, we’ll explore the scientific reasons why timing your harvest is critical to producing high-quality cannabis buds.
| Factors | Effects of Harvesting Too Early | Effects of Harvesting Too Late |
|---|---|---|
| Cannabinoids | If you harvest cannabis plants too early, the buds won’t have reached their full cannabinoid potential. This means that the potency of the buds will be lower, and you may not experience the full range of medicinal effects that the strain can offer. | On the other hand, if you harvest your buds too late, the THC levels will begin to degrade, meaning that the flowers will be less potent over time. The THC will begin to degrade into CBN, which has fewer psychoactive properties than THC, so the plant will lose much of its medicinal value. |
| Terpenes | Harvesting cannabis plants too early will also lead to a loss of terpenes, which are responsible for the distinct aroma and flavor of the strain. Terpenes help to modulate the effects of cannabinoids, so if they’re lost, the medicinal properties of the cannabis will be diminished. | Harvesting cannabis plants too late can also cause a loss of terpenes, due to oxidation or degradation. This can result in buds that have a less appealing aroma or flavor, and may be less therapeutic as a result. |
| Yield | Harvesting cannabis plants too early may result in a lower yield, because the plants haven’t had enough time to develop fully. The buds may be smaller and less densely packed, which can impact the final weight and quality of the harvest. | On the other hand, harvesting cannabis plants too late can also lead to a lower yield, because the plant may have begun to cannibalize itself. This can lead to a decrease in bud density and a lower overall weight. |
Timing your cannabis harvest is critical for achieving the best possible yield, potency, and flavor. By understanding the science behind cannabis maturation, you can avoid the risks of harvesting too early or too late and produce high-quality buds that are perfect for your needs.
The risks of harvesting too early or too late
Harvesting too early or too late can lead to less potent buds and reduced yields. Here are some of the risks associated with both scenarios:
- Harvesting too early: This may lead to buds that have not fully developed and have lower THC levels, resulting in a weaker and less effective high. Additionally, harvesting too early can cause the trichomes to not fully develop, resulting in a reduction of terpenes and overall flavor of the buds.
- Harvesting too late: On the other hand, harvesting too late may result in overripe buds that have a drop in THC levels and a potential increase in CBN (cannabinol), which is known for inducing sleep and sedation. Overripe buds may also have increased levels of mold or other contaminants, which can make them unsafe to consume.
- Other risks: Harvesting at the wrong time can also cause issues with the plant’s overall health, making it more susceptible to disease or pests. Waiting too long to harvest can cause the trichomes to degrade, leading to a loss of potency and flavor.
It’s important to keep an eye on several factors to determine the optimal harvest time for your cannabis plants.
How to tell when your cannabis is ready for harvest
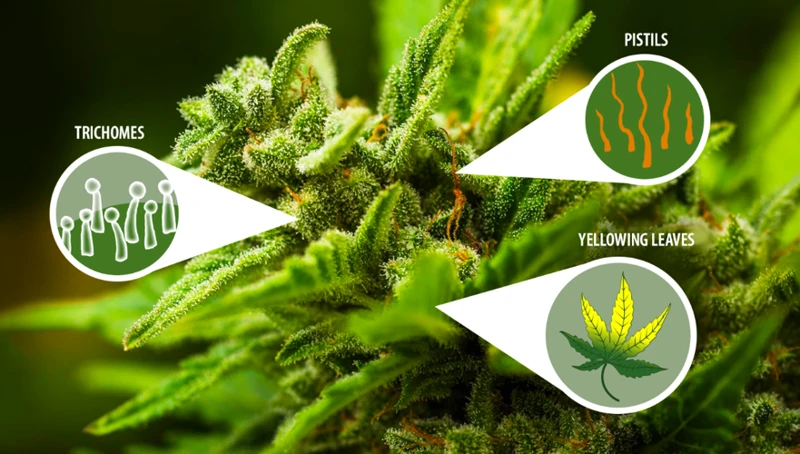
One of the most important decisions a cannabis grower has to make is determining the perfect time to harvest their plants. This can be a daunting task, as it requires a keen eye for detail and some knowledge of the plant’s growth cycle. There are several factors to consider, including the trichome development, pistil color, and overall plant health. In this section, we’ll dive deeper into these methods and explore how to know when your cannabis is ready for harvest.
Checking the trichomes
Checking the trichomes is one of the most reliable methods for determining when to harvest cannabis. Trichomes are tiny, hair-like structures that cover the buds and leaves of the plant. They contain the plant’s essential oils and are responsible for its unique aroma and flavor.
To check the trichomes, you will need a magnifying glass or a jeweler’s loupe. Look at the trichomes on the buds, specifically the ones on the calyxes, which are the small, leaf-like structures that surround the buds. You want to pay close attention to the color and transparency of the trichomes.
Here is a breakdown of what to look for:
| Trichome Appearance | Harvest Time |
|---|---|
| Mostly clear, with a few cloudy trichomes | Early harvest – the plant will have a more uplifting effect |
| Half clear, half cloudy trichomes | Mid-harvest – the plant will have a more balanced effect |
| Mostly cloudy, with a few amber trichomes | Late harvest – the plant will have a more relaxing effect |
| Mostly amber trichomes, with a few cloudy or clear ones | Overripe – the plant may have a sedative effect and the yield may be compromised |
It’s important to note that the ideal harvest time will depend on the strain and the desired effects. Some strains may have a shorter or longer window for optimal harvest time. Additionally, if you plan to extract the plant’s oils or make concentrates, you may want to harvest at a different time to maximize the potency and flavor.
Checking the trichomes is a simple and effective way to determine when your cannabis is ready for harvest. It’s important to also consider other factors such as the pistil changes, the color of the buds and leaves, and the environmental conditions before making a final decision. Harvesting at the right time will ensure a high-quality yield with the desired aroma, flavor, and effects.
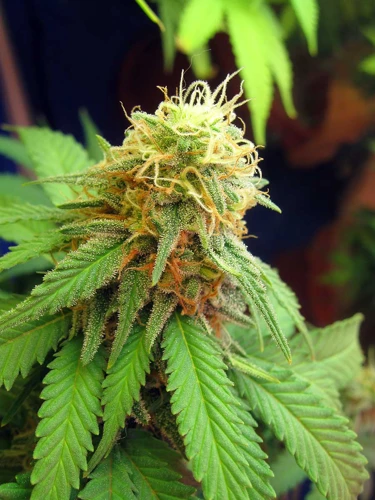
Measuring the pistil changes
Measuring the pistil changes is one of the ways to determine whether your cannabis plant is ready for harvest. Pistils are the tiny hair-like structures that emerge from the flowers of the cannabis plant. As the plant matures, the color of these pistils can give you an indication of the plant’s readiness. Here are a few things to look for:
- Change in color: In the early stages, pistils are usually white, but as the plant matures, they start changing color. If you see that more than 70% of the pistils have turned brown or reddish-brown, it is an indicator that your cannabis may be ready for harvest.
- Pistil retraction: As the buds mature, the pistils begin to retract back towards the flowers, giving them a denser and fuller appearance.
- Pistil curling: Curling pistils are another indication of the maturity of the plant. When the pistils curl inwards and start to darken, this is a sign that the plant is almost ready to harvest.
- Decrease in new white pistils: As the plant approaches maturity, fewer new white pistils emerge, indicating that the plant has almost finished growing.
It’s important to remember that the appearance of the pistils alone should not be the only factor in determining whether your cannabis plant is ready for harvest. It is best to use a combination of methods to make sure that your cannabis is truly mature and ready for harvest.
Scrutinizing the color of the buds and leaves
Examining the hues of the cannabis buds and leaves is an additional way to determine if the plants are ready for harvest. As the plants mature, their color changes from bright green to a deeper, muted tone. There are several factors to consider when analyzing the color of the buds and leaves, such as variety, genetics, and growing conditions.
Here’s a breakdown of what to look for in terms of color:
| Color | Indication of Readiness |
|---|---|
| Deep Green | The plant is likely not ready for harvest and needs more time to mature. |
| Muted Green | This is usually a good sign that the plant is in its prime for harvesting. |
| Purple, Red, or Other Colors | These hues may be a sign of stress, but they can also indicate genetic factors or ideal growing conditions specific to certain strains. If the discoloration appears to be a natural, healthy aspect of the plant’s genetics, it likely doesn’t affect the quality or potency of the buds. |
| Yellow or Brown | If the yellowing or browning is widespread, it may be a sign of disease, pest infestations, nutrient deficiencies, or overwatering. In this case, the plant should not be harvested until the underlying problem is resolved. However, if only a few of the oldest leaves are yellowing, this could be a normal part of the plant’s life cycle and doesn’t necessarily indicate a problem. |
It’s important to note that some strains are known for their naturally colorful buds, so it’s essential to be familiar with the specific strain being grown. Keep in mind that relying solely on the color of the cannabis buds and leaves to determine readiness for harvest is not as accurate as monitoring trichomes or pistil changes, but it can still provide useful insight.
Monitoring the humidity levels and other environmental factors
When monitoring the humidity levels and other environmental factors, it’s important to remember that cannabis plants are sensitive to their surroundings. You want to ensure that the environment is conducive to a healthy and successful harvest. Here are some of the factors you should keep an eye on:
| Factor | Why It’s Important |
|---|---|
| Humidity levels | High humidity levels can lead to mold and mildew, which can ruin your entire crop. Conversely, low humidity levels can cause the buds to dry too quickly and lose potency. It’s important to keep the humidity levels between 45% and 55% during the flowering stage. |
| Temperature | The ideal temperature range during the flowering stage is between 68°F and 77°F. Temperatures above or below this range can slow down growth and decrease potency. |
| Light exposure | During the flowering stage, your plants need 12 hours of light and 12 hours of darkness each day. Any exposure to light during the dark period can disrupt the flowering cycle and lead to reduced yields. |
| Air circulation | Good air circulation is essential for the health of your plants. It can prevent the buildup of CO2, which can stunt growth, and prevent the stagnant air that can create an environment for mold and mildew. |
| pH levels | The pH levels in the soil or hydroponic solution can affect the plant’s ability to absorb nutrients. The ideal pH range for cannabis is between 6.0 and 7.0. |
Keeping an eye on these factors will ensure that your cannabis plants are in the best possible environment for a successful harvest.
What to do before harvesting your cannabis plants
As you near the end of the cannabis growing season, you may be wondering what steps to take before harvesting your plants. It’s important to prepare your plants properly to ensure a successful harvest and a high-quality final product. With a few key considerations, you can help your plants maximize their potential and make the most of your hard work. Here are some crucial pre-harvest steps to take before you start cutting those buds.
Flushing the plants
Flushing the plants is an important step before the harvest. It involves watering the cannabis plants only with plain water for a period of time to remove excess nutrients from the soil or medium they are planted in. This ensures that the buds have a cleaner taste and smoother smoke. Here are the steps to flushing your plants:
- Stop fertilization: Two weeks before the harvest, stop fertilizing the plants. This allows them to use up the remaining nutrients in the soil.
- Watering: Water the plants with plain water for one to three weeks depending on the type of medium and strain of the plant. This can help remove any excess nutrients and salts that have built up in the soil or medium.
- Checking the pH: Make sure the pH level of the water is around 6.0 to 6.5 to ensure proper absorption by the roots. You can use a pH meter or pH strips to check the level.
- Monitoring the plants: During the flushing period, monitor the plants closely. The leaves may start yellowing and drooping a bit, which is normal. However, if the yellowing becomes excessive or the leaves turn brown or crispy, it may be a sign of a problem.
Flushing the plants can help prepare them for a better taste and quality of the buds during the actual harvest. Make sure to follow the recommended flushing period and use plain water to ensure the best results.
Stopping fertilization and watering
Once you have determined that your cannabis plants are ready for harvest, it is important to prepare them properly. One crucial step is stopping fertilization and watering at least one to two weeks before you plan to harvest. This process is known as flushing and allows for excess nutrients to be removed from the plant to improve the flavor and aroma of the buds.
Flushing involves watering your plants with plain pH-balanced water, without any added nutrients or supplements. Doing so helps the plant to use up any remaining nutrients stored in the leaves and stems. To ensure that you are flushing your plants correctly, it is important to keep track of the pH level of the water you are using.
You can use a pH meter or pH strips to monitor the level of acidity in the water. The ideal pH level for flushing cannabis plants is between 6.0 to 6.5. You should continue flushing your plants until the pH runoff from the soil is within this range.
When you stop fertilizing and watering your plants, they will begin to use their stored energy to produce more resinous buds. This will result in buds that are more potent and have a better flavor and aroma.
It is also important to note that overwatering can lead to mold and mildew growth, which can be detrimental to your yield. To avoid this issue, make sure that your plants are not sitting in standing water and that the soil is allowed to dry out slightly before you water them again.
To summarize, stopping fertilization and watering and flushing your plants is a key step in ensuring that your cannabis harvest is of the highest quality possible. By doing so, you can remove any excess nutrients and improve the overall flavor and aroma of your buds.
Preparing the drying area
Preparing the drying area for your cannabis buds is crucial to ensure they dry properly without any mold formation. Here are some steps you can take to prepare the drying area:
| Steps | Description |
|---|---|
| Choose a dry, dark room | The room should be well-ventilated and out of direct sunlight. You can use a closet, spare room, or grow tent for drying. |
| Setup a drying rack or line | You can hang your cannabis buds upside down on a drying rack or line using strings. Ensure that there is enough space between the buds for proper air circulation. |
| Check the humidity levels | The ideal humidity for drying cannabis buds is between 45-55%. You can use a hygrometer to monitor the humidity levels in the drying area. If the humidity is too high, you can use a dehumidifier to lower it. |
| Clean the drying area | The drying area should be clean and free from any dust, mold, or mildew. You can wipe down the area with a disinfectant solution to ensure cleanliness. |
| Install a fan | A fan can help to improve air circulation in the drying area, which is essential for preventing mold formation. |
Note: It is important to keep the drying area as clean and sterile as possible to avoid any contamination of your cannabis buds. Proper preparation of the drying area can ensure that your cannabis buds dry evenly and retain their potency and flavor.
Gathering the necessary tools and equipment
When it is time to harvest your cannabis plants, it is crucial to have all the necessary tools and equipment ready to ensure a smooth and successful process. Here is a list of some essential items that you will need:
- Pruners or Scissors: You will need a good pair of sharp pruners or scissors to cut the buds off the plant without damaging them.
- Gloves: Wear gloves to protect your hands from the sap and resin that can irritate your skin.
- Buckets or Totes: You will need containers to transport the harvested buds. Use buckets or totes that are easy to carry and have lids to help maintain humidity.
- Hangers and String or Drying Nets: Use hangers and string or drying nets to hang the buds and allow for proper air circulation during the drying process.
- Hygrometer: A hygrometer will tell you the humidity levels in the drying room. It is important to maintain a proper humidity range of 45-55% for ideal drying conditions.
- Jars: After curing your buds, they will need to be stored in jars. Use glass jars with airtight lids that are the appropriate size for the amount of buds you have.
- Boveda Packs or Humidity Control Devices: These packs will help maintain the proper humidity levels in the jars during the curing process.
- Labels: It is important to label your jars with the strain name, date, and any other relevant information to keep track of your harvest.
- Cleaning Supplies: Clean your harvesting tools and the drying and curing area thoroughly to prevent any contamination or mold growth.
Having all of these tools and equipment prepared in advance will make the harvesting and curing process much smoother and more efficient.
How to harvest your cannabis plants
With months of care and attention, your cannabis plants have grown and flourished into beautiful, healthy buds. Now comes the exciting but crucial step of harvest. Experience, a keen eye, and some specialized tools can make the difference between a successful harvest and one that leaves you wanting. Let’s delve into the specific steps to ensure that your harvest is a bountiful and satisfying one.
Picking the right time of day
When it comes to harvesting your cannabis plants, choosing the right time of day is important to ensure the quality of your buds. The time of day you choose to harvest can affect the levels of terpenes, cannabinoids, and moisture in your plants. Here are some factors to consider when deciding on the best time to harvest:
| Factor | Impact on Harvest Time |
| Light Exposure | If your cannabis plants are grown outdoors, harvesting in the morning before the sun becomes too hot can help prevent your plants from drying out too quickly. On the other hand, if your plants are grown indoors, it’s best to harvest after the lights have been off for at least 12 hours to ensure maximum potency. |
| Temperature | The time of day can also affect the temperature of your plants. Harvesting when it’s too hot or too cold can negatively impact the potency and taste of your buds. It’s best to wait until the temperature is mild, around 68-70°F, for the best results. |
| Humidity levels | High humidity levels can cause your buds to mold or rot, while low humidity levels can cause your buds to dry out too quickly. Harvesting when the humidity levels are around 40-50% can help ensure your buds dry evenly without mold or rot. |
By taking these factors into consideration and choosing the right time of day to harvest, you can help ensure the quality and potency of your cannabis buds.
Cutting the buds
Once you have determined that your cannabis plants are ready to be harvested, it’s time to cut the buds. Cutting the buds is a delicate process that requires precision and care to ensure the highest quality final product. Here are the steps to follow when cutting your cannabis buds:
| Step | Description |
|---|---|
| Step 1: | Prepare your tools and equipment. You will need a pair of sharp scissors, pruning shears or a sharp knife. Make sure your tools are clean and sterile to prevent any contamination of your buds. |
| Step 2: | Choose the right time of day. It’s best to cut your buds in the morning, after the dew has evaporated but before it gets too hot. This will ensure that the buds are at their freshest and most potent. |
| Step 3: | Begin cutting the buds from the bottom of the plant and work your way up. Use your scissors or pruning shears to cut each bud as close to the main stem as possible. |
| Step 4: | Be gentle when handling the buds to prevent damage to the trichomes, which contain the cannabinoids and terpenes that give cannabis its unique properties. Try to handle the buds as little as possible, and avoid touching the trichomes. |
| Step 5: | Place the buds in a clean container or basket. Be sure to leave enough space between each bud so that they are not touching each other, as this can cause them to become moldy or damp. |
| Step 6: | Continue cutting the buds until you have harvested all of them. Check the buds carefully for any signs of mold, rot or other damage. If you find any buds that are damaged or infected, discard them immediately. |
Cutting the buds is just the first step in the harvesting process. Next, you will need to hang the buds to dry and then cure them in jars. By following these steps carefully, you can ensure that your cannabis buds are of the highest quality and potency.
Leaving space for air circulation
Leaving ample space for air circulation is crucial during the harvesting process. Proper air flow helps facilitate the drying and curing process and prevents mold and mildew from growing on your precious buds. Here are a few tips to ensure that your buds dry evenly:
| Tip | Explanation |
|---|---|
| Hang buds individually | Hanging buds individually ensures that air can circulate around each one, preventing any mold or moisture from developing on the plant material. Using clothespins or string, tie each bud to a drying line or hanger. |
| Keep buds spaced out | Make sure that each bud is at least a few inches apart from the others. This will allow air to circulate freely around each one, drying them out evenly. |
| Use a fan | Place a fan near the drying area to promote airflow. This will help speed up the drying process and prevent mold from developing. |
| Avoid high humidity | Ensure that the drying area is well-ventilated and has a humidity level of no more than 55%. High humidity can cause mold and mildew to develop, ruining your harvest. |
Following these tips will help ensure that your buds dry evenly and are ready for curing.
Trimming the buds
After cutting the buds, it is important to trim them to remove any excess leaves and stems that could affect the quality and taste of your final product. This process involves using sharp scissors to carefully trim away the unwanted parts of the buds. Here are some tips for trimming your cannabis buds:
- Clean your scissors: It is important to make sure your scissors are clean and free of any debris that could contaminate your buds. Use rubbing alcohol or a cleaning solution specifically designed for cannabis trimming tools to sanitize your scissors before and after use.
- Trim away excess leaves: Use your scissors to carefully trim away any large fan leaves that are sticking out of the buds. These leaves do not contain much THC and can make your buds harsh to smoke.
- Trim close to the bud: To maximize the amount of usable bud, trim the leaves as close to the buds as possible without cutting into them. This will also help your buds dry more evenly.
- Be gentle: When trimming your buds, be gentle to avoid damaging the delicate trichomes that contain most of the THC. Trimming too aggressively can reduce the potency of your buds.
- Save the trim: The leaves and stems that you trim away can still be used to make cannabis-infused products like edibles and tinctures. Be sure to save them for later use!
By taking the time to properly trim your cannabis buds, you can ensure that you end up with a high-quality final product that is potent, flavorful, and enjoyable to smoke.
Drying and curing your cannabis buds
After patiently waiting for the cannabis to reach its optimal harvest window, the work isn’t done yet. Properly drying and curing the buds is crucial to bring out the best flavor and potency in the final product. This step can make or break the success of your harvest, so it’s essential to do it right. In this section, we’ll go through the steps you need to take to dry and cure your cannabis buds to perfection, ensuring that all your hard work pays off in the end. So, let’s dive in and discover the science and art of drying and curing cannabis.
Hanging the buds to dry
After harvesting your cannabis, the next step is to dry and cure it properly. The first step in this process is to hang the buds to dry. Here are some tips to ensure that your drying process goes smoothly:
- Trim the excess leaves: Before hanging the buds to dry, it’s important to trim off any extra leaves that may be covering the buds. This will help to improve the air circulation around the buds, which is crucial to the drying process.
- Hang the buds upside down: Once the excess leaves have been trimmed, the buds should be hung upside down to dry. You can use a string or rope to tie the buds to a drying rack or line. It’s important to ensure that the drying area is cool, dry, and generally free from any bad odors.
- Avoid overcrowding: It’s important to leave some space between each bud to allow for proper air circulation. Overcrowding the buds can lead to mold growth and other issues that can ruin your harvest.
- Monitor the humidity: During the drying process, it’s important to keep an eye on the humidity levels in the drying area. The ideal humidity level for drying cannabis is around 50%, which can be maintained using a dehumidifier if necessary. High humidity levels can cause mold growth, while low humidity levels can cause the buds to dry too quickly and lose potency.
- Be patient: Drying can take anywhere from 5 to 14 days, depending on the strain and the environment. It’s important to be patient and not rush the process. Rushing can lead to uneven drying and a less potent final product.
By following these tips, you can ensure that your buds are dried properly and are ready for the next step: curing.
Trimming once more
After the buds have been hung to dry and the initial trimming has been done, it’s time for a second round of trimming. This is an important step in the process of preparing your cannabis for consumption, as it removes any excess leaves and stems that may detract from the quality of the final product.
1. Prepare your workstation: Before you begin trimming, make sure you have a clean and organized workstation. You’ll need a pair of sharp scissors or trimming shears, a flat surface to work on, and a container to collect the trimmed buds.
2. Trim away any remaining leaves: Using your scissors or trimming shears, carefully trim away any remaining leaves that are still attached to the buds. Focus on removing the larger leaves, which can be tough and unpleasant to smoke.
3. Cut the buds down to size: After removing the excess leaves, you may notice that some of the buds are still quite large and bulky. Use your scissors to trim these down to a more manageable size, taking care not to remove too much of the actual bud material.
4. Inspect and touch-up: Take a close look at each individual bud, and use your scissors to touch up any areas that still have visible stems or leaves. Trim away any loose or hanging bits, and make sure the buds are well-rounded and free of any protrusions.
5. Collect your trimmed buds: As you trim each bud, place the trimmed material into a separate container. This will make it easier to keep track of how much product you have, and it will help you stay organized throughout the process.
By taking the time to properly trim your cannabis buds, you’ll be rewarded with a final product that is more visually appealing and enjoyable to smoke. Plus, you’ll be able to optimize your yields and ensure that every bit of your hard-earned bud is put to good use.
Jar curing
Once your cannabis buds are trimmed, it’s time to move on to the next step: jar curing. This is an essential process that allows the buds to properly age and develop the desired flavor, aroma, and potency. Here’s what you need to know about jar curing:
| Step | Description |
|---|---|
| Select airtight jars | Choose glass jars with airtight lids that can create a vacuum seal. This will help preserve the freshness of your buds. |
| Fill the jars | Fill the jars about 3/4 full with buds. Don’t pack them too tightly as this can lead to mold and mildew growth. |
| Add a humidity pack | For optimal results, add a humidity pack to each jar. This will help maintain a consistent humidity level of 62%. This is the ideal range for curing cannabis. |
| Store in a cool, dark place | Place the jars in a cool, dark place such as a pantry or cupboard. The ideal temperature range is between 60-70°F (15-21°C). |
| Monitor daily | Check on the buds daily to ensure they’re not too moist or too dry. If the humidity pack feels hard, replace it with a fresh one. If the buds feel too moist, leave the jars open for a few hours to allow them to air out. If they feel too dry, add a small piece of orange peel or lettuce to the jar for a few hours to rehydrate them. |
| Burp the jars | After the first week, start burping the jars once a day for about 10-15 minutes. This involves opening the lids to let fresh air in and release any excess moisture. Do this for the first two weeks of curing. |
| Continue curing | Curing your buds can take anywhere from two weeks to several months, depending on your personal preference. The longer you cure them, the more potent and flavorful they will become. Remember to check on them regularly and adjust humidity levels as needed. |
Properly jar curing your cannabis buds is crucial for achieving the desired flavor and potency. Follow these steps carefully and take your time to let your buds develop fully.
Burping the jars
After the buds have been jarred and left to cure for a few days, it’s important to “burp” the jars regularly to ensure a proper cure. Burping the jars means opening them for a short period of time to release excess moisture and gases that have built up inside the jar. This process is important because it prevents mold and mildew from developing on the buds and ensures a smooth smoking experience.
Here are some steps to follow when burping your jars:
- Open the jars for about 5-10 minutes each day.
- Make sure the room is well-ventilated to avoid any mold or mildew growth.
- Check the buds for any signs of moisture or mold. If any are found, remove them immediately.
- As the curing process progresses, you can reduce the frequency of burping, but it’s important to continue checking for moisture and mold regularly.
- After a few weeks of burping and monitoring, your buds should be fully cured and ready for consumption or storage.
Remember to be patient during the curing process and not rush it. Properly curing your buds can make a huge difference in the quality and potency of your cannabis, so it’s worth taking the time to do it right.
Conclusion
After going through the entire process of growing and harvesting your cannabis plants, it’s important to remember that patience is key when it comes to the final step of drying and curing your buds. Proper drying and curing techniques can make all the difference in the quality and potency of your final product.
Remember to:
- Hang your buds in a dry and cool area with good air circulation to dry them out
- Trim and check for any signs of mold or damage before jar curing
- Place your trimmed buds in airtight jars to start the curing process
- Burp your jars daily to release excess moisture and ensure proper curing
It’s also important to note the significance of timing your harvest in order to achieve the best possible results. Rushing the process and harvesting too early or too late can greatly impact the potency and overall quality of your buds. Pay close attention to the trichomes, pistils, and color of your plants to determine the optimal time for harvest.
Lastly, remember to have all the necessary tools and equipment ready before beginning the harvesting process, and to properly prepare your plants by flushing and stopping fertilization and watering. With patience and attention to detail, you can successfully harvest and cure your cannabis buds for the best possible outcome.
Frequently Asked Questions
What are trichomes and how do they help determine harvest timing?
Trichomes are small, hair-like structures on cannabis buds that produce and store resin. Examining the color and shape of these trichomes can help determine the optimal time to harvest for desired potency and effects.
What environmental factors should be monitored before harvesting cannabis plants?
Humidity levels, temperature, and air circulation should all be monitored to ensure optimal conditions for drying and curing cannabis buds. Pests and mold should also be addressed before harvesting.
Why is flushing the plants important before harvesting?
Flushing involves stopping the use of fertilizers and flushing the plants with water to remove excess nutrients. This helps to improve the flavor and quality of the buds by reducing harshness and ensuring a clean burn.
What tools and equipment will I need for harvesting my cannabis plants?
You will need pruning shears, gloves, a drying rack or hanging apparatus, mason jars, hygrometer or humidity packs, and a storage container. Optional items include trimmers, scissors, and a magnifying glass to inspect trichomes.
How long does it take to dry and cure cannabis buds?
The drying process can take anywhere from 5-14 days depending on environmental conditions such as humidity and temperature. Curing can take up to several weeks or even months to achieve the desired flavor and potency.
What is the best way to dry cannabis buds?
Hanging the buds in a warm, dry, and dark location with good air circulation is the most popular drying method. The drying room should have a humidity level of 45-55% and a temperature range of 60-70°F.
What is the best way to trim cannabis buds?
Hand trimming with scissors or pruning shears is the most precise method, but can be time-consuming. Mechanical trimmers can also be used, but may damage or bruise the buds.
What is jar curing and why is it important for cannabis buds?
Jar curing involves placing dried cannabis buds in airtight jars to allow for further drying and curing. This process helps to preserve flavor, potency, and smoothness by allowing the buds to slowly release and absorb moisture.
When is the best time of day to harvest cannabis plants?
Harvesting in the morning after the plants have had a chance to rest and recover overnight is recommended. Avoid harvesting in high heat or humidity conditions.
Why is it important to burp jars during the curing process?
Burping the jars involves opening them to release excess moisture and replenish oxygen. This process prevents mold and preserves the flavor and potency of the buds.

