
Different Ways to Cure Your Cannabis Buds
As cannabis gains more social acceptance and becomes increasingly legalized around the world, more people are taking up cultivation as a hobby or business. While the growing and harvesting stages of cannabis are vital, one key aspect that can make or break the final product is the curing process. But what is curing? Why is it important? And what are the different methods for achieving the best results? In this article, we’ll explore the intricacies of cannabis curing and the benefits of this process, as well as the various popular methods for getting the perfect buds. So, let’s dive in and uncover the mysteries of cannabis curing!
Why is Curing Cannabis Important?
Contents
Many people wonder why curing cannabis is such an essential process after harvesting. However, the truth is that curing is critical to achieving the desired potency, flavor, and aroma of your buds. Through curing, you can preserve the terpenes and cannabinoids in your buds, convert THCA to THC, and reduce harshness. In this section, we will explore how each of these factors plays a crucial role in making cannabis curing an integral part of the harvesting process.
Preservation of Terpenes and Cannabinoids
Preservation of terpenes and cannabinoids is one of the most significant benefits of curing cannabis buds. Terpenes are the fragrant oils that give the cannabis plant its distinct aroma and taste. Cannabinoids, on the other hand, are the compounds responsible for the psychoactive and medicinal effects of the cannabis plant. When dried and cured correctly, the terpenes and cannabinoids are safely preserved for consumption, and their potency is intensified. Below are some methods for curing cannabis buds:
- Air Drying: This is the most common method for curing cannabis buds. It involves hanging the cannabis buds upside down in an area with good ventilation for several days or weeks. This method allows for slow and even drying of the buds, creating a smoother smoke and preserving the terpenes and cannabinoids.
- Water Curing: This method involves removing the chlorophyll and other impurities from the buds by soaking them in water for several days before drying them. Water curing is less popular than air drying, but it retains the aroma and flavor of the buds.
- Box Curing: Box curing involves placing cannabis buds in a wooden box and tightly sealing it for several days or weeks. This method allows for a slower drying process, which results in a better taste and aroma of the buds.
- Jar Curing: Jar curing is similar to box curing, but it involves using mason jars. This method helps to retain moisture in the buds, which can enhance their flavor and aroma. It is a popular method for curing cannabis buds due to ease of storage and the ability to monitor humidity levels.
- Burping Your Jars: This is a technique used when using jar curing. It involves opening the jars regularly to release the built-up moisture and prevent mold and mildew growth. Burping should be done at least once a day for the first week, then a few times a week for the next few weeks, and then once a week for the remaining curing period.
- Vacuum Sealing: This method involves placing cannabis buds in an airtight bag and using a vacuum sealer to remove all the air. It is a fast curing method, and it preserves terpenes and cannabinoids by preventing oxidation caused by exposure to air.
- Boveda Packs: Boveda packs are humidity control packs used in jars during the curing process. They help to maintain a consistent level of humidity in the jars and prevent the buds from drying out.
Each of these methods has unique advantages and disadvantages, but they all lead to the preservation of terpenes and cannabinoids, which is crucial to both recreational and medicinal cannabis users.
Conversion of THCA to THC
One of the important reasons for curing cannabis is the conversion of THCA to THC. THCA is the acidic precursor of THC, which is non-intoxicating and has medicinal benefits. Through the process of decarboxylation, THCA can be converted to THC, which is the psychoactive compound that produces the “high” associated with cannabis consumption.
During the drying and curing process, enzymes break down the THCA into THC. The process requires a controlled environment with low humidity, as excessive moisture can inhibit enzyme activity. The conversion of THCA to THC can also occur through smoking or heating the cannabis.
The table below shows the percentage of THC and THCA in a sample of cannabis before and after curing:
| THC | THCA | |
|---|---|---|
| Before Curing | 0.5% | 22.5% |
| After Curing | 15% | 0.5% |
As shown in the table, the percentage of THC increases significantly after curing, while the percentage of THCA decreases. This means that curing can increase the potency of cannabis and provide a more enjoyable and effective experience for consumers.
It is important to note that curing cannabis for too long can result in the breakdown of THC and other cannabinoids, leading to a decrease in potency. It is important to closely monitor the curing process and determine the optimal time for consumption. The conversion of THCA to THC is an important aspect of the curing process that enhances the quality and effects of cannabis.
Reduction of Harshness and Improve Flavor
Curing cannabis buds can not only preserve their terpenes and cannabinoids, but it can also reduce harshness and improve flavor. When cannabis is first harvested, it can have a strong, grassy taste and an aroma that can be overwhelming. However, as the buds cure and dry, they begin to develop a much more desirable flavor and aroma. Here are some ways in which curing can improve the taste and quality of cannabis:
- Breaking Down Chlorophyll: Chlorophyll is responsible for the green color of cannabis buds, but it also gives them a grassy and bitter flavor. As the buds cure, chlorophyll breaks down and dissipates, resulting in a smoother taste and more pleasant aroma.
- Allowing Terpenes to Develop: Terpenes are responsible for the unique flavors and aromas found in different strains of cannabis. Curing allows these terpenes to fully develop and intensify, resulting in a more complex and enjoyable flavor profile.
- Reduction of Harshness: Freshly harvested cannabis can often have a harsh taste that can cause coughing and throat irritation. Curing can reduce this harshness, resulting in a smoother smoke and more enjoyable experience.
- Improving the Burn: Properly cured cannabis will burn more evenly, resulting in a smoother smoking experience and more consistent effects.
- Enhancing the High: As the THCA in cannabis buds converts to THC during curing, the effects of the cannabis can become more potent and enjoyable. This can result in a more balanced high and a more enjoyable experience overall.
The proper curing of cannabis buds is essential to ensure the best possible flavor and quality. Whether you prefer to air dry your buds or use a jar or box method, taking the time to properly cure your cannabis can greatly enhance your overall experience.
Popular Curing Methods
Now that we’ve established the importance of curing cannabis, let’s dive into various methods available. From traditional air-drying to modern vacuum-sealing, there are various techniques that cannabis growers and enthusiasts have perfected over time. Each method offers its own unique benefits, ultimately leading to a cured product that is rich in flavor and potency. Let’s take a closer look at some of the most popular curing methods and their benefits.
Air Drying
One of the most popular methods for curing cannabis is air drying. This method involves hanging the cannabis buds upside down in a dry, dark and well-ventilated area, allowing them to slowly dry out over a period of time. Here are some steps to follow for air drying:
- Harvesting: After harvesting your cannabis, trim off any excess leaves and branches.
- Hanging: Use a wire or string to hang the buds upside down. Make sure to leave enough space between each bud to allow for air flow.
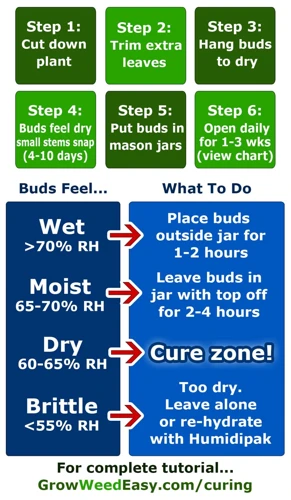
- Curing Room: Choose a curing room that is dark, cool and dry. Humidity levels should be kept between 45-55% to prevent mold growth.
- Patience: It can take anywhere from 7 to 14 days for the buds to dry completely. Make sure to check the buds regularly to ensure they are drying evenly.
- Curing Jars: Once the buds are dry, place them in airtight containers, such as mason jars, and store in a cool, dry place. Remember to burp the jars daily during the first week of curing. This allows for any excess moisture to escape and promotes an even cure.
Air drying is a simple and effective method for curing cannabis. However, it is important to have patience and monitor humidity levels to prevent molding. Properly dried and cured buds will have a stronger aroma, smoother smoke and more well-rounded effects when consumed.
Water Curing
One lesser-known but effective method of curing cannabis is through water curing. This process involves removing all the water-soluble impurities from the buds, resulting in a cleaner and smoother smoke. Here’s how to do it:
1. Prepare the buds
Trim off any excess leaves and hang the buds upside down to dry for a day or two. This will ensure that the buds are dry enough to avoid mold growth during the water curing process.
2. Submerge the buds in water
Fill a container with room temperature distilled water, and submerge the buds completely in the water. Use a weight to keep the buds submerged, but be careful not to damage them.
3. Change the water daily
Every day, replace the water with fresh distilled water to ensure that all the impurities are being drawn out of the buds.
4. Dry the buds
After three to seven days (depending on the degree of impurities), remove the buds from the water and place them on a drying rack to dry completely. This may take a few days, so be patient.
5. Cure the buds
Once the buds are completely dry, you can proceed with a traditional curing process in a jar or other container.
While water curing can be effective in removing impurities, it’s important to note that it can also strip away some of the natural flavor and aroma of the buds. Additionally, it’s not recommended for strains with a high resin content, as it can significantly reduce potency. If you do decide to try water curing, make sure to use distilled water and monitor the process closely to avoid mold growth.
Box Curing
One popular method for curing cannabis is the use of a curing box. This method is efficient and relatively easy to manage. The box curing method is particularly useful for those who want to cure a large amount of cannabis buds.
During box curing, the cannabis buds are placed in a cardboard box, which is then sealed with tape. The tape should be strong enough to keep out any external air or moisture. The box should be lined with parchment paper or newspaper to absorb any excess moisture.
A small hygrometer can be placed inside the box to monitor the humidity levels. It is important to maintain a relative humidity (RH) level of around 60-65% to allow for proper curing. If the humidity levels are too low, the buds will dry out too quickly and lose their potency. If the humidity levels are too high, the buds will become too moist and develop mold.
The box should be kept in a cool, dark place such as a closet or basement. It is important to monitor the box every few days to ensure that the humidity levels are stable. The buds should also be rotated to ensure that they are evenly exposed to the air.
After about a week or two, the buds will start to develop an earthy aroma and become slightly sticky to the touch. They will also start to look more refined and polished. This is a sign that the curing process is working and the buds are developing their characteristic flavor and potency.
Box curing is a relatively simple and effective method for curing cannabis. However, it is important to monitor the humidity levels and to rotate the buds to ensure even curing. With proper care, box cured cannabis can develop a complex flavor profile and potent effects.
| Advantages | Disadvantages |
|---|---|
| -Allows for curing a large amount of buds at once | -Requires monitoring of humidity levels |
| -Relatively easy to manage | -Risk of mold if humidity levels are too high |
| -Produces consistent and refined flavors | -Takes longer than some other curing methods |
Jar Curing
One popular method for curing cannabis buds is using glass jars. This method is often preferred by many growers as it allows for a more controlled environment for the curing process. Here are the steps for jar curing:
- Prepare the Jars: Before starting the process, make sure the jars are clean and free from any residual moisture. Sterilize the jars in boiling water or in the oven at 200 degrees Fahrenheit for at least 20 minutes.
- Trim the Buds: Trim the buds down and remove any excess leaves or stems. Make sure the buds are dry on the outside but still slightly moist on the inside.
- Fill the Jars: Fill the sterilized jars with the trimmed buds, leaving some space at the top.
- Burp the Jars: For the first week, open the jars for a few minutes each day to release any built-up moisture and gases. This process is called “burping” the jars.
- Check the Buds: After the first week, check the buds regularly for moisture and mold. If there is too much moisture, leave the jars open for a few hours to allow excess moisture to escape. If mold is present, remove the affected buds immediately.
- Continue Curing: Repeat the burping process for the next several weeks. The length of time for jar curing can vary, but most growers prefer to cure their buds for at least 3-4 weeks.
Jar curing is a popular method because it allows for a more precise control over the curing environment. It also allows for the buds to retain their shape and aroma. However, growers should be mindful of checking the buds regularly for mold and moisture, as well as ensuring the proper humidity and temperature levels are maintained. This will result in high-quality, well-cured cannabis buds with a rich flavor profile and desirable effects.
Burping Your Jars
One popular method for curing cannabis buds is known as “burping” your jars. This technique involves opening the jars in which your cannabis buds are stored to allow for the release of built-up gases.
The steps for burping your jars include:
- Fill your jars with your dried buds, leaving some space at the top.
- Seal the jars tightly and place them in a cool, dark place.
- The next day, open the jars and let them “breathe” for a few minutes.
- Re-seal the jars and repeat this process once a day for the first week.
- For the second week, burp the jars every other day.
- For the third week, burp the jars once or twice for the entire week.
But why is burping necessary? When cannabis buds are first placed in jars, they release moisture and gases as they continue to dry. If these gases are not allowed to escape, they could create an anaerobic environment that can lead to mold and mildew growth.
Regularly burping your jars allows for the release of these gases, while still maintaining a controlled humidity level. This helps to prevent mold and mildew growth and ensures that your buds are cured properly.
It is important to note that while burping your jars is important, it can also have some downsides. Each time you open the jar, you are exposing the buds to oxygen and light, which can degrade their quality over time. Additionally, while burping your jars, you need to carefully monitor the humidity levels as you are letting moisture out of the container.
Burping your jars is an important step in the curing process, as it allows for the proper release of gases and helps to prevent mold growth. But it is important to do so carefully and monitor the humidity levels to ensure a high-quality final product.
Vacuum Sealing
One popular method for curing cannabis buds is vacuum sealing. This involves using a vacuum sealer to remove air from airtight bags or containers, creating an oxygen-free environment for the buds to cure. Vacuum-sealed bags or containers can be stored in a cool, dark place for several months.
One benefit of vacuum sealing is that it helps preserve the terpenes and cannabinoids in the cannabis buds. By removing oxygen, which can degrade these compounds, vacuum sealing helps to keep the buds potent and flavorful.
Another advantage of vacuum sealing is that it can speed up the curing process. By creating a controlled environment with no air, the buds can undergo the curing process more quickly than they would in a less controlled environment.
However, it’s important to note that vacuum sealing should be done carefully to avoid damaging the buds. In particular, buds that are still moist should not be vacuum sealed, as this can cause them to become compressed and lose their shape.
| Advantages of Vacuum Sealing | Disadvantages of Vacuum Sealing |
|---|---|
| Preserves terpenes and cannabinoids | Buds can become compressed and lose shape |
| Speeds up curing process | Requires vacuum sealer equipment |
| Creates a controlled environment | Can be difficult to monitor humidity levels |
Vacuum sealing is a good option for those who want to speed up the curing process and preserve the potency and flavor of their cannabis buds. However, it’s important to use caution and avoid damaging the buds in the process.
Boveda Packs
One of the easiest and low-maintenance methods for curing cannabis buds is by using Boveda packs. These packs are small, portable and can be easily placed into jars with your cannabis buds. They are essentially humidity control packets that will help maintain a consistent humidity level within the jar, preventing mold and over-drying.
Boveda packs come in a variety of humidity levels, typically ranging from 58%-62%, 65%, 69%, 72% and 75%. The ideal humidity level for curing cannabis is around 62%, which helps preserve terpenes and cannabinoids without letting the buds become too wet or dry.
Here is a comparison table for different Boveda pack humidity levels:
| Boveda Pack Level | Ideal for: |
|---|---|
| 58% | Drying and curing in low humidity climates |
| 62% | Curing and storing cannabis |
| 65% | Storing cannabis with dry climates |
| 69% | Storing cannabis and humid climates |
| 72-75% | Reviving previously dried out cannabis |
Using Boveda packs is simple. Just place one or two of the packs (depending on the size of your jar) with your cannabis buds and seal the jar shut. These packs will release or absorb moisture as needed, maintaining that optimal 62% humidity level.
While Boveda packs can help maintain proper humidity levels, it’s still important to check and inspect your buds regularly to make sure there are no signs of mold or mildew growth. It’s also important to note that Boveda packs are not a replacement for proper drying and curing techniques, but rather a helpful tool to enhance the process.
Tips for Better Curing
Once you have harvested and trimmed your cannabis buds, the curing process begins. Curing is a crucial component in producing high-quality cannabis. However, proper curing goes beyond just storing your buds in a container. To help you achieve the best results, we have gathered some helpful tips and tricks for better curing. These practices will not only preserve the aroma and potency of your buds, but also prevent any harmful molds or mildew. Follow these tips to ensure a smooth and successful curing process.
Quality Control and Inspection
Ensuring the quality of your cannabis during the curing process is crucial. Here are some tips for quality control and inspection:
- Visual inspection: Take a close look at your buds for any signs of mold, mildew or discoloration. Remove any damaged or discolored buds to prevent the spread of mold and to maintain the potency of your cured cannabis.
- Tactile inspection: Feel your buds for moisture content. If your buds are too dry, the curing process might be too long or your humidity levels might be too low. If your buds are too wet, they might not be drying properly, which can lead to mold growth.
- Olfactory inspection: Take a whiff of your buds. If they have a musty or moldy smell, it might be an indication of mold or mildew growth. Proper ventilation and humidity control can help prevent mold and mildew growth.
- Taste testing: Once your buds have fully cured, give them a taste test. The curing process should improve the flavor and reduce harshness, but if your buds still taste harsh or have an unpleasant flavor, it might be an indication of improper curing.
By maintaining quality control and conducting regular inspections during the curing process, you can ensure that your cannabis is potent, flavorful and free of mold and mildew.
Humidity and Temperature Control
Proper humidity and temperature control is crucial for a successful cannabis curing process. Humidity levels should be kept between 60-65% in order to prevent moisture loss or gain in the buds, which can lead to mold growth or drying out of the plant material. Temperature should be kept around 60-70°F or 15-21°C, as higher temperatures can cause the buds to lose flavor and potency, while lower temperatures can slow down or halt the curing process altogether.
One way to ensure proper humidity and temperature control is to use a hygrometer and thermometer in the curing environment. This will allow you to monitor the levels and make any necessary adjustments to the humidity or temperature as needed.
In addition to monitoring the levels, it’s important to create a stable environment for the buds during the curing process. Avoid fluctuations in temperature or humidity by keeping the curing area away from direct sunlight or sources of heat, and use fans or dehumidifiers as needed to regulate the environment.
Another useful tool for humidity control during curing is the use of humidity packs like Boveda packs. These packs can be placed inside the curing jars to maintain a consistent humidity level and also prevent over-drying or mold growth.
Consistent humidity and temperature control is essential for a successful cannabis curing process, and should not be overlooked. Use a hygrometer and thermometer, avoid fluctuations in the environment, and consider the use of humidity packs to ensure a high-quality final product.
| Humidity Control | Temperature Control |
|---|---|
| – Use a hygrometer to monitor humidity levels | – Keep temperature between 60-70°F or 15-21°C |
| – Maintain humidity levels between 60-65% | – Avoid direct sunlight or sources of heat in curing area |
| – Use fans or dehumidifiers to regulate environment | – Use a thermometer to monitor temperature |
| – Consider use of humidity packs to maintain consistent levels | – Avoid fluctuations in temperature |
Light Control
Proper light control is another essential factor to consider during the curing process. Exposing cannabis buds to light can cause THC to break down into CBN, a cannabinoid with a more sedative effect. To avoid this, it is important to store your cannabis in a dark place, such as a closet or cabinet, during the curing process.
Effective Light Control Tips
| Tip | Description |
|---|---|
| Use amber or UV-blocking jars | Amber or UV-blocking jars can help to significantly reduce the amount of light your buds are exposed to, protecting their potency and flavor. |
| Avoid direct sunlight | Direct sunlight can cause cannabis to degrade quickly. Make sure to keep your jars or containers away from windows or any areas where they may be exposed to sunlight. |
| Use a light-tight container | When storing your cannabis buds, make sure to use a container that is light-tight, such as a plastic bag or a sealed jar, to keep out any excess light. |
| Keep track of light exposure | If you are curing your cannabis buds for a longer period of time, it may be useful to keep track of how much light exposure they are receiving. This can help you adjust your storage methods to ensure maximum potency and flavor. |
By following these tips, you can effectively control the amount of light your cannabis buds are exposed to, preserving their potency and flavor during the curing process.
Avoiding Mold and Mildew
Ensuring that your cannabis buds are free from mold and mildew is crucial to producing high-quality, safe product. Here are some tips to avoid mold and mildew:
- Proper humidity control: High humidity levels can create a breeding ground for mold and mildew. It is essential to maintain proper humidity levels during the curing process. A relative humidity (RH) level of 60-65% is ideal for curing cannabis. Use a hygrometer to monitor the humidity levels in your curing jars or containers.
- Sufficient airflow: Good ventilation is necessary to prevent the buildup of stagnant air, which can lead to the growth of mold and mildew. Ensure that your curing area has proper airflow, and do not pack too many buds in one container.
- Regular inspection: It is crucial to inspect your buds regularly for any signs of mold or mildew. Examining them under a magnifying glass can help you spot any small signs of mold or mildew before they become a more significant problem.
- Dry trimming: Wet trimming can leave excess moisture on the buds, leading to mold and mildew growth. It is best to wait until your buds are dry and then trim them.
- Proper storage: Once your buds are dried and cured, proper storage is necessary to prevent mold and mildew growth. Use air-tight jars, and store them in a cool, dark, and dry place.
- Use of Fans and Dehumidifiers: In case it is essential, use a fan or a dehumidifier to reduce the humidity levels from the surrounding air.
By following these tips, you can significantly reduce the chances of mold and mildew growth and produce high-quality, safe cannabis buds for consumption.
How Long Should You Cure Your Cannabis?
After going through the lengthy and detailed process of growing and harvesting your cannabis crop, you may be wondering just exactly how long you should cure your buds. This is an important step in the process, as it helps to enhance the overall quality and potency of your final product.
The length of time you should cure your cannabis depends on a number of factors, including the strain, humidity levels, and personal preferences for taste and aroma. For some strains, a shorter cure of 1-2 weeks may be sufficient, while others may require a longer curing period of 4-6 weeks or more.
The general consensus among experienced cultivators is that a cure of at least 2-4 weeks is necessary to fully develop the flavor, potency, and aroma of your buds. During this time, you should be regularly checking the buds for signs of mold or mildew, and ensuring that the humidity levels remain between 55-65%.
It’s important to note that the curing process is not a one-size-fits-all approach, and that the length of time you cure your buds will ultimately depend on your individual preferences for taste, scent, and potency. Some growers prefer their buds to have a slightly more fresh, green taste, while others prefer a more mellow and earthy flavor. It’s always a good idea to do a taste test at different stages of the curing process to determine when your buds have reached their optimal flavor and potency.
If you plan on storing your buds long-term, a longer curing period of 6-8 weeks is recommended to help preserve their quality and prevent degradation over time. This involves storing your cured buds in a cool, dark place with controlled humidity levels and minimal exposure to light.
To summarize, the length of time you should cure your cannabis depends on a variety of factors, including strain, humidity levels, and personal preferences for taste and aroma. A minimum cure of 2-4 weeks is recommended for most strains, while a longer cure of 6-8 weeks may be necessary for long-term storage. Ultimately, it’s up to you to decide when your buds have reached their optimal flavor and potency, through careful monitoring and taste testing throughout the curing process.
Conclusion
In conclusion, curing cannabis is a crucial step in the cultivation process that shouldn’t be overlooked by any means. Proper curing methods can help preserve the aroma, flavor, and potency of the buds, ultimately enhancing the overall quality of the smoking experience.
There are various popular curing methods available, including air drying, water curing, box curing, jar curing, burping, vacuum sealing, and using Boveda packs. Each method has its own unique benefits and drawbacks, so it’s essential to do your research and choose the best method that suits your preferences and the batch of cannabis you have harvested.
To ensure a successful curing process, there are some crucial tips to keep in mind, such as quality control and inspection, humidity and temperature control, light control, and avoiding mold and mildew. These can help you achieve the desired potency, flavor, and aroma of your cannabis.
Finally, the length of time you should cure your cannabis depends on the specific strain, moisture content, and your personal preference. As a general rule of thumb, it’s best to cure your cannabis for up to two months for the best results.
In summary, proper curing can make a significant difference in the quality of your cannabis. With the right curing methods and techniques, you can achieve a premium smoking experience that’s full of flavor and potency. So, take the time to perfect your curing process, and you’ll undoubtedly reap the rewards in the end.
Frequently Asked Questions
What is the difference between curing and drying cannabis?
While drying is the process of removing moisture from the freshly harvested buds, curing refers to the process of slowly aging and preserving the dried buds to improve their overall quality and potency.
How long should you dry your cannabis buds before curing them?
It depends on the drying method and environmental conditions, but generally, you should dry your buds for 3-7 days until the stems snap instead of bending.
What is water curing and how does it work?
Water curing is a method of removing impurities and harsh flavors from the buds by submerging them in purified water for several days, then drying them. This process doesn’t preserve the terpenes or cannabinoids, but can improve the taste and smoothness of the smoke.
What is box curing and how does it work?
Box curing is a method of slowing down the drying and curing process by placing the buds in a cardboard box with adjustable humidity levels. This method allows for a more controlled and gradual curing process, resulting in a smoother and more potent end product.
What is jar curing and how does it work?
Jar curing is a popular method of curing cannabis buds by placing them in airtight glass jars and burping them daily to release excess moisture and gases. This slow and controlled curing process allows the buds to age and develop more complex flavors and aromas.
What is vacuum sealing and how does it work?
Vacuum sealing is a method of removing the air from the curing jars or bags to create a seal that prevents oxidation and degradation. This method is useful for long-term storage or preserving the potency of buds.
What are Boveda packs and how do they help with curing?
Boveda packs are small packets of salt and water that help regulate the humidity inside the curing jars or containers. They can also add or remove moisture as needed to maintain a consistent environment, which can result in better flavor, aroma, and potency.
Why is quality control and inspection important during the curing process?
Quality control and inspection help ensure that your buds are curing properly and not developing mold, mildew or other contaminants. Checking the buds regularly can also help you identify any issues and make adjustments to improve the curing process.
What is the ideal temperature and humidity for curing cannabis?
The ideal temperature for curing cannabis is between 60-70°F (15-21°C), with humidity levels between 55-62%. These conditions can vary depending on the curing method and personal preference.
How long should you cure your cannabis buds?
The minimum recommended curing time is 2-4 weeks, but some growers prefer to cure their buds for several months to achieve the desired flavor, aroma, and potency. The length of time can also depend on factors like the strain, drying method, and curing method.

