
The Best Way to Dry Cannabis for Potency and Flavor
As cannabis enthusiasts, we all want to enjoy the full potential of our favorite strain. However, achieving optimal potency and flavor is not just about the genetics or the cultivation methods used. The way we dry and cure our cannabis plants holds a crucial role in the final result. With so many different methods out there, it can be overwhelming to decide which one to use. That’s why we’ve compiled this step-by-step guide to help you achieve the best possible result in drying your cannabis. Read on to discover the importance of proper drying, the various drying methods available, and how to cure your dried product for maximum potency and flavor.
The Importance of Properly Drying Your Cannabis
Contents

Drying your cannabis properly is instrumental in achieving the potency and flavor that cannabis enthusiasts crave. Without proper drying, however, the hard work put into cultivating your cannabis plants can be rendered useless. The process of drying cannabis is much more intricate than simply leaving it out to dry. It involves careful consideration of temperature, humidity levels, and ventilation. In this section, we will explore the reasons why proper drying is essential, the beneficial effects it has on the potency and flavor of your cannabis, and the best methods for achieving optimal results.
Why Proper Drying is Important?
Proper drying is a crucial process that can drastically impact the potency and flavor of your cannabis. When you harvest your cannabis, it contains a high amount of moisture that needs to be removed to avoid mold and mildew growth. If you do not dry your cannabis properly, it can lead to a subpar product that is harsh to smoke and has decreased potency levels.
Below is a table outlining some of the key reasons why proper drying is important:
| Reasons | Impacts |
| Removes Moisture | Prevents mold and mildew growth, which can ruin the buds. |
| Reduces Harshness | Drying cannabis slowly and properly can reduce the harshness and improve the overall quality of the smoke. |
| Potency Enhancement | Terpenes and cannabinoids, which are responsible for the flavor and potency of cannabis, can be lost if dried incorrectly. |
| Longer Shelf Life | Properly dried cannabis can have a longer shelf life, allowing you to enjoy it for a longer period. |
Proper drying not only affects the overall quality of your cannabis but can also impact the health of the consumer. Any moisture left in the buds can lead to the growth of bacteria and mold, which can pose severe health risks to individuals who consume it. Thus, it is crucial to ensure that the cannabis buds are appropriately dried before moving on to the curing process.
The Beneficial Effects of Proper Drying on Potency and Flavor
Properly drying your cannabis plants is crucial for maximizing the potency and flavor of your harvested buds. Here are some of the beneficial effects of proper drying:
- Preserves potency: Drying your cannabis plants properly helps to preserve the potency of the buds by minimizing the loss of cannabinoids and terpenes. If the drying process is rushed or not done correctly, you risk losing some of the potency of your buds.
- Enhances flavor: Proper drying can also enhance the flavor of your buds by allowing the terpenes to fully develop. When your buds are dried too quickly or at too high of a heat, the terpenes can evaporate, affecting the overall flavor of your cannabis.
- Reduces the risk of mold and bacteria: When your cannabis plants are not dried properly, there is a higher risk of mold and bacteria forming on the buds. Proper drying helps to reduce this risk and ensures that your buds are safe to consume.
- Improves the overall smoking experience: Properly dried buds are easier to grind and handle, burn more evenly, and produce smoother smoke. This improves the overall smoking experience and makes for a more enjoyable high.
By taking the time to properly dry your cannabis plants, you can maximize the potency and flavor of your buds, reduce the risk of mold and bacteria, and improve the overall smoking experience.
When to Harvest Your Cannabis Plants
As a cannabis grower, there is nothing quite as exciting as anticipating the moment when it’s time to harvest your plants. But with that excitement comes a sense of perplexity – how do you know when your cannabis plants are ready to be harvested to ensure optimal potency and flavor? Understanding the factors that influence the timing of your harvest and the basics of the harvesting process is crucial in achieving a successful grow. Let’s dive into the main elements you need to consider before the harvest begins.
Factors to Consider When Deciding When to Harvest
When deciding when to harvest your cannabis plants, there are several factors that should be taken into consideration in order to maximize potency and flavor. These include:
| Factor | Description |
|---|---|
| Trichome Color | Trichomes are small resin glands that appear on the buds and leaves of cannabis plants. As harvest time approaches, these glands will change color, with clear trichomes indicating that the plant is not yet ready for harvest, and cloudy or amber trichomes indicating that the plant is at its peak potency. |
| Flower Structure | The structure of the plant’s flowers can also indicate when it is time to harvest. When the flowers have stopped growing new pistils and the calyxes are swollen and beginning to retract, the plant is typically ready to be harvested. |
| Genetics | Some strains of cannabis will naturally reach maturity earlier or later than others, so it is important to take genetics into account when determining the optimal harvest time for your plants. |
| Environmental Conditions | The climate and weather conditions during the growth cycle can also impact when a plant is ready to be harvested. Plants that are grown in colder climates may mature more slowly than those grown in warmer environments, for example. |
| Growth Medium | Whether the plant is grown in soil or hydroponically can also impact when it is time to harvest. Plants grown in soil may take longer to mature since the nutrients are not delivered in as concentrated a form as they are in hydroponic systems. |
By taking all of these factors into account, you can determine the optimal time to harvest your cannabis plants for maximum potency and flavor. This will ensure that you get the most out of your crop and can enjoy the benefits of all your hard work.
Basics of Harvesting
Harvesting cannabis plants at the right time is crucial for optimal potency and flavor. Knowing when to harvest depends on several factors such as the strain, desired effects, and the plant’s maturity. Here are the basics of harvesting cannabis:
| Step 1: | Check plant maturity using a magnifying glass to examine the trichomes (tiny, hair-like structures) on the buds. When the trichomes turn cloudy and a few turn amber, it’s time to harvest for a more relaxing effect. For a more energizing effect, harvest when most of the trichomes are still clear and translucent. |
| Step 2: | Prepare the drying space by cleaning and sanitizing the area, ensuring proper airflow, and the right temperature and humidity. |
| Step 3: | Cut off the main stem of the plant at the base and hang it upside down from a string or clothes hanger in a dark, dry space |
| Step 4: | Trim the fan leaves from the buds and handle them gently to avoid damaging the delicate trichomes |
| Step 5: | Check the drying buds daily for mold or mildew, and rotate the buds often to ensure even drying |
| Step 6: | After the buds are dry and brittle, start the curing process by placing them in airtight glass jars and “burping” them daily to release excess moisture. |
Following these basic steps will help ensure that your cannabis is harvested at the right time and that proper drying and curing techniques are employed for optimal potency and flavor.
How Harvesting Impacts Drying Process
When it comes to drying cannabis plants, the timing of the harvest can greatly impact the drying process. Harvesting too early can result in plants that are too wet and take longer to dry, while waiting too long to harvest can cause the buds to become too dry and brittle. The optimal time to harvest your plants is based on factors such as the strain, growing conditions, and the desired effect.
Once you have determined the perfect time to harvest your plants, it’s important to cut the branches from the main stem and remove any excess fan leaves. This will ensure that the buds dry evenly and there is proper airflow throughout the plant during the drying process.
After the branches are trimmed, they can be hung or placed on a drying rack, depending on your preferred drying method. It’s crucial to avoid overcrowding during this stage, as this can prolong the drying process and increase the risk of mold growth.
Proper harvesting techniques can also have an impact on the drying process. Trimming the buds before drying can speed up the drying process by exposing more surface area to the air, but some prefer to trim the buds after drying to preserve flavor and potency. The choice ultimately comes down to personal preference.
By taking the time to properly harvest your cannabis plants and preparing them for the drying process, you will ensure a smoother and more efficient drying process, resulting in buds with optimal potency and flavor.
To summarize the impact of harvesting on the drying process :
| Harvesting Too Early | Harvesting Too Late |
|---|---|
| Plants may be too wet and take longer to dry | Buds may become too dry and brittle |
| Trimming before drying can speed up drying process | Trimming after drying can preserve flavor and potency |
| Proper airflow is crucial for even drying | Proper airflow is crucial for even drying |
| Overcrowding can prolong drying process and increase risk of mold growth | Overcrowding can prolong drying process and increase risk of mold growth |
Drying Methods
After deciding to harvest your cannabis plants, the next step is to dry them properly in order to optimize potency and flavor. There are various methods for drying your cannabis plants, each with their own advantages and disadvantages. It’s important to consider the differences in these methods in order to choose the one that will work best for your specific needs. Depending on your drying method, you will also need to consider adding humidity control to the drying environment. In this section, we will explore different methods of drying and their benefits.
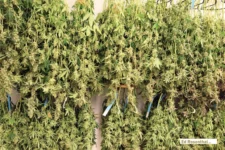
Hang Drying
One of the most popular methods for drying cannabis is hang drying. This process involves hanging the harvested plants upside down in a cool, dark, and well-ventilated area. Hanging allows for the buds to maintain their shape and size while the stems gradually release any remaining moisture. Here is a step-by-step guide for hang drying your cannabis plants:
| Step | Description |
|---|---|
| 1 | Trim the fan leaves: Using a pair of sharp scissors, remove the large fan leaves from the plants. These leaves do not contain much THC and can be discarded. |
| 2 | Hang the plants upside down: Using a piece of string or wire, hang each plant upside down in a cool, dark, and well-ventilated area. Make sure that the plants are not too crowded to allow for adequate airflow. |
| 3 | Check the buds: After a few days, check the buds for signs of moisture. Squeeze them gently- if they feel spongy, they still have moisture and need more time to dry. If they feel dry and crispy, they are ready to move onto the next step of the curing process. |
Hang drying typically takes around 7-10 days, depending on several factors such as humidity levels, temperature, and the size of the buds. It is important to monitor the humidity levels in the drying area to prevent mold from growing on the buds. A humidity level of around 50% is ideal for hang drying cannabis. If the humidity level is higher than 60%, consider adding a dehumidifier to the drying environment to reduce the risk of mold growth.
Hang drying is a low-cost and effective way to dry cannabis plants. It allows for the buds to maintain their shape and size while gradually releasing moisture from the stems. It is important to monitor the drying environment closely to ensure that the buds are drying properly and to prevent any mold growth.
Rack Drying
Another popular method for drying cannabis is rack drying. This involves using a rack or a screen to hang your buds individually. The advantage of using this method is that it allows for optimal air circulation, which speeds up the drying process and helps prevent mold growth.
Steps for Rack Drying Your Cannabis Buds:
| Step 1: | Trim your buds and remove any excess moisture on the surface of the buds. |
| Step 2: | Attach each individual bud to a rack or screen using string or hooks. Make sure that you leave enough space between each bud to allow for proper air circulation. |
| Step 3: | Hang the rack or screen in a dry, cool, and dark location with good air circulation. Avoid areas with high humidity or temperature fluctuation. |
| Step 4: | Check on your buds daily and rotate them to ensure that they dry evenly. Remove any buds that show signs of mold or excessive drying. |
| Step 5: | Dry your buds until they feel crispy to the touch and the branches snap when bent. This usually takes around 5-10 days, depending on the humidity level and temperature of the drying environment. |
Advantages of Rack Drying Method:
– Allows for optimal air circulation to speed up the drying process and prevent mold growth
– Preserves the shape of the buds and prevents them from sticking together
– Allows for easy monitoring and maintenance of the drying process
Disadvantages of Rack Drying Method:
– Requires more space and equipment compared to other drying methods
– Can be time-consuming to attach each individual bud to a rack or a screen
– Can be more challenging to control the humidity levels in the drying environment compared to box drying method
Rack drying is a great option for those who want to preserve the shape and quality of their buds while ensuring optimal air circulation during the drying process. If you have the space and equipment, rack drying can be an effective way to quickly dry your cannabis buds without compromising their potency and flavor.
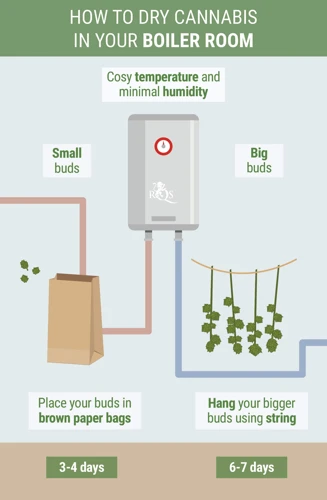
Box Drying
One of the lesser-known methods of drying cannabis is the box drying method, which involves sealing your trimmed buds inside an airtight container, such as a cardboard box or airtight plastic tote. This method is preferred by some growers as it allows for a slower, more controlled drying process.
How to Box Dry Cannabis
To box dry your cannabis, begin by trimming your buds as normal, and then placing them inside an airtight container. If using a cardboard box, you can line it with parchment paper to prevent sticking. Be sure to leave some space between individual buds to prevent molding or rotting.
Monitoring the Drying Process
Unlike hanging or rack drying, box drying requires more frequent monitoring to prevent mold growth. Check on your buds daily, and ensure that they are not becoming too moist or dry. If you notice excess moisture, you may need to leave the container open for a period of time to allow for proper air circulation.
Humidity Control
If you live in a particularly humid climate, you may need to add a humidity control pack to your box to prevent excess moisture. Conversely, if your climate is extremely dry, you may need to mist your buds periodically to prevent overdrying.
| Pros | Cons |
|---|---|
| Slower drying process allows for better preservation of terpenes and cannabinoids, leading to a more flavorful and potent end product | Requires more frequent monitoring to prevent mold growth, which can be time-consuming |
| Can be done in small spaces with minimal equipment, making it a good option for home growers with limited space | May require additional humidity control measures in humid climates |
| Slower drying process can lead to more even drying and fewer hot spots | May not be suitable for larger harvests, as it can be difficult to control temperature and humidity in larger containers |
When to Move on to the Curing Stage
After your buds have dried for a period of 5-10 days, you can begin checking for signs of readiness to move on to the curing stage. Look for a slight crunch or snap when you break apart a small stem or twig on your buds. If the stem instead bends or feels spongy, your buds need more time to dry.
Conclusion
While box drying involves more frequent monitoring than other methods, it can be a great way to ensure a slow and controlled drying process, leading to a more flavorful and potent end product. Be sure to monitor your buds closely and make any necessary adjustments to ensure the optimal drying conditions.
Adding Humidity Control to Drying Environment
Maintaining the proper humidity level during the drying process is crucial to achieving the best flavor and potency in your cannabis. Adding humidity control to your drying environment can be a game-changer. Here are some ways to do it:
- Humidity Packs: Using humidity packs, also known as Boveda packs, is one of the easiest ways to control humidity levels. These packs come in different humidity levels, usually ranging from 58% to 62%, and can be placed in a jar or a container with the dried buds. The packs will release or absorb moisture to maintain the desired humidity level, ensuring that the buds neither get too dry nor too wet.
- Dehumidifier: If you’re drying your cannabis in a large room or a tent, using a dehumidifier can be an effective way to control humidity levels. A dehumidifier sucks moisture out of the air, lowering the relative humidity. This can be especially helpful in humid climates where humidity levels can be hard to control.
- Humidifier: If you’re drying your cannabis in a dry environment, you can add a humidifier to increase the humidity level. This can be helpful if the air is very dry, and you need to prevent the buds from drying out too quickly.
- Hygrometer: A hygrometer is a tool that measures the relative humidity in the air. Using a hygrometer to check the humidity level in your drying room or tent can be helpful to ensure that it stays within the optimal range of 45% to 55%. If the humidity level is too high, you can use a dehumidifier or open windows to allow ventilation. If the humidity level is too low, you can use a humidifier or spray water in the room to increase the humidity level.
By using any of these methods, you will be able to create an optimal drying environment that will preserve the potency and flavor of your cannabis.
Comparing Different Drying Methods
When it comes to cannabis drying, there are several popular methods that people use, each with their own pros and cons. Here’s a breakdown of the most common drying methods:
- Hang Drying: This is the most common method of drying cannabis. It involves hanging freshly cut branches upside down from a string or wire in a cool, dry place with good airflow. This method is low cost and easy to do, but it can take longer than other methods and may not be suitable for larger harvests.
- Rack Drying: This method is similar to hang drying, but instead of hanging branches, you place them on racks. This method allows for more even airflow around the buds and can be easier to manage for larger harvests. However, it requires additional equipment and space.
- Box Drying: Box drying involves placing the buds in a cardboard box with ventilation holes and keeping them in a cool, dry space. Although it requires less space than hanging or rack drying, this method may take longer and requires more frequent monitoring to prevent mold growth.
- Adding Humidity Control to Drying Environment: Some growers prefer to use a dehumidifier or humidifier to control the humidity levels in their drying environment. This can help prevent mold growth and ensure a consistent drying process. However, this method can be costly and may not be necessary for smaller harvests.
It’s important to note that every drying method has its own advantages and disadvantages. The method you choose will depend on factors such as the size of your harvest, the space you have available, and your budget. Ultimately, the goal is to dry your cannabis slowly and evenly to preserve its potency and flavor.
Post-Drying and Curing
Now that your cannabis plants have been properly dried, the next crucial step is the post-drying and curing process. This step is just as important as the drying process itself, as it can greatly enhance the potency and flavor of your cannabis buds. By properly curing your dried cannabis, you can achieve a smooth smoke with a richer taste profile and a potent high. However, curing is a delicate process that requires careful attention to detail and patience, as it can take several weeks to complete. In this section, we will explore the importance of post-drying and curing, how long to cure your dried cannabis, the basics of curing, and factors that can impact the quality of the final product.
Why Post-Drying and Curing is Key to Enhancing Potency and Flavor
Post-drying and curing is a crucial step in the cannabis cultivation process that directly impacts the potency and flavor of the final product. During this step, the moisture content in the buds is further reduced and the drying process is completed. This allows the potency of the buds to increase and enhances the flavor of the smoke.
Post-drying and curing helps break down chlorophyll and other pigments present in the buds, which can result in a harsh and unpleasant flavor. By properly curing the buds, the harshness is reduced, allowing for a smoother smoke.
Moreover, curing also converts non-psychoactive THCA into psychoactive THC, increasing the potency of the buds. This conversion happens through a process called decarboxylation. Decarboxylation occurs naturally over time, but curing speeds up the process, resulting in more potent buds faster.
Curing also helps to remove any remaining moisture in the buds, preventing the growth of mold and bacteria. This ensures that the buds remain fresh and safe to consume for a longer period.
Post-drying and curing is an essential step in the cannabis cultivation process that should not be overlooked. It enhances the potency and flavor of the final product, and ensures that the buds remain fresh and safe to consume for an extended period.
How Long to Cure Your Dried Cannabis?
After you have dried your cannabis, it is essential to cure it for a specific timeframe to ensure that it reaches its maximum potency and flavor. The length of time to cure your cannabis can vary based on a few different factors. Here are some key considerations to keep in mind while deciding how long to cure your dried cannabis:
- Type of strain: Different strains of cannabis have different curing requirements. Generally, Sativa strains take more time to cure than Indica strains.
- Dryness of the buds: The dryness level of the buds will greatly impact the curing process. If the buds are too dry, the curing process will take less time. On the other hand, if the buds are more moist, the curing process will need to take longer.
- Curing containers: The type of container you use for curing your dried cannabis can also impact the curing time. For example, if you use glass jars, they will require a longer curing time than bags or plastic containers.
- Ambient temperature and humidity: The temperature and humidity level of the environment where you are curing your cannabis will also impact the time it takes to cure. If the temperature is on the high end, the curing time will decrease, while low humidity levels can help expedite the curing process.
These factors, along with others, can impact the length of time it takes to cure your cannabis effectively. In general, curing cannabis for at least two weeks is recommended to get the best results. Some cannabis enthusiasts prefer to cure their cannabis for up to six months or longer to achieve their desired potency and flavor profile. However, it’s important to monitor your cannabis carefully during the curing process to ensure it doesn’t become over-dried or moldy. It is better to check your cannabis daily and to err on the side of caution rather than risk losing your crop to degradation or contamination.
The Basics of Curing Your Cannabis
After drying, cannabis plants still contain moisture, which must be removed to prevent spoilage and mold growth. The curing process allows for the final stage of moisture removal, but it also offers a range of other benefits that can greatly enhance the potency and flavor of your cannabis.
The Basics of Curing Your Cannabis
The curing process involves placing the dried cannabis buds in an airtight container while allowing a minimal amount of air exchange. The goal is to slowly draw out the remaining moisture from the buds while preserving their volatile terpenes and cannabinoids.
To cure your cannabis properly, you’ll need to follow these basic steps:
| Step | Description |
| Step 1 | Trim your dried buds to remove any excess leaves or stems. |
| Step 2 | Place the trimmed buds in a clean, airtight container made of glass or food-grade plastic. |
| Step 3 | Keep the container in a dark, cool place with a temperature of around 60-70°F (15-21°C) and a humidity level of about 60-65%. Use a hygrometer to monitor the humidity levels. |
| Step 4 | Open the container once a day for the first week to allow for air exchange, and then gradually decrease the frequency of openings to once every few days. |
| Step 5 | Cure your cannabis for at least 2 weeks, but preferably longer (up to 8 weeks) for optimal flavor, potency, and smoothness. |
While curing may seem like a tedious process, it’s essential for achieving the desired flavors and potency of your cannabis. Without proper curing, the buds can become harsh and unpleasant to smoke, and you may miss out on many of the beneficial compounds found within the plant.
Factors that Impact Curing Process
The curing process is essential for enhancing the overall potency and flavor of your dried cannabis. However, it is important to understand that various factors can impact the effectiveness of the curing process. These factors should be taken into consideration to ensure that you achieve the best results possible.
The following table summarizes the factors that impact the curing process:
| Factor | Description |
| Temperature | High temperatures can cause the buds to dry out too quickly, while low temperatures can slow down the curing process. An optimal temperature for curing is between 60-70°F (15-21°C). |
| Humidity | High humidity can cause mold and mildew to form on the buds, while low humidity can cause them to become too dry. Maintaining a humidity level between 55-65% is ideal for the curing process. |
| Airflow | Proper airflow is necessary to prevent mold and mildew growth and to ensure that the buds dry evenly. However, too much airflow can cause the buds to dry too quickly. |
| Light | Exposure to light can cause THC to break down, which can decrease the potency of the buds. It is recommended to store the buds in a dark place during the curing process. |
| Container | The type of container used for curing can impact the effectiveness of the process. Airtight containers can help to maintain the proper humidity levels, while allowing too much airflow can cause the buds to dry out too quickly. |
By taking these factors into consideration and making any necessary adjustments, you can ensure that your curing process is successful and results in high-quality, potent, and flavorful cannabis.
Conclusion
In conclusion, properly drying and curing your cannabis plants is essential for achieving optimal potency and flavor. By taking the time to understand the factors that impact the drying and curing process, as well as the different methods available, you can ensure that your cannabis is dried to perfection.
While there are different options for drying your cannabis, such as hang drying, rack drying, and box drying, it’s important to keep in mind the importance of controlling humidity levels to prevent mold growth and maintain the terpene profile. Each method has its own advantages and disadvantages, but ultimately the goal is to create an environment that allows for slow and consistent drying.
Post-drying and curing is just as important as the drying process itself. Curing your cannabis allows for the flavors and aromas to fully develop, and also helps to eliminate any remaining moisture. By storing your dried cannabis in an airtight container and regularly monitoring humidity levels, you can ensure a smooth and flavorful smoking experience.
Additionally, understanding when to harvest your cannabis plants is crucial for achieving the desired effects. Consider factors such as trichome color, plant size, and the desired level of THC or CBD. By taking the time to properly harvest and dry your cannabis, you can maximize potency and flavor for a truly exceptional smoking experience.
Overall, drying and curing cannabis may seem daunting at first, but with dedication and attention to detail, it can become an enjoyable and rewarding process. Taking the time to perfect your drying and curing techniques will result in a top-quality product that you can be proud to share with others.
Frequently Asked Questions
How long does it take to dry cannabis plants?
The drying process typically takes between 5-14 days, depending on the drying method used and environmental factors.
Can I dry cannabis plants too quickly?
Yes, drying cannabis too quickly can result in a harsh taste and diminished potency. It’s important to take the time to dry your plants properly.
What temperature should I dry my cannabis at?
For optimal results, the drying temperature should be between 60-70°F (15-21°C) with a relative humidity of 45-55%.
How do I know when my cannabis is dry enough?
You can tell your cannabis is dry enough when the buds snap off the stem cleanly and the smaller stems snap instead of bending.
Can I use a microwave to dry my cannabis?
No, using a microwave to dry your cannabis is not recommended as it can damage the potency and flavor of your buds.
Why is curing my cannabis important?
Curing your cannabis helps improve the potency and flavor by allowing the buds to develop a smoother smoke and more nuanced taste.
How long should I cure my dried cannabis?
Typically, cannabis should be cured for at least two weeks, but some strains may benefit from a longer cure time of up to six months.
What is the best container to use for curing cannabis?
Glass jars with airtight lids are the best containers for curing cannabis as they allow for proper air exchange and humidity control.
Can I speed up the curing process?
While it’s not recommended, you can speed up the curing process by increasing airflow or using a drying agent like a commercial humidity pack. However, this can affect the flavor and potency of your buds.
How do I prevent mold during the drying process?
To prevent mold, ensure that your cannabis is not too moist before drying and that the drying environment has proper airflow and humidity control. Check your buds regularly for signs of mold and remove any contaminated plant material immediately.

