
Trimming and Preparing Cannabis Buds for Drying and Curing
As the harvesting season approaches, many cannabis growers may find themselves feeling overwhelmed with the task of trimming and preparing their buds for drying and curing. Proper trimming and preparation is crucial for achieving high-quality cannabis that not only looks great but also provides exceptional flavor and potency. However, without the right tools, knowledge, and patience, the process can quickly become a daunting and difficult task.
In this article, we will provide step-by-step guidance on how to trim and prepare your buds for the drying and curing process. We’ll also share tips and tricks to ensure your cannabis achieves its full potential. Whether you’re a seasoned grower or just starting out, this guide will equip you with everything you need to know to get the most out of your harvest. So, let’s get started!
Why Proper Trim and Preparation Is Important
Contents
Proper trim and preparation is crucial for the production of high-quality cannabis buds. By meticulously trimming and preparing the buds prior to the drying and curing process, you can ensure that the final product is potent, flavorful and visually appealing. If buds are not trimmed and prepared properly, the likelihood of developing mold and mildew increases, and the overall quality of the buds is negatively impacted.
Trimming and preparation is important for several reasons: First and foremost, trimming away excess leaves and stems allows the bud to dry more evenly, which helps to prevent mold and mildew growth. Additionally, removing excess plant material helps to improve the overall appearance and bag appeal of the buds. Excess leaves can also give off an unpleasant taste when burned, so trimming them away enhances the flavor of the bud.
Properly trimming and preparing buds also helps to concentrate their potency. Trichomes, the tiny resin glands on the surface of the buds, contain the majority of the cannabinoids and terpenes that produce the psychoactive and medicinal effects of the plant. By trimming away excess leaves and stems, more of the plant’s energy goes towards trichome production, which ultimately results in a stronger, more potent final product.
Proper trim and preparation sets the foundation for a high-quality final product. Without it, the buds may not dry and cure properly, and could be prone to mold and mildew growth. Taking the time to meticulously trim and prepare buds before drying and curing is well worth the effort in terms of improving potency, flavor and appearance.
Tools and Materials Needed
Tools and Materials Needed
The first step in trimming and preparing buds for the drying and curing process is to gather all the necessary tools and materials. Here are the most important items you will need:
1. Sharp Scissors or Shears: You will need a pair of sharp scissors or shears to make clean cuts on the buds. Look for a pair of trimming scissors designed specifically for cannabis to make your job easier.
2. Nitrile Gloves: Wearing gloves will keep your hands and buds clean and free from oils and contaminants.
3. Trimming Tray: A trimming tray is a flat surface with raised edges that will catch any loose trichomes or plant matter while you trim. You can buy a specialized trimming tray or use a baking sheet lined with parchment paper.
4. Mason Jars: You will need mason jars or other hermetically sealed containers to store your cured buds.
5. Hygrometer: A hygrometer measures the humidity levels in your curing jars, helping you monitor the curing process more accurately.
6. Dehumidifier: If you live in a humid climate, a dehumidifier can be helpful in keeping the humidity levels in your curing space low.
7. String or Wire: String or wire can be used to hang the buds to dry.
Having these tools and materials at hand will make the trimming and preparation process much smoother and efficient, allowing you to produce higher quality buds with better flavor and potency.
Steps to Trim and Prepare Buds for Drying and Curing
To prepare your buds for drying and curing, it is important to follow a careful and thorough trimming process. This will help improve the overall quality, potency, and flavor of your buds.
Step 1: Harvesting the Buds
Before you can begin trimming, you will need to harvest your buds. Ideally, you should harvest when the buds have reached their peak potency and are no longer producing new pistils. Use a sharp pair of scissors or pruning shears to cut the buds off the plant and remove any excess stem or leaves.
Step 2: Removing the Large Fan Leaves
Once you have harvested your buds, the first step is to remove any large fan leaves that are still attached to the buds. These leaves do not contain any significant amount of cannabinoids, and leaving them on can make it harder to trim the smaller sugar leaves later on.
Step 3: Trimming the Sugar Leaves
After removing the large fan leaves, it is time to start trimming the smaller sugar leaves that surround the buds. Use a pair of trimming scissors to carefully cut away the excess foliage and reveal the beautiful buds underneath. Take care to trim away as much of the sugar leaves as possible, while still preserving the shape and structure of the bud.
Step 4: Drying the Buds
Once you have finished trimming your buds, it is time to begin the drying process. This is a critical step in preparing your buds for curing, and should be done carefully to avoid ruining the quality of your crop. The ideal temperature for drying is around 65-70 degrees Fahrenheit and the humidity should be around 45-55%. One popular method of drying is to hang the buds upside down on a string or wire in a cool, dark place.
Step 5: Curing the Buds
Finally, once your buds have been dried, it is time to begin the curing process. Curing is an important step that helps improve the flavor, aroma, and potency of your buds over time. To properly cure your buds, place them in sealed glass jars in a cool, dark place for at least a few weeks. You should “burp” the jars once a day to allow excess moisture to escape and ensure that your buds are properly curing.
Preparing your buds for drying and curing is a critical step in the cultivation process. Following these steps carefully will help you achieve the best possible results and ensure that your buds are ready to be enjoyed by you and your friends.
Step 1: Harvesting the Buds
Once the marijuana plants have matured and are ready for harvest, the first step in trimming and preparing buds is to harvest them. This involves cutting the branches of the plant and gathering them for the trimming process. To ensure that the buds are of the highest quality, it is important to harvest at the right time.
To determine the best time for harvest, look for signs that the buds are ready. The trichomes, or tiny resin glands on the buds, should be milky and translucent. This indicates that the THC levels are at their peak. If the trichomes are clear or amber-colored, it is best to wait a little longer before harvesting.
Once you have identified that the buds are ready for harvest, use clean, sharp scissors or pruning shears to cut the branches. Cut each branch close to the base of the plant, leaving a small stem protruding from the buds. This stem will be used later in the trimming process.
It is important to handle the buds with care during the harvesting process to minimize damage to the trichomes. Use gentle hands and avoid squeezing or crushing the buds. This can cause the trichomes to break open and decrease the potency of the final product.
After harvesting, it is recommended to place the branches in a cool, dark, and well-ventilated area to initiate the drying process. This will help to preserve the potency, flavor, and aroma of the buds.
Step 2: Removing the Large Fan Leaves
Once you have harvested your buds, it’s time to move on to the trimming process. The first step in trimming your buds is to remove the large fan leaves that surround them. These leaves do not contain any significant amount of THC or other cannabinoids, so they are not necessary for the curing process. Removing them will give you a better view of the buds and make it easier to trim them properly.
To do this step, you will need a pair of sharp trimming scissors or pruning shears. You can use your fingers to remove the leaves, but the process will be much quicker and easier with the help of a tool. Hold the stem of each bud and use the scissors to cut the fan leaves as close to the stem as possible. Be careful not to damage the bud itself in the process.
If the leaves are especially large and thick, you may need to make a few cuts to remove them completely. It’s important to remove as much of the leaf material as possible, as leaving too much can slow down the drying process and even cause mold to grow.
As you remove each leaf, you can either discard it or save it for other purposes. Some people use fan leaves to make edibles or tinctures, while others compost them. Regardless of what you choose to do with them, removing the fan leaves is an important step in preparing your buds for drying and curing.
Once you have completed this step, you should have a pile of buds with their large fan leaves removed. The next step is to move on to trimming the remaining sugar leaves, which contain the majority of the THC and other cannabinoids.
Step 3: Trimming the Sugar Leaves
Once the large fan leaves are removed from the buds, it’s time to focus on trimming the smaller sugar leaves. These leaves are called sugar leaves because they contain trichomes or resin glands that give the buds their potency and flavor.
To begin, gather your trimming scissors or shears and a clean, flat surface to work on. It’s important to use sharp, clean scissors to prevent damaging the buds or spreading mold or bacteria.
Start by holding the bud with one hand and using the other hand to carefully snip off any excess leaves that are sticking out. Take care not to cut off any of the actual buds. Move on to the larger sugar leaves, which are usually located at the base of the buds. These leaves should be carefully trimmed until they are flush with the bud. Leave as much of the trichome-covered buds intact as possible, as this will improve the overall quality of the final product.
Some growers prefer to leave more sugar leaves intact to create a denser, more resinous product, while others prefer to trim more extensively for a smoother smoking experience. It’s important to understand your own preferences and trimming goals before starting the process.
As you work through each bud, take breaks as needed to rest your hands and eyes. It’s a good idea to have a clean, damp cloth nearby to wipe off any resin that accumulates on your scissors or hands. This will help prevent contamination and ensure a consistently high-quality end product.
Trimming the sugar leaves is a crucial step in preparing the buds for the drying and curing process. It can be time-consuming and labor-intensive, but the end product will be well worth the effort.
Step 4: Drying the Buds
After trimming the buds, the next step in the drying and curing process is to dry them. Proper drying is crucial as it helps to remove moisture from the buds and prevent mold and mildew from forming during the curing process. Here are the steps to dry the buds properly:
Step 1: Hang the trimmed buds upside down in a dark, cool, and well-ventilated room. The ideal temperature range for drying buds is between 60°F to 70°F with humidity levels around 50% to 60%.
Step 2: Make sure to leave some space between the buds to allow air to circulate around them. You can use a drying rack or hang the buds from a string or wire.
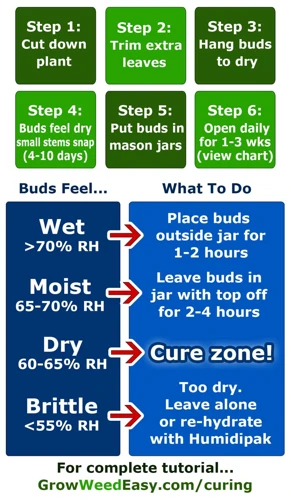
Step 3: Check the buds daily to make sure they are drying properly. Buds should feel dry to the touch with stems that snap instead of bend when gently squeezed. This can take anywhere from several days to a few weeks, depending on the humidity levels and temperature of the drying area.
Step 4: It’s important not to rush the drying process as this can result in lower quality buds. Avoid using heat sources such as ovens or microwaves, as this can damage the buds and affect their potency.
Step 5: Once the buds are dry, they are ready for the curing process. It’s important to store them in airtight jars in a cool, dark place with a relative humidity level of around 60% to 65%. This helps to slow down the drying process and allow the buds to cure properly, which can take anywhere from several weeks to a few months.
Proper drying is a critical step in the process of preparing buds for consumption. Taking the time to dry them properly will help to preserve their potency and flavor, ensuring a high-quality end product.
Step 5: Curing the Buds
Once your buds are dry, it’s time to move onto the curing process. Curing is a critical step in the preparation of your buds, as it allows them to develop the right flavors, aromas, and potency. Here are the steps to properly cure your buds:
Step 1: Gather Your Supplies – You will need mason jars, a digital hygrometer, and Boveda packs or equivalent humidity control packs. These supplies are essential to control the humidity in the jars and maintain a consistent environment for curing.
Step 2: Transfer the Buds to the Jars – Using gloves to avoid touching the buds with your bare hands, transfer the buds to the jars. Fill the jars about 3/4 of the way full, leaving some space for air circulation.
Step 3: Add Humidity Control Packs – To maintain consistent humidity levels, add a humidity control pack to each jar. The recommended humidity level is around 58-62%, as it provides the ideal environment for curing. These packs will also help prevent mold and mildew from developing in the jars.
Step 4: Monitor the Jars Daily – For the first few days of the curing process, it’s important to check the jars daily for any signs of mold or mildew. If you notice any, remove the affected buds and increase air circulation around the remaining buds. Check the humidity levels daily to make sure they remain consistent.
Step 5: “Burp” the Jars – Burping the jars means opening the lids for a short period of time each day to release any excess moisture and refresh the air. This step is crucial to prevent mold and mildew from developing inside the jars. As the curing process continues, you can gradually decrease the frequency of burping until the jars only need to be opened once every few days.
Step 6: Monitor the Curing Process – The curing process can take anywhere from two weeks to several months, depending on the humidity level, temperature, and other factors. Monitor the buds closely, and keep a record of the progress you see over time. You will notice changes in the color, texture, and smell of the buds as they cure.
Step 7: Enjoy Your Well-Cured Buds – Once the buds have been properly cured, store them in a cool, dry place away from direct sunlight. Enjoy the fruits of your labor, knowing that you have prepared them with care and attention to detail.
Tips and Tricks for Trimming and Preparing Buds
When it comes to trimming and preparing buds for the drying and curing process, there are some tips and tricks you should keep in mind to ensure the best possible outcome.
Use the Right Tools: Having the right tools can make all the difference when it comes to trimming and preparing your buds. A good pair of scissors or trimming shears can make the job much easier and more efficient. Consider investing in a pair specifically designed for trimming cannabis, as these often have a more precise blade that can make it easier to get into tight spaces.
Trimming for Different Growing Methods: Depending on your growing method, you may need to trim your buds differently. For example, if you used the ScrOG (screen of green) method, you may have more leaves to trim because the plant was trained to grow horizontally. Understanding the nuances of your specific growing method can help you trim your buds in a way that will maximize their quality.
Keep an Eye Out for Mold and Mildew: When trimming your buds, it’s important to keep an eye out for any signs of mold or mildew. These can develop during the drying and curing process if the buds are not properly ventilated. Look for any spots that look fuzzy or discolored, and if you see any, remove those sections of the bud to prevent further contamination.
Be Patient and Take Your Time: Trimming and preparing buds can be a time-consuming process, but it’s important not to rush it. Taking your time and being patient can help you achieve the best possible outcome. Rushing can lead to mistakes and a reduction in quality.
By keeping these tips and tricks in mind, you can ensure that your buds are trimmed and prepared properly. Using the right tools, trimming for your specific growing method, watching out for mold and mildew, and being patient can all contribute to a successful drying and curing process and ultimately, a high-quality end product.
Use the Right Tools
Having the right tools can make a big difference in the quality of your buds and the efficiency of your trimming process. When it comes to trimming and preparing buds for drying and curing, there are a few essential tools that you’ll want to have on hand.
Sharp Scissors: A pair of sharp, high-quality trimming scissors are a must-have for any cannabis trim job. Look for scissors with thin, narrow blades that can easily maneuver around the buds without damaging them.
Trimming Shears: Trimming shears are a larger, more heavy-duty version of trimming scissors. These are useful for trimming larger branches, stems or other tough areas that may be difficult to trim with just scissors.
Buckets or Bins: As you trim your buds, you’ll want somewhere to collect the trimmings. This may include a bucket or bin for collecting the larger fan leaves you remove in Step 2, as well as a separate bin for collecting the sugar leaves you remove in Step 3.
Gloves: Trimming can be tough on your fingers and nails, and it can also leave your hands smelling strongly of cannabis. Wearing gloves is a good way to protect your hands and make the trimming process a more pleasant experience.
Magnifying Glass: A magnifying glass can be helpful when looking for small, hard-to-see imperfections on your buds such as small bits of leftover stem or missed bits of sugar leaf.
Investing in the right tools can make a big difference in the quality and efficiency of your trimming process. Be sure to invest in high-quality trimming tools that are comfortable to use, and always keep them clean and well-maintained for the best results.
Trimming for Different Growing Methods
One important aspect of trimming and preparing buds for drying and curing is understanding how to trim based on the growing method used. Trimming for different growing methods will require different approaches and techniques to get the best results.
For indoor-grown buds: Indoor-grown buds are generally smaller and more densely packed than their outdoor counterparts. As such, trimming these buds requires a bit more attention to detail. Start by removing any large fan leaves, as they do not contain high concentrations of cannabinoids and can take longer to dry than the buds themselves. Next, take care to trim the sugar leaves as close to the buds as possible without damaging the flower. Finally, hang the trimmed buds to dry and cure as usual.
For outdoor-grown buds: Outdoor-grown buds are typically larger than indoor-grown buds and may have more stem material. Begin by trimming off any large fan leaves, being careful not to damage the buds themselves. Next, trim the sugar leaves as close to the buds as possible, again being careful not to damage the flower. Some outdoor growers even prefer to leave some of the sugar leaves intact to protect the buds during the drying process. Hang the trimmed buds to dry and cure as usual.
For hydroponically-grown buds: Hydroponically-grown buds are often prized for their dense, resinous buds. When trimming hydroponically-grown buds, start by removing any large fan leaves. Next, trim the sugar leaves as close to the buds as possible without damaging the flower. Be sure to pay close attention to any bud sites that may have been exposed to light, as they may need more trimming than other areas.
For organic-grown buds: Trimming organic-grown buds requires a bit more care than other methods, as the plants may contain more plant matter or debris. Begin by removing any large fan leaves, taking care to inspect them for mold or mildew. Next, gently remove any debris or plant matter that may be present on the buds themselves. Finally, trim the sugar leaves as close to the buds as possible without damaging the flower. Hang the trimmed buds to dry and cure as usual.
No matter what method was used to grow the buds, taking the time to properly trim and prepare them for the drying and curing process can help to enhance their flavor, aroma, and potency.
Keep an Eye Out for Mold and Mildew
One of the biggest challenges when trimming and preparing buds for drying and curing is avoiding mold and mildew. These issues can develop at any stage of the process and can ruin an entire crop if left unchecked. It is crucial to keep a strict eye out for any signs of mold or mildew.
Inspecting the Buds: Before trimming, it is important to closely inspect each bud for any signs of mold. Keep an eye out for white powdery spots, black or brown spots, or an unpleasant odor. If any of these signs are present, remove the affected buds immediately and do not use them for curing.
Drying in the Right Environment: Properly drying the buds can also prevent mold from forming. Make sure to dry the buds in a well-ventilated area with a temperature of around 65-70°F and a humidity level of 50-60%. High humidity and temperatures above 75°F can create an environment for mold and mildew to grow.
Curing Correctly: After drying, curing the buds is the next step in the process. However, it is important to avoid overpacking the buds in airtight containers, as this can create a humid environment and promote mold growth. Instead, place the buds loosely in a glass jar with a tight-fitting lid and burp the jar daily to release excess moisture.
Prevention Measures: Another way to prevent mold and mildew is to use a dehumidifier or humidifier to regulate the humidity levels in your grow room or drying area. Additionally, consider using a mold and mildew prevention spray or add moisture-absorbing silica packets to your jars during the curing process.
By keeping a vigilant eye out for mold and following these prevention measures, you can effectively avoid this common problem and ensure a high-quality end product.
Be Patient and Take Your Time
When it comes to trimming and preparing buds for the drying and curing process, it is essential to remember that patience is key. Rushing the process can lead to detrimental results, such as unevenly trimmed buds or buds that are not dry enough before being placed into storage.
Take your time when trimming the buds, as a rushed job can lead to excess plant material being left on the buds, giving them a less desirable taste and texture. It is recommended to trim the buds over a flat surface, like a large tray or table, to catch any loose pieces.
Be patient during the drying process as well. Drying the buds too quickly can result in a loss of flavor and potency, while drying them too slowly can lead to mold and mildew growth. The ideal drying time is around five to seven days, although it can vary depending on environmental factors like humidity levels and temperature.
During the curing process, patience is also essential. Letting the buds sit in a sealed container for at least two weeks can allow for the flavors and aromas to fully develop. Opening the container for short periods each day can also help release any excess moisture and prevent mold growth.
It is crucial to give each step of the process the time and attention it deserves to ensure the highest quality buds. Rushing the process can lead to poor results, so sit back, relax, and let nature take its course.
Conclusion
In conclusion, the proper trimming and preparation of cannabis buds for drying and curing is a crucial step in achieving high-quality, potent cannabis. By using the right tools and techniques, you can ensure that your buds are free from excess plant material and evenly dried and cured to preserve their flavor, aroma, and potency.
It is also essential to be patient and take your time during the trimming process, as rushing can result in a lower quality end product. Keeping an eye out for mold and mildew is also crucial, as these issues can compromise the quality of your buds and even make them unsafe to consume.
Furthermore, trimming methods can vary based on the growing method used, so it is essential to tailor your trimming technique to your specific strain and cultivation methods.
Overall, by following the steps outlined in this guide and using the proper tools and techniques, you can produce high-quality, flavorful, and potent cannabis buds that are sure to impress even the most discerning cannabis connoisseurs.
Frequently Asked Questions
How long does it take to dry buds?
The drying process can take anywhere from 5 to 14 days, depending on factors such as humidity and temperature.
Do I need to trim buds before drying?
Yes, it is important to trim buds before drying to ensure even drying and a smoother smoking experience.
What is the best way to store cured buds?
Cured buds should be stored in airtight containers, such as glass jars, in a cool, dark place.
How do I know when the buds are ready for trimming?
Buds are ready for trimming when they feel slightly dry to the touch and the large fan leaves have been removed.
What is the difference between drying and curing?
Drying is the process of removing moisture from the buds, while curing is the process of allowing the buds to further develop their flavor and potency through controlled storage.
How often do I need to check on the buds during the drying process?
It is recommended to check on the buds at least once a day during the drying process to ensure proper airflow and prevent mold growth.
What is the ideal temperature and humidity for drying buds?
The ideal temperature for drying buds is between 60-70°F (15-21°C), with humidity levels between 45-55%.
Can I dry buds using a microwave or oven?
No, drying buds in a microwave or oven can cause uneven drying and can ruin the flavor and potency of the buds.
Why is it important to remove the large fan leaves before drying?
Removing the large fan leaves before drying allows for better airflow and prevents moisture from getting trapped in the buds.
When is the best time to harvest buds?
The best time to harvest buds is when the trichomes on the buds have turned milky white and the pistils have started turning amber.

