
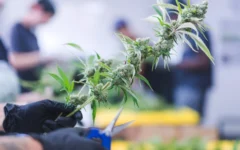
Hand Trimming Techniques for Perfect Cannabis Harvest
Harvesting cannabis is an exciting experience for any grower, as it marks the culmination of months of hard work and dedication. While there are different methods of harvesting cannabis, hand trimming remains the most popular among experienced growers. But what makes hand trimming so important? What are the benefits of this technique, and when is the right time to get started? In this guide, we’ll explore the various aspects of hand trimming buds, including the tools required, step-by-step instructions, and post-trimming procedures. Whether you’re a beginner or an experienced grower, this guide will help you achieve the perfect harvest through the art of hand trimming buds.
Why Hand Trimming Is Important
Contents
When it comes to harvesting cannabis buds, there are several methods to choose from, but hand trimming remains a preferred choice among growers. The process of hand trimming involves removing excess leaves and stems from the buds by hand. Though it can be time-consuming and requires considerable effort, the results are well worth it. In this section, we’ll explore the various benefits of hand trimming and discuss when it’s best to use this method.
Benefits of Hand Trimming Buds
There are several benefits of hand trimming buds instead of using machinery or automation. Here are some of the key advantages:
- Better Quality: Hand trimming is more gentle and precise than machine trimming, which can lead to less damage to the trichomes and a higher quality final product.
- Improved Appearance: Hand trimming allows for more control over the shape and look of the buds, resulting in a more visually appealing finished product.
- Increased Potency: Trimming by hand can help preserve as much of the resin as possible, which can lead to a more potent final product.
- Reduced Contamination: When done correctly, hand trimming can reduce the chance of contamination from mold or bacteria, which can be a risk with machine trimming.
- Greater Attention to Detail: By trimming by hand, the trimmer has the ability to give each bud individual attention, resulting in a more consistent and evenly trimmed final product.
In addition to these benefits, hand trimming can also be a more meditative and enjoyable experience for the trimmer, allowing them to connect more deeply with the plant and the process. However, it’s important to note that hand trimming can be a time-consuming and labor-intensive process, which may not be feasible for larger-scale operations.
When to Hand Trim Buds
Hand trimming buds is an important technique that cannabis growers can use to ensure the highest quality final product. To achieve the best results, it is essential to know the optimal time for trimming buds. Below are some factors to consider when deciding when to hand trim buds:
- First, determine if your buds are ready for harvest. This can happen anywhere from 7-14 days after the flowering stage is complete. You can check the readiness of the buds by looking at the trichomes under a magnifying glass or microscope. When the trichomes are cloudy with a few amber ones, it’s time to harvest.
- After harvesting the buds, allow them to dry until they reach the desired moisture content. Drying times can vary depending on factors like humidity, temperature, and the size of the buds.
- Once the buds are dry, it’s time to start the trimming process. Some growers prefer to wet trim their buds, while others prefer to dry trim. Consider which technique you will use based on your personal preferences and the characteristics of the plants you’re working with.
- If you choose to wet trim, the buds should be trimmed immediately after harvesting while they are still fresh. This technique is preferred by some growers because it’s easier to trim wet buds and leaves than dry ones.
- Dry trimming involves allowing the buds to dry for a period of time, usually about a week, before trimming. This technique is preferred by some growers because it allows the buds to cure a bit before trimming, which can enhance the flavor and aroma of the final product.
- Whole plant hand trimming is another technique that some growers use. With this approach, the plant is harvested and hung to dry before being trimmed. This technique can be more time-consuming than trimming buds individually, but it can also be a more efficient way to trim large quantities of plants.
The optimal time to hand trim buds can vary depending on several factors. Growers should consider the readiness of the buds, the drying time, and their preferred trimming technique to determine when to start the hand trimming process. By taking the time to carefully consider these factors, growers can ensure that they produce the highest quality final product.
How to Hand Trim Cannabis

One of the crucial steps in harvesting cannabis is trimming the buds. Hand trimming is a popular method for getting the best results, but it requires skill and patience. In this section, we will explore the tools required for hand trimming and provide you with a step-by-step guide to help you achieve a perfect trim. We will also share some useful tips to ensure efficient hand trimming. So, roll up your sleeves, get your tools ready, and let’s dive into the world of hand trimming cannabis buds!
Tools Required for Hand Trimming
When it comes to hand trimming your cannabis buds, it is important to have the right tools. Using the proper tools will help you achieve a more precise and efficient trim, resulting in a higher quality product. Here are the tools required for hand trimming:
| Tool | Description |
|---|---|
| Trimming scissors | These are the most important tools for hand trimming. Look for high-quality, sharp scissors with pointed tips to reach tight spaces. |
| Tray | A tray is useful for catching trimmed buds and keeping them organized during the trimming process. Choose a tray that is shallow and easy to clean. |
| Disposable gloves | Gloves are essential for maintaining hygiene while handling cannabis. Use disposable gloves to prevent the transfer of oils and germs. |
| Small pruning shears | Pruning shears may be useful for clipping off larger stems, but they are not essential. Look for small pruning shears with sharp blades and a comfortable grip. |
| Bud trimmer | A bud trimmer may be useful for larger harvests, but it is not essential. Look for a trimmer with adjustable blades and a powerful motor. |
Having these tools on hand will help you achieve a precise and efficient hand trim. Make sure to clean and sanitize your tools before and after each use to prevent the spread of disease and bacteria.
Step-by-Step Guide for Hand Trimming Buds
Hand trimming buds can be a time-consuming process but it’s worth it to ensure a high-quality final product. Follow these step-by-step instructions for the most effective hand trimming process:
Step 1: Prepare Your Workspace
Before you start trimming, make sure everything is clean and organized. You should also have all the necessary tools within reach.
Step 2: Buck Your Buds
Remove the buds from the branches and collect them in a large bin or tray. Discard any leaves, stems or other debris.
Step 3: Remove Fan Leaves
Once you have harvested your buds, remove fan leaves (large leaves at the base of the bud). Because fan leaves have little to no THC content, they should be removed for better appearance and quicker drying.
Step 4: Trim Large Sugar Leaves
Remove large sugar leaves – those covering the buds – with scissors or snips. You can also use a trimming machine to do this, although it may not provide the same level of accuracy.
Step 5: Move to Small Sugar Leaves
After you’ve trimmed the large leaves, move on to the smaller sugar leaves. Use your scissors to carefully cut away any remaining leaves to expose the buds. Be sure not to remove too much, as this can affect the quality and potency of your final product.
Step 6: Manicure Your Buds
Once you have removed all of the unwanted leaves, it’s time to give your buds a manicure. Take your small scissors or snips and carefully trim away any protruding leaves or stems for a tidy appearance.
Step 7: Perform a Final Trim
Once your buds are manicured, give them a final inspection. Make sure they’re free of debris and are in good shape. If necessary, perform a final trim.
Step 8: Clean Your Tools
After you’re finished, clean your tools with alcohol. This will help prevent the spread of bacteria and fungus from one plant to another.
By following these steps, you can be sure your hand-trimmed buds will be of the highest quality. Remember to be patient, take your time, and work carefully to avoid damaging the buds.
Tips for Efficient Hand Trimming
Efficient hand trimming of cannabis buds is essential to ensure a high-quality harvest. Here are some tips to make the hand trimming process more effective:
| Tip | Description |
| Use sharp scissors | Sharp scissors will make the trimming process easier and faster. Dull scissors can damage the buds and make the process more difficult. |
| Trim in a cool, dry environment | Warm and humid environments can cause the buds to become sticky and difficult to handle. A cool and dry environment will make the process faster and easier. |
| Work in good lighting | Working in good lighting will help to ensure that all of the small leaves are removed from the buds. |
| Start with larger outer leaves | Starting with the larger outer leaves will help to speed up the process and make it easier to get a consistent trim. |
| Adjust the grip on scissors as needed | Changing the grip on the scissors can make it easier to access hard-to-reach areas on the buds. |
| Take breaks | The repetitive motion of hand trimming can cause strain and fatigue. Taking regular breaks can help to prevent injury and increase overall efficiency. |
By following these tips, hand trimming cannabis buds can be a quicker process while ensuring high-quality results.
Different Techniques for Hand Trimming
When it comes to hand trimming buds, there are various techniques you can use to achieve different results. From wet to dry trimming and manicuring to final trim, each technique requires unique tools and approaches. However, it can be overwhelming to decide which trimming technique would suit your needs best. So, let’s dive into the various hand trimming techniques and explore their benefits, steps, and tips to help you make an informed decision.
Wet Trimming
Wet trimming is a technique of trimming wet buds right after harvesting. This method is preferred by many growers because it’s easier to handle damp buds. With this technique, you can remove both the fan leaves and sugar leaves, leaving behind only the buds.
Tools Required for Wet Trimming
Before you start wet trimming, you need to prepare the following tools:
| Pruning shears | To cut the stems of the buds |
| Bowl of icy water | To submerge the buds while trimming |
| Disposable gloves | To keep your hands clean and prevent contamination |
| Scissors | To trim the buds and remove the leaves |
| Drying rack | To air dry the buds after trimming |
Step-by-Step Guide for Wet Trimming Buds
Here are the steps to follow for wet trimming:
- Prepare your tools and a clean working area.
- Harvest your plants and cut off any large fan leaves.
- Use pruning shears to cut the stems of the buds.
- Place the buds into a bowl of icy water to keep them fresh and prevent them from drying out.
- Wear gloves to keep your hands clean and prevent contamination.
- Remove the small sugar leaves using scissors. Be careful not to trim too much and damage the buds.
- Trim off any remaining fan leaves and stems using the scissors.
- Place the trimmed buds onto a drying rack and let them air dry until they reach the desired moisture content.
Tips for Efficient Wet Trimming
Here are some tips that can help you with your wet trimming process:
- Make sure to have a clean and organized workspace before you start trimming.
- Work quickly to prevent the buds from drying out.
- Trim in a cool, dry, and dark room to prevent mold growth.
- Don’t trim too much. Leave enough leaves to protect the buds.
- Use sharp scissors to prevent damage to the buds.
- Place a fan near the drying rack to improve air circulation and reduce drying time.
Using wet trimming is a great option if you want to streamline your harvesting and trimming process. It eliminates the need for drying the buds before trimming, so you can get your crop to the curing stage faster. However, it requires some practice and skill, so take your time and be patient with the process to get high-quality buds.
Dry Trimming
When it comes to hand trimming buds, one technique that many people prefer is dry trimming. This method involves removing the leaves from the buds after they have been dried, as opposed to the wet trimming method, where the leaves are removed while the buds are still moist.
Dry trimming offers its own set of advantages, including the fact that it can lead to more flavorful and potent buds. When the leaves are left on during the drying process, they can help protect the buds from moisture loss and damage, allowing them to retain more of their natural characteristics.
If you’re planning to try dry trimming, you’ll need to start by gathering the necessary tools, including:
| Tool | Description |
|---|---|
| Sharp pruning shears | For making precise cuts close to the buds |
| Bowl or bin | To catch the trimmed leaves and other debris |
| Clean, dry workspace | A place to spread out the buds and work on them |
Once you have your tools ready, you can start the actual trimming process. Here is a step-by-step guide:
- Remove the buds from the drying rack or other storage location and place them in a bowl or other container that you can work with easily.
- Take each bud and use your pruning shears to remove any large fan leaves that may be sticking out. Be careful not to cut into the actual buds themselves.
- Next, use your shears to trim off any remaining small leaves that are sticking out from the buds. These are often referred to as “sugar leaves” and can be identified by their small size and crystal-like appearance. Trim as close to the bud as possible without removing any actual bud material.
- Continue this process with each bud until you have removed all the excess leaves and are left with only the buds themselves.
- When you’re finished trimming, place the buds in an airtight container and store them in a cool, dry place where they can continue to cure for several days to a few weeks.
While dry trimming can be a bit more time-consuming than wet trimming, it offers many benefits, including not having to deal with wet plant material and potentially higher-quality buds. To make the process more efficient, consider using a trimming tray or other tools to help speed up the process.
Whole Plant Hand Trimming
Whole plant hand trimming involves trimming the cannabis plant in its entirety rather than just trimming the buds. This technique is ideal for growers who want to maximize the resin production on their plants.
Tools Required for Whole Plant Hand Trimming
The tools required for whole plant hand trimming are the same as those needed for bud trimming:
| Tools | Use |
|---|---|
| Trimming Scissors | To trim sugar leaves and remove small buds. |
| Pruning Shears | To remove larger fan leaves and branches. |
| Buckets or Bags | To collect trimmed material. |
Step-by-Step Guide for Whole Plant Hand Trimming
The whole plant hand trimming process involves the following steps:
- Prepare a clean and comfortable work area.
- Cut the main stem of the cannabis plant as close to the soil as possible.
- Hang the entire plant upside down until it is completely dried.
- Begin the trimming process by removing the fan leaves using pruning shears.
- Next, trim off any excess stems from the buds using trimming scissors.
- Finally, trim the sugar leaves surrounding the buds, again using trimming scissors.
- Collect the trimmed material in a bucket or bag.
Tips for Efficient Whole Plant Hand Trimming
Here are some tips to make the whole plant hand trimming process more efficient:
- Use sharp tools to make the trimming process easier and less time-consuming.
- Take short breaks to rest your hands and avoid cramping.
- Wear gloves to prevent sticky resin from building up on your hands.
- Use a trimming tray to collect trimmed material and prevent it from falling on the floor.
Whole plant hand trimming can be a lengthy, but rewarding process. It allows growers to make the most of their cannabis plant by maximizing the resin production. Remember to be patient and take breaks when needed to avoid fatigue.
Manicuring Techniques
Manicuring is one of the most important techniques when hand trimming cannabis as it is the process of removing excess leaves around the buds, hence giving a neat appearance to the buds. There are different manicuring techniques used when hand trimming buds, each with its own benefits and drawbacks. Below we summarize each technique in a table:
| Manicuring Technique | Description | Benefits | Drawbacks |
|---|---|---|---|
| Finger roll method | Rolling the buds between fingers, allowing the excess leaves to stick out and then trimming them with scissors. | Quick, efficient and low-cost technique. Allows for more control over how much of the leaf to remove, hence reducing the risk of over-manicuring buds. | May not remove all the excess leaves around the buds. Constant rolling between fingers may cause buds to become hot and sticky, making them harder to handle. |
| Scissor method | Using scissors to remove excess leaves around the buds. Can be done in a variety of ways including straight cuts, curved or angular cuts. | Yields a neater appearance than other techniques. Efficient and precise, allowing for greater control over how much of the leaf to remove. | May be time-consuming and labor-intensive. Constant cutting may result in dulling of the scissors, resulting in jagged or uneven cuts. |
| Razor blade method | Using a razor blade to trim excess leaves from the buds. | Precise and efficient technique that removes excess leaves carefully, leaving a neat final appearance. Can be used to remove tough or thicker leaves that other techniques may have trouble with. | May be dangerous if not done carefully, as the razor blade can slip or cause accidental cuts. May require a steady hand and additional tools to complete the technique. |
Each of these manicuring techniques requires careful attention to detail and a steady hand to ensure that the buds are not over-manicured, resulting in loss of trichomes or damage to the plant material. By finding the right technique for your bud trimming style and skillset, you can ensure that your end product is of the highest quality.
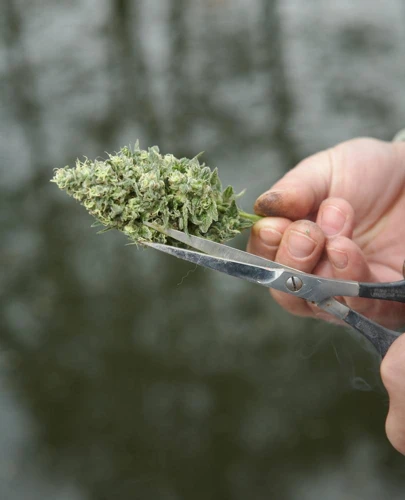
Final Trim
After the buds have been trimmed and all excess leaf material has been removed, it’s time for the final trim. This step is critical to achieving a perfect harvest. The final trim is where the bud is inspected to ensure that all parts of the plant have been removed, leaving only the desirable flower.
Inspect the Bud: Before beginning the final trim, inspect the buds one last time to locate any remaining stems or leaves. Remove them as close to the bud as possible without cutting into the flower.
Use Scissors: For the final trim, scissors are the best tool to use. A sharp pair of scissors will give you precise cuts and help to avoid damaging the buds. Trim the stem as close to the bud as possible, making sure not to cut off any of the trichomes.
Trim at an Angle: When trimming, hold the scissors at an angle to the bud. This will help to give the buds a more natural look and prevent them from looking too uniform.
Focus on the Edges: Pay special attention to the edges of the buds. This is where extra leaf material tends to be located. Removing it will give the buds a cleaner, more manicured look.
Inspect Again: Once the final trim is complete, inspect the buds once again to make sure that all excess material has been removed. Any remaining leaves or stems can cause the buds to taste harsh and decrease their overall quality.
The final trim is an important step in achieving the perfect harvest. Using scissors and trimming at an angle while focusing on the edges will help to give the buds a natural, uniform look. Inspecting the buds before and after the final trim is crucial to ensuring that all excess material is removed.
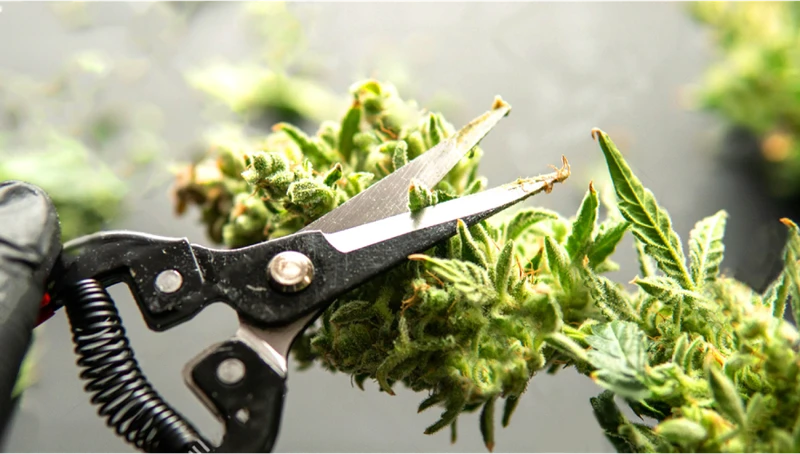
Trimming Sugar Leaves
When hand trimming cannabis buds, it’s important not to overlook the sugar leaves. These small leaves are covered in trichomes which contain THC and other cannabinoids, but they can also add harshness to the smoke if not properly trimmed. Here’s a step-by-step guide to trimming sugar leaves for a smooth and enjoyable smoking experience:
| Step 1: | Hold the bud in your non-dominant hand and use trimming scissors or snips in your dominant hand. |
| Step 2: | Locate the sugar leaves – these are the small, single-fingered leaves that grow out from the buds. |
| Step 3: | Use the scissors to carefully snip off each sugar leaf where it meets the bud. |
| Step 4: | Be sure to avoid cutting off any buds or fan leaves by accident. |
| Step 5: | Continue until all visible sugar leaves have been trimmed. |
Remember, trimming sugar leaves can be time-consuming, but it’s an important step in achieving a smooth smoking experience. With a little patience and attention to detail, you can produce buds that are both visually appealing and enjoyable to smoke.
Post-Trimming Process
Now that the hand trimming process is complete, it’s time to shift the focus to the post-trimming process which is crucial for yielding high-quality buds. Proper curing and storage techniques can make a significant difference in the potency, flavor, and aroma of the finished product. Neglecting this stage can lead to the growth of mold or mildew on the buds and can affect the overall quality of the final product. It’s important to follow the appropriate steps for curing and storing hand-trimmed buds to maintain their potency and quality. Let’s dive into the details of the post-trimming process.
Curing Cannabis Buds
Once you’ve successfully hand-trimmed your cannabis buds, the next important step is to cure them. Curing is a process that involves drying the buds and allowing them to age slowly in a controlled environment. This process not only helps to improve the potency and flavor of the buds but also helps to preserve their freshness and prevent mold growth. Here are some steps you can follow to cure your hand-trimmed cannabis buds:
- Start by drying the buds: After trimming the buds, you’ll need to dry them to remove any excess moisture. You can do this by hanging the buds upside down in a dark, dry room with good airflow. Make sure that the room is not too humid, as this can lead to mold growth.
- Cure the buds: Once the buds are dry, you can begin the curing process. The primary objective of curing is to slow down the degradation of cannabinoids, which can happen due to exposure to heat, light, and air. Place the dried buds in a sealed container, such as a mason jar, and store them in a dark place at a consistent temperature of around 60-65 degrees Fahrenheit.
- Monitor the conditions: During the curing process, it’s essential to keep an eye on the buds to ensure that they are not too dry or moist. Check the buds regularly and open the container for a few minutes each day to allow fresh air to circulate. If the buds feel too moist, you can remove them from the container and let them dry for a few hours before putting them back in the jar.
- Be patient: Curing cannabis buds is a slow process, and it can take several weeks or even months for the buds to reach their optimal flavor, potency, and aroma. Be patient and resist the urge to open the container too often, as this can disrupt the curing process.
By following these steps, you can ensure that your hand-trimmed cannabis buds are properly cured and ready to enjoy. Remember that the curing process is just as important as the growing and trimming process, and taking the time to do it right can make all the difference in the quality of your buds.
Storing Hand-Trimmed Buds
After harvesting and trimming your buds, it’s important to store them properly to maintain their quality and preserve their potency. Here are some tips on how to store hand-trimmed buds:
- Airtight Containers: Store your hand-trimmed buds in airtight containers to prevent air and moisture from entering. This will help preserve their flavor, aroma, and potency. Mason jars, glass containers, or even food-grade plastic containers with tight-fitting lids can work well.
- Darkness: Store your buds in a cool, dry, and dark place to prevent exposure to light. Light can degrade the quality of your buds and break down the beneficial cannabinoids and terpenes.
- Boveda Packs: Consider using Boveda humidity packs to help regulate the moisture levels in your containers. These packs release or absorb moisture to maintain a consistent humidity level, which can help prevent mold or drying out.
- Avoid Freezing: While freezing can help prolong the shelf life of some foods, it’s not recommended to freeze your hand-trimmed buds. Freezing can damage the delicate trichomes and affect the potency and quality of your buds.
- Check Regularly: Make sure to check your stored buds regularly for any signs of mold, mildew, or humidity issues. If you notice any problems, remove the affected buds and adjust the storage conditions accordingly.
By following these tips, you can store your hand-trimmed buds properly and enjoy their full flavor and potency for longer. Remember, proper storage is key to maintaining the quality of your cannabis harvest.
Conclusion
In conclusion, hand trimming buds is a crucial step in the cannabis cultivation process. While it may seem tedious and time-consuming, the benefits of hand trimming far outweigh those of machine trimming. Hand trimming allows for a higher level of precision and control over the final product, resulting in a cleaner and more visually appealing end product. Additionally, hand trimming offers a more enjoyable sensory experience, producing a stronger and more distinct aroma and flavor profile.
It is important to note that hand trimming requires proper tools, technique, and patience to achieve the desired result. Taking the time to properly hand trim your buds will ensure that your final product is of the highest quality and helps to maintain the integrity of the cannabis plant.
After the hand trimming process is complete, it is important to properly cure and store your buds to maintain their potency and flavor profile over time. Taking the necessary steps to properly maintain your hand-trimmed buds will pay off in the end, ensuring a consistent and high-quality end product.
In conclusion, while hand trimming may not be the easiest or most efficient method, it is the superior method for achieving the best possible quality and maximizing the potential of your cannabis plants. With the proper tools, technique, and patience, hand trimming can be a rewarding and enjoyable experience for any cannabis cultivator.
Frequently Asked Questions
FAQs
1) Is hand trimming really necessary for harvesting cannabis?
Hand trimming ensures the most precise trimming and a higher quality final product, so it is usually preferred, but it ultimately comes down to personal preference and time constraints.
2) What tools do I need for hand trimming?
You will need a sharp pair of scissors, trimming snips, gloves, and a tray or surface to catch trimmings.
3) What is the difference between wet trimming and dry trimming?
Wet trimming is done immediately after harvesting the buds, while dry trimming is done after the buds have been dried. Wet trimming can make the process messier but allows for more precision, while dry trimming is less messy but can be more time-consuming.
4) Can I reuse sugar leaves for other cannabis products?
Yes, sugar leaves can be used for making edibles or concentrates, as they still contain high levels of THC.
5) How long does it take to hand trim buds?
The time it takes to hand trim buds can vary depending on the quantity and quality of the buds, as well as the skill level of the trimmer. It can take anywhere from a few hours to a few days.
6) Can I use an electric trimmer instead of hand trimming?
Electric trimmers can make the process faster, but they might not provide the same precision and quality as hand trimming.
7) How do I know if my buds are ready for hand trimming?
Your buds should be fully matured and at their peak potency before you begin hand trimming. You can tell if they are ready by checking their trichomes with a magnifying glass.
8) How long should I cure my hand-trimmed buds?
Your buds should be cured for at least two weeks to ensure that they are properly dried and the flavors and aromas have developed.
9) How should I store my hand-trimmed buds?
Your hand-trimmed buds should be stored in an airtight container, in a cool and dark place, to preserve their quality.
10) Can I freeze my hand-trimmed buds to keep them fresh?
Freezing your buds can cause them to lose their potency and flavor, so it is not recommended. It is best to store them in a cool and dark place at room temperature.

