
How to Properly Dry Cannabis Buds After Harvest
As a beginner cannabis grower, you may be wondering how to properly dry your cannabis buds for the best taste and potency. With so much conflicting information available online, it’s easy to feel perplexed about where to begin. However, proper drying and curing is crucial to ensure a safe and enjoyable smoking experience. In this guide, we’ll provide you with step-by-step instructions on how to dry your cannabis buds, as well as the reasons why it’s so important. So, let’s dive in and learn how to properly dry your buds after harvest.
Why Proper Drying Is Crucial
Contents

When it comes to cultivating high-quality cannabis, proper drying and curing are just as important as the growing process itself. Not only does drying your buds carefully help preserve their potency and flavor, it’s also crucial for ensuring a safe smoking experience. However, drying your buds is more than just letting them dry out in the open air. There are specific steps you need to follow to properly dry your cannabis to prevent mold, preserve terpenes, and ensure your buds are usable when it’s time to enjoy them.
Preventing Mold and Bacteria
When it comes to drying cannabis buds, preventing mold and bacteria is a critical step in the process. If left unchecked, mold and bacteria can quickly develop and ruin your entire crop, resulting in wasted time, money, and effort.
To prevent mold and bacteria growth, it’s important to properly prepare your buds before drying. This means trimming away any excess leaves and stems and checking for signs of mold or rotting. Make sure to wash your hands thoroughly before handling the buds to avoid introducing any additional bacteria.
Choosing a suitable drying location is also crucial for preventing mold and bacteria growth. You’ll want to select a location that is dry, cool, and well-ventilated. A room with a temperature around 70°F and humidity between 45-55% is ideal. Be sure to avoid areas with high humidity, such as a basement or bathroom, as this can create the perfect environment for mold growth.
Humidity control is another important factor when it comes to preventing mold and bacteria. You can use a dehumidifier or air conditioning unit to help control humidity levels in the drying area. You can also use fans to improve air circulation, which can help prevent mold and bacteria growth.
Regular observation and maintenance of the drying environment is key to preventing mold and bacteria growth. Be sure to check your buds for any signs of mold, rotting, or discoloration daily. If you notice any signs of mold or bacteria growth, it’s essential to remove the affected buds immediately.
By following these tips, you can prevent mold and bacteria growth during the drying process, ensuring that your buds remain safe to consume and of the highest quality.
| Steps to Prevent Mold and Bacteria During Drying |
|---|
| 1. Properly prepare your buds before drying |
| 2. Select a suitable drying location with low humidity |
| 3. Control humidity levels in the drying area |
| 4. Use fans to improve air circulation |
| 5. Regularly check buds for signs of mold, rotting, or discoloration |
Preserving Potency and Flavor
Preserving the potency and flavor of your cannabis buds is crucial for a high-quality end product. Proper drying and curing techniques preserve the terpenes and cannabinoids that give cannabis its distinct aroma, taste, and effects.
Here are some tips for preserving potency and flavor:
- Avoid high temperatures: High temperatures can speed up the drying process, but they can also damage the terpenes and cannabinoids that give cannabis its flavor and effects. Keep the temperature between 60-70°F (15-21°C) to preserve flavor and potency.
- Avoid low humidity: Low humidity can cause your buds to dry out too quickly and become harsh and brittle. Aim for a relative humidity of 45-55% to preserve the terpenes and cannabinoids.
- Don’t rush the process: Rushing the drying process may lead to chlorophyll being trapped inside the bud, which can affect both the flavor and effects. Allow the buds to dry slowly for the best end result.
- Burp your jars: Once your buds are dry, store them in airtight jars and burp them once a day for the first week to release any excess moisture. This will prevent mold and preserve the flavor and potency.
- Avoid exposing your buds to light: Light can break down the terpenes and cannabinoids in your buds, which can impact both the flavor and effects. Keep your jars in a cool, dark place for the best preservation.
By following these tips, you can ensure that your cannabis buds maintain their potency and flavor, resulting in a high-quality end product that you can enjoy.
Ensuring a Safe Smoke
When it comes to consuming cannabis, safety should always be a top priority. Properly drying your buds is an important step in ensuring a safe smoke. When cannabis is not dried correctly, it can potentially harbor harmful bacteria and mold. These can be dangerous when inhaled, especially for those with compromised immune systems.
Mold is a common problem when drying cannabis. It thrives in warm, humid environments and can quickly spread throughout a batch of buds. Mold can cause respiratory issues, as well as headaches and a weakened immune system. It’s important to check your buds frequently during the drying process to make sure they are not developing any mold.
Bacteria is another concern when drying cannabis. Bacteria can grow on the buds, especially if they are not dried thoroughly. When consumed, bacteria can cause stomach issues and even more serious illness in some cases. To avoid this, make sure your buds are completely dry before consuming.
Proper drying techniques are important for a safe and enjoyable cannabis experience. Take the time to monitor your drying environment and check your buds frequently for any signs of mold or bacteria. By doing so, you are taking important steps to ensure a safe and enjoyable smoke.
| Types of Harmful Microorganisms | Effects on Health |
|---|---|
| Mold | Respiratory issues, headaches, weakened immune system |
| Bacteria | Stomach issues, more serious illness in some cases |
When to Harvest Your Cannabis
Knowing when to harvest your cannabis plants is crucial to ensure you get the best quality buds possible. It can be tempting to harvest your plants as soon as the buds begin to appear, but it’s important to be patient and wait until the right time.
The Trichome Method
One of the most reliable ways to determine when your cannabis plants are ready for harvest is by using the trichome method. Trichomes are the small, crystal-like glands on the surface of the buds and leaves that contain the THC, CBD, and other cannabinoids that give cannabis its medicinal and psychoactive properties.
To use the trichome method, you’ll need to invest in a jeweler’s loupe, microscope, or magnifying glass with at least 60x magnification. Check the trichomes on the buds and leaves of your plants and look for a milky or cloudy appearance, which indicates that the THC levels are at their peak. If you wait until the trichomes have turned amber or brown, the THC levels will have begun to degrade, and you’ll end up with a less potent product.
The Pistil Method
Another method to determine the right time to harvest is by checking the pistils on the buds. Pistils are the small, hair-like structures that grow out of the buds and can tell you a lot about the plant’s maturity.
When your plant is getting close to harvest time, the pistils will start to change color. The white pistils will turn to dark brown or red, and this signals that the buds are ready to harvest. However, this method is less reliable than the trichome method, as pistil color can vary depending on the strain, and some plants may have already started changing color earlier in the flowering stage.
Additional Considerations
Apart from the trichome and pistil methods, there are a few other factors you should consider when deciding if your cannabis plants are ready to be harvested. These include:
– The age of your plant: Cannabis plants generally take between 8-12 weeks to reach maturity, although this can vary depending on the strain and growing conditions. Pay attention to the flowering stage and make sure you wait until the buds have fully developed.
– The size of your buds: When ready for harvest, the buds on your plant should be dense, firm, and plump. If they feel loose or spongey, your plants may need more time to mature.
– The overall health of your plant: Before harvesting your cannabis plants, take a close look at them and make sure they’re healthy and free of pests and diseases.
By following these guidelines, you can accurately determine the right time to harvest your cannabis plants, ensuring you get the best quality buds possible.
How to Dry Your Cannabis Buds
Now that you have harvested your cannabis buds at the perfect time, it’s time to start the drying process to prepare them for consumption. Proper drying is crucial to preserve potency, flavor and prevent the growth of mold and bacteria that could be harmful to your health. This might seem like a daunting task, but with the following steps, you will be able to dry your cannabis buds effectively and efficiently. Let’s dive in and explore the different methods of drying cannabis buds.
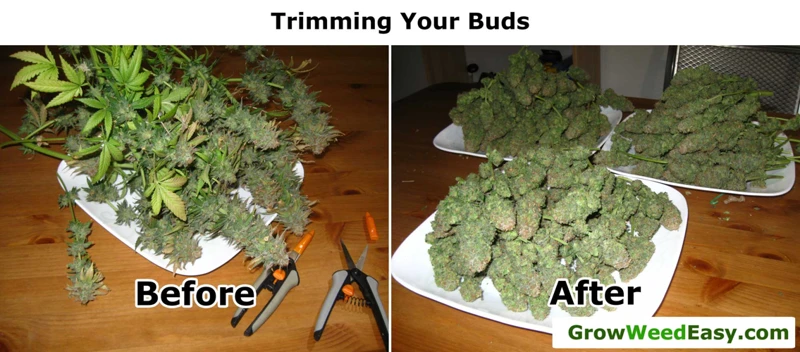
Step 1: Prepare Your Buds
The first step in properly drying your cannabis buds is to prepare them for the drying process. This involves several important steps to ensure that your buds will dry evenly and without any mold or other issues. The following are some key steps to follow in preparing your buds for drying:
- Trim your buds: Before drying your buds, it’s important to trim away any excess leaves or stems. This will not only help your buds dry more evenly, but it will also make them look more appealing and attractive.
- Remove any moisture: Moisture is the enemy of properly dried cannabis buds. To ensure that your buds are as dry as possible before the drying process, you might want to consider using a dehumidifier or fan to remove excess moisture from your grow room or drying area. This will help to prevent mold and other issues during the drying process.
- Prepare your drying area: The area where you will be drying your buds should be clean, dry, and free from any contaminants that could affect the quality of your buds. You might also want to consider using a grow tent or other enclosed space to control the environment and help regulate temperature and humidity levels during the drying process.
- Handle your buds carefully: Finally, it’s important to handle your buds carefully during the preparation process. This means avoiding touching them with your bare hands, as oils and other contaminants from your skin can affect the flavor and potency of your buds. Instead, use gloves or other tools to handle your buds as gently and carefully as possible.
By following these key steps, you can ensure that your cannabis buds are properly prepared for the drying process, and will be ready to dry evenly, with no mold or other issues that could affect their quality or potency.
Step 2: Choose Your Drying Method
When it comes to drying cannabis buds, there are a few different methods to choose from. Each method has its own advantages and disadvantages, so it’s important to choose the one that works best for your needs. Here are some of the most popular drying methods:
| Method | Description | Pros | Cons |
|---|---|---|---|
| Hang Drying | Simply hang the buds upside down in a cool, dry place for about a week. | Easy and traditional method that many growers prefer. Results in a smoother, more flavorful smoke. | Requires a lot of space and time. Leaves buds susceptible to mold and over-drying. |
| Screen Drying | Lay the buds out on a screen or wire mesh to allow air to circulate around them. | Allows for good airflow and less space is required than with hang drying. Buds dry more evenly and are less likely to mold. | The process can be slower than hang drying, and buds may need to be moved often to avoid over-drying or uneven drying. |
| Box Drying | Place buds in a cardboard box with plenty of air vents, and hang a fan to circulate air around them. | Offers good control over the drying environment, and allows for easy monitoring of moisture levels. Buds dry evenly and at a quicker rate than with other methods. | Requires more effort and resources to set up, and can be noisy due to the fan. May also require frequent monitoring and adjustment of humidity and temperature controls. |
| Commercial Dehydrator | Use a dehydrator specifically designed for drying cannabis. | Offers a highly controlled drying environment and quick drying times. Preserves flavor and potency well, and can handle larger quantities of buds. | Can be expensive and may not be readily available. Results in a slightly harsher smoke than other methods, and requires regular maintenance and cleaning. |
No matter which drying method you choose, it’s important to monitor the humidity and temperature levels of your drying environment carefully to ensure that your buds dry properly and do not become moldy or over-dried.
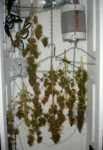
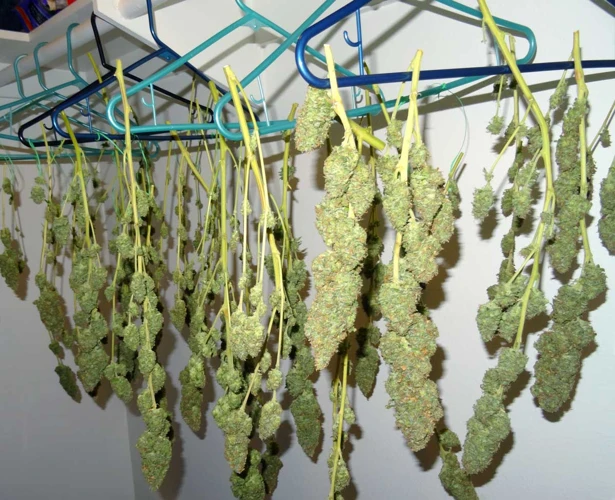
Step 3: Hang Your Buds
After preparing your buds for drying, it’s time to hang them up. This is a crucial step in the drying process, as improper hanging can lead to mold and mildew growth. Here’s how to properly hang your buds:
| Step | Description |
|---|---|
| 1 | Choose a Drying Location: The drying location should be dark, cool, and have good air circulation. A spare closet or unused room is ideal. |
| 2 | Prepare the Hanging Setup: Use a string or clothespin to attach each bud to a hanger or line. Try to avoid overcrowding, as this can lead to mold growth. |
| 3 | Hang the Buds: Hang the buds upside down and make sure none are touching each other. This allows for proper air flow around each bud during the drying process. |
| 4 | Adjust Humidity and Temperature: If necessary, use a dehumidifier or air conditioner to ensure the drying environment has a humidity level between 45% and 55%. The temperature should be between 60 and 70°F. |
It’s important to consistently monitor the temperature and humidity levels of the drying environment to ensure a successful drying process. By following these steps, your buds should be well on their way to becoming perfectly dried for a smooth, flavorful smoke.
Step 4: Monitor Your Drying Environment
During the drying process, it’s important to monitor your drying environment to prevent mold, bacteria growth, and ensure that your buds dry evenly. Here are some tips to help you monitor your drying environment:
- Temperature: The ideal temperature for drying cannabis buds is between 60-70°F. Any higher than 70°F and the buds may dry too quickly and lose potency, flavor, and aroma. Use a thermometer to check the temperature regularly.
- Humidity: The humidity level in your drying room should be around 50-60%. Too much humidity can cause mold and mildew, while too little humidity can cause the buds to dry out too quickly. Use a hygrometer to check the humidity level.
- Airflow: Proper airflow is essential for drying cannabis buds. Good airflow helps to prevent mold and mildew and ensures even drying. Use a fan to circulate the air in the drying room.
- Light: Keep the drying area dark to prevent the breakdown of THC. Exposure to light can degrade the potency of your buds.
- Smell: Check for any unusual odors in the drying room. A strong, musty smell is a sign of mold growth and requires immediate action.
By monitoring your drying environment regularly, you can ensure that your buds dry evenly and remain safe from mold and bacteria growth.
Step 5: Check Your Buds for Dryness
After a few days of drying, it’s important to check your cannabis buds for dryness before moving on to the curing process. This will help ensure that your buds are not too wet or too dry, as both can have negative effects on the final product. Here are some methods you can use to check your buds for dryness:
| Method | Description |
|---|---|
| The Snap Test | Pick a small stem from one of your drying buds and try to bend it. If it snaps easily, with an audible cracking sound, your buds are dry enough to move on to the curing process. If it only bends slightly without snapping or makes a damp, soft cracking sound, your buds need more time to dry. |
| The Trichome Test | Using a magnifying glass or jeweler’s loupe, look at the trichomes on your buds. If they are still dewy or sticky, your buds are not yet dry enough. If they are dry and brittle-looking, it’s safe to move on to the curing process. |
| The Moisture Meter Test | Using a moisture meter, you can get an exact reading of the moisture content in your buds. Ideally, your buds should have a moisture content between 10-15%. If your buds are still too wet, they will have a higher moisture content. If they are too dry, the moisture content will be lower. |
These methods can help ensure that your buds are properly dried before moving on to the curing process. It’s important to take the time to check your buds for dryness to ensure that you end up with high-quality cannabis that is safe to smoke and packed with flavor and potency.
How Long Does it Take to Dry Cannabis Buds?
One of the most important steps in growing cannabis is learning how to properly dry and cure your buds. After harvesting your cannabis plants, you’ll need to let them dry out before storing or smoking them.
How long it takes to dry cannabis buds will depend on a few different factors, including the humidity and temperature in your drying environment, the size of your buds, and the drying method you choose.
Generally, it can take anywhere from five to ten days for your buds to completely dry out. However, it’s important to keep an eye on your drying buds and monitor them regularly to ensure they don’t over-dry or become too moist.
If your buds dry out too quickly, they can lose potency and flavor. On the other hand, if they stay too moist, they can develop mold or bacteria, which can be harmful to your health.
To monitor your drying buds, you can use a hygrometer to measure the humidity levels in your drying area. Ideally, you should aim for a humidity level between 45% and 55% during the drying process.
You can also check your buds for dryness by snapping a small stem. If it snaps easily and cleanly, your buds are ready for the curing process. If it still feels moist and bendable, they need more time to dry.
Remember that the drying process is crucial for preserving the potency, flavor, and safety of your cannabis buds. So take your time and be patient, and your buds will reward you with a smooth, flavorful smoke.
How to Cure Your Dried Cannabis Buds
After the drying process, your cannabis buds will be crispy and may still contain moisture, which is why curing is necessary to get the best possible taste and potency. Curing is the process of aging your buds under certain conditions that allow them to continue to dry out slowly and evenly, while also allowing them to develop their flavor and aroma. In this section, we will discuss how to properly cure your cannabis buds.
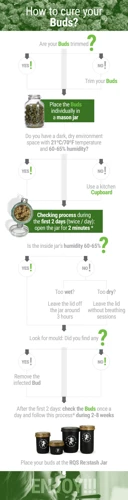
Step 1: Prepare Your Curing Environment
First, you need to prepare your curing environment by setting up a storage container that can seal airtight. Glass jars with rubber or silicone seals work best, but you can also use plastic containers. Ensure your container is clean and dry, and avoid using any containers that have previously held food or other substances that may have a lingering smell.
Step 2: Place Your Buds in the Container
Once the container is ready, place your dried buds inside. Do not pack them too tightly as this may cause them to become moldy. You can also choose to add a humidity control pack inside the container to help regulate the moisture levels.
Step 3: Monitor and Burp Your Container
After placing your buds in the container, you need to monitor them to ensure they are curing properly. Keep the container in a cool, dark place with a temperature range between 60-70°F (15-21°C) and a humidity range between 58-62%. Check the buds daily and burp the container by opening the lid for a few minutes to release any built-up moisture. Do this once a day for the first week, and then once every few days for the next couple of weeks.
Step 4: Continue to Monitor Your Buds
As your buds cure, continue to monitor them for any signs of mold or mildew. If you notice any, remove the affected buds immediately. It’s also essential to keep the curing environment airtight to prevent them from drying out too quickly or being exposed to light, which can degrade the quality of your buds.
Step 5: Enjoy Your Cured Buds
Once your buds have been curing for about 2-4 weeks, you can start testing them for quality. They should feel slightly spongy to the touch and should have a pleasant aroma. If your buds pass both tests, then congratulations! You have successfully cured your cannabis buds and are ready to enjoy them.
Proper curing can make a significant difference in the quality of your cannabis buds. By following the steps outlined above, you can ensure that your buds will be potent, flavorful, and safe to consume. Don’t rush this critical step of the process, and you will be rewarded with a product that is truly top-notch.
Conclusion
In conclusion, properly drying and curing your cannabis buds is incredibly important for ensuring the highest quality end product. By taking the time to hang dry your buds and then cure them in an airtight container, you can preserve the potency, flavor, and overall quality of your cannabis. Additionally, proper drying and curing helps prevent the growth of mold and bacteria, making your cannabis safer to consume.
As a beginner, it’s important to remember that patience is key when it comes to drying and curing your buds. Rushing the process can lead to a lower quality product and potentially even harm your health. By following the steps outlined in this guide, you can ensure that your cannabis is properly dried and cured for the best possible smoking or vaping experience.
Remember to always be mindful of your drying environment and to check your buds regularly for dryness. Once your cannabis is dry and has been properly cured, you can enjoy the fruits of your labor and appreciate the natural complexities and flavors that come with high-quality cannabis. So take your time, follow the steps, and enjoy your well-deserved reward.
Frequently Asked Questions
How do I know if my cannabis buds are ready for harvest?
There are a few different methods to determine if your buds are ready for harvest, but the most common is to look at the color of the trichomes. When most of the trichomes have turned milky white and some have turned amber or reddish-brown, it’s usually a good time to harvest.
Can I dry my cannabis buds in the microwave?
It’s not recommended to try drying your cannabis buds in the microwave, as it can quickly overheat and damage the buds or even start a fire.
How important is proper drying and curing for the quality of my cannabis buds?
Proper drying and curing are essential for producing high-quality cannabis. Drying too quickly or storing buds before they’ve properly dried can result in mold or a harsh, unpleasant taste.
What is the best temperature and humidity to dry cannabis buds?
The ideal temperature for drying cannabis buds is between 60 and 70 degrees Fahrenheit, with a humidity level of around 50%. Humidity that’s too high can encourage mold growth, while humidity that’s too low can cause the buds to dry too quickly and lose flavor.
Can I speed up the drying process by increasing the temperature or airflow?
While it’s tempting to speed up the drying process, it’s generally not recommended. Drying too quickly can result in loss of flavor and potency, and can even damage the buds. It’s best to maintain a consistent, moderate temperature and humidity until the buds are fully dried.
How do I know when my cannabis buds are fully dried?
When the buds feel dry to the touch on the outside and the stems snap instead of bending, they are likely fully dried. Another way is to use a hygrometer to measure the humidity inside the jar in which you’ve kept the buds for at least two weeks—that humidity should be between 58% and 65%.
What is curing, and why do I need to do it?
Curing is the process of slowly allowing the remaining moisture in the buds to even out throughout the entire flower, which can take from several days to a few weeks. Proper curing can improve the flavor, aroma, and potency of your buds and prevent mold growth.
Do I need to trim the leaves off my cannabis buds before drying?
While you don’t necessarily need to trim off all the leaves, it can improve the quality of your buds to remove any large leaves that don’t have trichomes. This allows more airflow and can help prevent mold growth.
Can I dry my cannabis buds in the sun?
While it’s possible to dry your buds in the sun, it’s generally not recommended. The heat and humidity levels can be difficult to control, and direct sunlight can damage the buds or even cause them to mold. It’s best to dry your buds in a cool, dark, well-ventilated space.
What should I do if I find mold on my drying cannabis buds?
If you find any mold on your buds, it’s best to throw away the affected buds and inspect the surrounding area for any mold growth that could spread. Proper ventilation and air circulation can help prevent mold growth in the future.

