
Curing Cannabis: Proper Techniques for Drying and Curing Your Harvest
The process of cultivating cannabis is a time-consuming and intricate one, and the final result is only as good as the curing techniques used. Curing allows for the preservation of potency, aroma, and flavor of the cannabis, as well as removing excess moisture and chlorophyll, and minimizing bacterial growth and mold. But, with so many different drying and curing methods available, it can be overwhelming to decide which one is best for your harvest. In this article, we will break down the proper techniques for drying and curing your cannabis step-by-step, including the best drying techniques and proper curing methods, as well as common mistakes to avoid. By the end, you’ll have a better understanding of how to achieve the perfect cure for your buds.
Why Curing Your Cannabis is Important
Contents
Curing your cannabis is arguably one of the most important steps in achieving high-quality buds that are both potent and flavorful. But why exactly is curing so crucial? Well, the answer lies in the various benefits it provides. Proper curing techniques allow you to preserve potency and aroma, remove excess moisture and chlorophyll, develop smoother smoke, and minimize bacterial growth and mold. If you want to achieve optimal results from your harvest, it’s important to understand the reasons why curing is such an integral part of the process. Before we dive into the specifics of curing, let’s first take a look at when to harvest your plants so that you can ensure the most successful curing process possible. To learn more about harvesting, check out our guide on timing your harvest for cannabis plants.
Preserve potency and aroma
To ensure that your cannabis harvest maintains its potency and aroma, proper curing techniques are crucial. Here are some ways that curing can preserve these important qualities:
- Break down chlorophyll: During the drying and curing process, chlorophyll breaks down, allowing for a more mild taste.
- Develop flavor and aroma: The curing process allows for the development of unique and distinct flavors and aromas of the strain, which could be lost otherwise.
- Preserve cannabinoids: Without proper curing, cannabinoids such as THC and CBD start to degrade, leading to a weaker product.
- Prevent mold and bacterial growth: Proper curing methods help to minimize the chances of mold or other harmful bacteria growing on the buds, which could affect its potency and cause adverse health effects if consumed.
- Improve overall smoke: A properly cured cannabis product will smoke smoother and lead to a more enjoyable user experience. It will also give a better flavor and an even burn when smoking.
Proper drying and curing techniques are necessary to maintain the quality of cannabis and ensure a pleasant smoking experience. By following the techniques detailed in this article, you can preserve the potency, flavor, aroma, and overall quality of your cannabis harvest.
Remove excess moisture and chlorophyll
One of the main reasons why curing your cannabis is important is because it helps to remove excess moisture and chlorophyll from the buds. Moisture in the buds can lead to bacterial growth and mold, while chlorophyll gives the buds a harsh taste and makes the smoke difficult to inhale. Let’s take a closer look at how curing helps to remove these unwanted compounds:
| Excess Moisture | Chlorophyll |
|---|---|
| Curing allows for the slow release of moisture from the buds, which helps to prevent bacterial growth and mold. If buds are not properly cured, they can develop mold or become too moist, creating a harsh, unpleasant smoking experience. | During the drying stage, chlorophyll in the buds breaks down and is released. If buds are not properly cured, they can retain some of this chlorophyll, which can make the smoke harsh and difficult to inhale. |
| By slowly removing moisture, the buds become more dense and potent, as the remaining cannabinoids become more concentrated. | Curing allows for the breakdown of chlorophyll into simpler, smoother-tasting compounds, resulting in a more enjoyable smoking experience. |
| Properly cured buds also burn more evenly, allowing for a consistent smoking experience. | Curing also helps to preserve the potency and aroma of the buds, as the terpenes are not degraded by excess chlorophyll. |
As you can see, removing excess moisture and chlorophyll through proper curing techniques is crucial for creating a smooth, enjoyable smoking experience with potent and flavorful buds.
Develop smoother smoke
Properly curing your cannabis not only preserves its potency and aroma but also plays a crucial role in developing a smoother smoke. When cannabis is not properly cured, it can result in a harsh and unpleasant smoke that can be difficult to inhale.
To avoid this, it is essential to remove excess moisture and chlorophyll during the curing process. When excess moisture is present in the plant material, it can cause uneven burning and a harsh taste. Additionally, chlorophyll, the compound responsible for the green color of the plant, can also contribute to a harsh smoke. Thankfully, the curing process helps to break down and remove these unwanted compounds, resulting in a smoother smoking experience.
During the curing process, cannabinoids such as THC and CBD are also converted to their more psychoactive form, resulting in a stronger high. This is due to the breakdown of some of the non-psychoactive acidic cannabinoids such as THCA and CBDA, which are converted into their more potent forms when exposed to air and heat during the curing process.
Proper curing also helps to develop unique and complex flavors and aromas in your cannabis. As the plant material slowly dries and cures, it develops distinct notes of earthy, citrusy, fruity, or spicy flavors, depending on the strains and growing conditions.
Proper curing of your cannabis not only preserves its potency but also improves the quality of the smoke and helps to develop a complex flavor profile. Ensuring that your cannabis is dried and cured correctly will result in a more enjoyable consumption experience, from the taste to the high.
| Benefit of Properly Curing Cannabis | Description |
|---|---|
| Smooth Smoke | Removing excess moisture and chlorophyll during curing allows for a smoother and less harsh smoking experience. |
| Stronger High | Cannabinoids are converted to their more psychoactive forms during curing, resulting in a stronger and more potent high. |
| Unique Flavors and Aromas | Curing allows for the development of complex and distinct flavors and aromas in the cannabis, resulting in an enjoyable consumption experience. |
Minimize bacterial growth and mold
Properly curing cannabis not only preserves its potency and aroma but also minimizes bacterial growth and mold. Bacteria and fungal growth can result in a complete loss of the harvested buds, therefore, it is essential to take proper measures to prevent it during the curing process.
To ensure that your buds do not develop mold, it is crucial to keep the buds dry and eliminate any excess moisture. You should also avoid handling the buds excessively as it can introduce harmful bacteria.
You must store the cured buds in an airtight container such as glass jars that have been properly cleaned and dried. It is also important to check the humidity levels constantly as excessive moisture can lead to mold growth, while low humidity can result in brittle and overdried buds.
Proper curing techniques play a vital role in preventing bacterial growth and mold. Buds that are dried quickly or cured improperly can be a perfect breeding ground for bacteria and mold. Patience is key when curing cannabis, and the process should never be rushed.
By following the proper drying and curing techniques, you can minimize bacterial growth and mold and ensure that your harvested buds are of the highest quality and potency, preserving both their aroma and flavor for months or even years after the curing process.
| Minimizing Bacterial Growth and Mold in Cannabis |
|---|
| Keep the buds dry and eliminate any excess moisture |
| Avoid handling the buds excessively to prevent the introduction of harmful bacteria |
| Store the cured buds in an airtight container such as glass jars that have been properly cleaned and dried |
| Constantly check the humidity levels to prevent excessive moisture and low humidity |
| Never rush the curing process, as buds that are dried quickly or cured improperly can be a perfect breeding ground for bacteria and mold |
When to Harvest Your Cannabis
Determining the right time to harvest your cannabis can be a daunting task for even experienced growers. It’s crucial to achieve the perfect balance between potency, flavor, and aroma to ensure the highest quality bud. But with so many factors to consider, from trichome color to environmental conditions, it’s important to approach the process with caution and attention to detail. In this section, we’ll dive into the various factors that can influence when it’s time to harvest your cannabis, and provide tips and techniques for achieving optimal results.
Look for trichomes
One of the most important steps in determining the best time to harvest your cannabis is to observe the trichomes on your buds. Trichomes are tiny, hair-like structures that grow on the cannabis plant and are responsible for producing the plant’s resin.
There are a few ways to observe the trichomes, but one of the most common methods is to use a magnifying glass or jeweler’s loupe to get a closer look.
It’s also important to observe the trichomes on multiple parts of the plant, as different parts may ripen at different rates.
Additionally, it’s important to consider the strain and growing conditions when determining the best time to harvest. Some strains may naturally have a longer flowering period than others, and environmental factors such as humidity and temperature can also affect ripening times.
Observing the trichomes is a critical step in determining the best time to harvest your cannabis. Taking the time to observe them closely and monitor their changes can result in a higher-quality and more potent final product.
Consider strain and growing conditions
Consideration of the strain and growing conditions is crucial when deciding the right time to harvest your cannabis. Different strains have varied flowering times, with some taking longer than others to mature. Factors such as growing conditions also affect the maturation process. Here are some things to keep in mind when deciding when to harvest your cannabis:
- Strain: Varieties of cannabis have different flowering times. Sativa strains usually take longer to reach maturity compared to indica strains. Researching the strain’s growing time will help you determine when to harvest.
- Growing conditions: The environment in which you grow your cannabis affects the maturation cycle. Factors such as temperature, humidity, water, light, and nutrients all play a significant role.
- Trichome color: Observing trichome color is important in determining when to harvest. Clear trichomes mean the plant is not ready, while amber trichomes indicate it is past its prime. The ideal time is when most of the trichomes appear cloudy.
- Cultivation method: The cultivation method also plays a role in determining when to harvest the cannabis. For example, if you choose to grow hydroponically, the plant may mature faster compared to growing it in soil due to the nutrients availability.
- Overall plant health: It’s important to take note of the plant’s overall health when determining when to harvest. Signs of diseases or pests could indicate a delay in maturation.
Considering all of these factors will help you determine when the perfect time to harvest your cannabis is. Proper timing will ensure that you get the best quality buds with optimal potency and aroma.
Time of day and humidity
Time of day and humidity are also important factors to consider when determining the best time to harvest your cannabis. In general, it is best to harvest in the early morning after the dew has evaporated and before the sun gets too hot, as this is when the plant is at its freshest and most potent. However, if you live in a particularly humid area, you might want to wait until mid-day or even late afternoon when the humidity is lower.
To help you determine the best time to harvest your cannabis based on the time of day and humidity levels, refer to the following table:
| Time of Day | Ideal Humidity Level | Harvest Considerations |
|---|---|---|
| Early morning (before 10am) | 60-70% | Plant is fresh and potent |
| Late morning (10am – 12pm) | 50-60% | Lower humidity levels can lead to faster drying times |
| Early afternoon (12pm – 3pm) | 40-50% | Harvesting during low humidity can minimize mold growth |
| Late afternoon (3pm – 6pm) | 50-60% | Allows for some drying time before nightfall |
It is important to keep in mind that these are general guidelines, and the exact timing and humidity conditions for harvesting your cannabis will depend on a variety of factors, including the strain and growing conditions. Keep an eye on your plants and adjust your harvesting schedule accordingly to achieve the desired potency, aroma, and flavor profile for your cannabis harvest.
How to Harvest Your Cannabis
Once your cannabis plants have fully matured, it’s time to harvest them carefully to ensure the best possible yield. Harvesting involves several steps, including trimming and manicuring, drying, and curing. Each of these steps is crucial in the process of producing high-quality cannabis buds that are potent and flavorful. To make sure you get the most out of your harvest, it’s important to follow the proper techniques and take the time to do it right. Let’s take a closer look at each step of the process, starting with how to harvest your cannabis.
Trimming and manicuring
One of the most important steps in preparing your cannabis for drying and curing is trimming and manicuring. This process involves removing any excess leaves and stems from the buds to ensure that only the highest quality cannabis is preserved. Trimming and manicuring is a delicate process and requires a careful hand and a sharp pair of scissors.
There are a few different tools that you can use for trimming and manicuring your cannabis buds. Some people prefer to use scissors, while others prefer to use specialized trimming machines. Whatever tool you choose, it is important to take your time and be gentle with the buds.
To begin, carefully remove any large fan leaves that are protruding from the buds. These leaves contain very little THC and can detract from the potency and flavor of your cannabis. Once the fan leaves have been removed, take a close look at the buds and carefully remove any remaining sugar leaves or stems that are visible.
It is important to be gentle when trimming and manicuring your cannabis buds, as excess handling can damage the delicate trichomes that contain THC and other cannabinoids. Once you have finished trimming your buds, you are ready to move on to the drying process.
| Tools for trimming and manicuring: | Steps for trimming and manicuring: |
|---|---|
| Scissors | Carefully remove large fan leaves |
| Trimming machine | Remove any remaining sugar leaves or stems |
| Take your time and be gentle with the buds | |
| Be careful not to damage the trichomes |
Drying techniques
When it comes to drying your cannabis buds, there are several techniques you can use. Each technique has its own advantages and disadvantages, and it’s important to pick the one that works best for your needs. Here is an overview of the most common drying techniques:
| Air drying | Water cure |
|---|---|
| Air drying is the most common and traditional way to dry cannabis buds. Simply hang your buds from a drying rack in a cool, dark, and dry room with good ventilation. This method can take anywhere from 7 to 14 days, depending on the humidity and temperature levels in the room. The main advantage of air drying is that it’s an inexpensive and simple method that doesn’t require any special equipment. | Water curing is a unique method where you submerge your freshly harvested buds in water for a few days. This process removes any chlorophyll, which can make the buds taste smoother. After the buds have been submerged in water, they are hung to dry in a dark and ventilated area. Water curing can take anywhere from 7 to 14 days and requires minimal equipment. The main disadvantage of water curing is that it can also remove some of the desirable terpenes and cannabinoids, which can affect the potency and aroma of the buds. |
| Hydrogen peroxide wash | Freeze-drying |
| A hydrogen peroxide wash is a method where you soak your buds in a solution of hydrogen peroxide and water for a few minutes before hanging them to dry. This method can help remove any mold or mildew on the buds and also sterilize them. However, it’s important to use caution when using hydrogen peroxide, as too much can damage the buds. | Freeze-drying is a method where you freeze your freshly harvested buds and then use a vacuum to evaporate any moisture. This process can take several days and requires specialized equipment. The main advantage of freeze-drying is that it preserves the potency and aroma of the buds, as well as prevents mold and bacterial growth. However, it’s also an expensive and time-consuming method. |
| Microwave drying | Nitrogen flushing |
| Microwave drying is a method where you dry your buds in a microwave. This process is quick and easy, but it can also destroy the potency and aroma of the buds if not done correctly. | Nitrogen flushing is a method where you flush the air in the drying room with nitrogen to prevent oxidization of the buds. This process can help preserve the potency and aroma of the buds, but it also requires specialized equipment and can be expensive. |
Ultimately, the drying technique you choose will depend on your personal preferences and the resources you have available. It’s important to experiment with different methods to find the one that works best for you.
Curing methods
Curing is the process of preserving and enhancing the flavor, potency, and quality of your cannabis buds. When it comes to curing cannabis, there are several methods to choose from. Each method has its own advantages and disadvantages, so it’s important to find the one that works best for you. Below you can find a list of some of the most popular curing methods:
| Air Curing |
| Air curing is the most common method of curing cannabis. It involves hanging your harvested buds upside down in a well-ventilated area for several days to a couple of weeks. During this time, the excess moisture will evaporate from the buds, and the chlorophyll will break down, resulting in a smoother smoke. Air curing is a relatively simple and inexpensive way to cure your cannabis, but it requires patience and careful monitoring to avoid overdrying or mold growth. |
| Water Curing |
| Water curing is a method of curing that involves soaking your freshly harvested buds in water for several days to remove impurities and chlorophyll. This process can result in a milder, cleaner smoke, but it can also reduce the potency and flavor of your buds. Water curing is best suited for low-quality buds that are not intended for smoking. |
| Hydrogen Peroxide Wash |
| Hydrogen peroxide wash is a method of curing that involves soaking your buds in a mixture of water and hydrogen peroxide for a short period to remove impurities and potential contaminants. This method is best suited for outdoor-grown buds that may have been exposed to pesticides or other harmful substances. However, it can also affect the potency and flavor of your buds, so it should be used with caution. |
| Freeze-Drying |
| Freeze-drying is a method of curing that involves freezing your buds and then slowly drying them in a vacuum at low temperatures. This process can help preserve the aroma and potency of your buds, but it can also be expensive and time-consuming. Freeze-drying is best suited for high-quality buds that require a longer curing time to fully develop their flavor and potency. |
| Microwave Drying |
| Microwave drying is a controversial method of curing that involves microwaving your buds for a short period to quickly remove moisture. This method can be fast and effective, but it can also lead to overheating and uneven drying, resulting in harsh, low-quality buds. Microwave drying is not recommended for high-quality buds that require careful curing to preserve their potency and flavor. |
It’s important to note that the curing method you choose can have a significant impact on the flavor, potency, and overall quality of your cannabis buds. So, before you start curing, make sure to carefully consider the pros and cons of each method and choose the one that best meets your needs and preferences.
How to store your cured buds
Once you’ve properly cured your cannabis buds, it’s crucial to know how to store them to maintain their quality for as long as possible. Here are a few important tips for storing your cured buds:
- Use airtight glass jars: Glass jars are ideal for storing cannabis, as they prevent moisture from entering and help preserve freshness, aroma, and potency. Make sure to choose jars that seal tightly to prevent oxygen from entering, which can dry out your buds and damage their quality.
- Avoid plastic bags or containers: Plastic can create static electricity which can damage trichomes on the buds, and can also trap in residual moisture or chemicals, negatively affecting the quality of your buds.
- Store in a cool, dark place: Heat and light can damage THC, so it’s best to store your jars in a cool, dark place like a closet or cabinet. Just make sure the temperature doesn’t drop too low, as this can cause the buds to become brittle and break apart.
- Label your jars: It’s a good idea to label your jars with the strain name and date of storage, as this can help you keep track of your inventory and ensure you use the oldest buds first.
By following these simple storage tips, you’ll be able to enjoy your high-quality cannabis buds for months to come, without worrying about losing potency or flavor.
Best Drying Techniques for Cannabis
Drying your freshly harvested cannabis plants is a crucial part of the overall curing process. The method you choose can influence the final aroma, flavor, and potency of your buds. With various drying techniques available, it can be challenging to determine which one is best for your crop. In this section, we’ll explore some of the most effective drying techniques, so you can make an informed decision on which approach to take. From air drying to water curing, we’ll cover the pros and cons of each method, and how they can impact your cannabis harvest. Whether you’re a novice cannabis grower or a seasoned pro, understanding the differences between these drying techniques can help you achieve high-quality, flavorful buds.
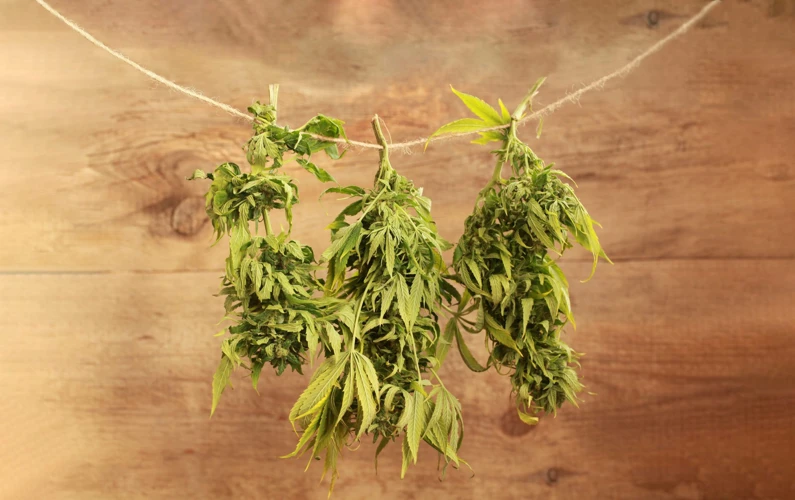
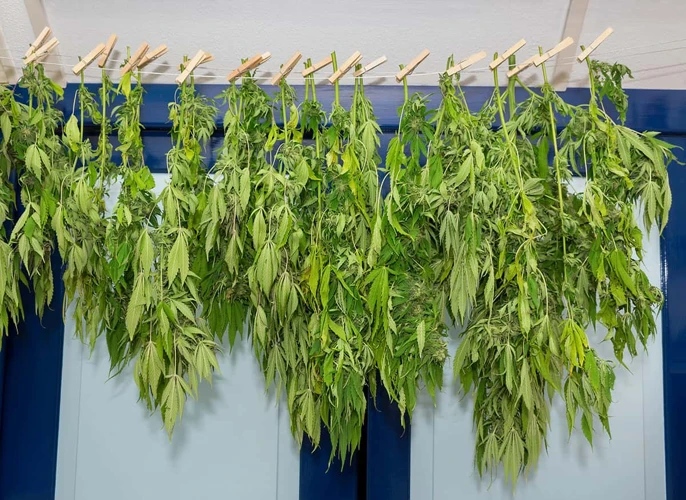
Air drying
One of the most common and traditional techniques for drying cannabis is air drying. This method involves hanging the plant upside down in a cool, dark, and well-ventilated area for several days up to two weeks. Here are the steps for air drying cannabis:
- Prepare the plant: Harvest the plant by cutting it at the base of the stem. Remove the large fan leaves, but leave the smaller sugar leaves intact.
- Hang the plant: Tie a string around the stem of the plant and hang it upside down in a dark area with good air circulation. Make sure there is enough space between the plants to allow for proper air flow.
- Check the drying progress: Depending on the humidity and temperature of the room, the plant may take anywhere from 3 to 14 days to dry properly. Check the buds regularly for dryness by gently touching them. If they feel dry and crispy, they’re ready for curing. If they still feel moist or spongy, give them more time to dry.
- Trim the buds: Once the buds are dry, remove them from the stem and trim off any remaining sugar leaves. This will improve the appearance and flavor of the buds.
Air drying is a simple and low-cost method for drying cannabis. However, it can also be risky as high humidity levels, and poor air circulation can lead to mold and mildew growth on the buds. It’s essential to monitor the humidity levels and temperature of the drying room to ensure that the buds dry properly without becoming too brittle. Proper air drying can lead to deliciously cured cannabis buds that have a smooth smoke and a pleasant aroma.
Water cure
One alternative to air drying is the water cure method, which is a quick and efficient way of drying and curing cannabis. This technique involves completely submerging the buds in water for a few days to remove all traces of chlorophyll and other impurities. This results in a final product that has a milder flavor and is less harsh on the lungs.
Here is a comparison of the water curing method with the other drying techniques:
| Technique | Time required | Difficulty level | Resulting product |
|---|---|---|---|
| Air drying | 1-3 weeks | Easy | Intense flavor and aroma |
| Water cure | 3-7 days | Easy | Mild flavor and aroma |
| Hydrogen peroxide wash | 1-2 days | Moderate | Less harsh, but still intense flavor and aroma |
| Freeze-drying | 24-48 hours | Difficult | Potent and flavorful buds |
| Microwave drying | 5-10 minutes | Dangerous | Harsh and aroma-less buds |
Keep in mind that the water curing method is not suitable for all strains, as some can become too brittle and lose potency. However, if done correctly, this technique can be an effective way of drying and curing your cannabis without the risk of mold or uneven drying.
Hydrogen peroxide wash
If you’re looking for a way to clean your cannabis buds before drying and curing, hydrogen peroxide wash is a popular method. It’s important to note that this method is controversial and some growers prefer not to use it. However, proponents claim it can help remove any pesticides, mold, or bacteria that might be present on the buds.
Here’s how to do it:
| Materials: | 3% hydrogen peroxide solution | Water |
|---|---|---|
| Instructions: | Mix a solution of hydrogen peroxide and water in a 1:4 ratio. | Submerge your buds in the solution for 5-10 seconds. |
| Remove the buds and rinse them thoroughly with clean water. | Hang them up to dry. |
It’s important to be careful with the amount of hydrogen peroxide you use as too much can damage the trichomes on your buds. Some growers also recommend using food-grade hydrogen peroxide for this method.
As with any cleaning method, it’s important to weigh the potential benefits against the potential risks. Make sure to do your research and make an informed decision for your grow.
Freeze-drying
A unique method for drying cannabis is the process of freeze-drying. This technique utilizes sublimation – the process of transitioning a solid directly to a gas without going through a liquid phase.
Using this technique, you can preserve the potency, aroma, and flavor of your buds more efficiently than other methods. Freeze-drying can also help remove excess moisture and chlorophyll, which is why it’s a popular technique for creating edibles.
Here are the steps to freeze-dry cannabis:
- Prepare your buds: After harvesting your cannabis, trim and manicure your buds as usual. Freeze your buds immediately after trimming to retain as much potency and flavor as possible.
- Freeze your buds: Place your trimmed buds in a vacuum-sealed bag and put them in the freezer overnight. This process freezes the water molecules in the plant cells, making them easier to remove during the next step.
- Dehydrate your buds: Take the vacuum-sealed bag out of the freezer and remove the buds. Place them on a tray lined with parchment paper or a non-stick drying rack. Set your freeze dryer to the proper temperature and duration for your specific buds, and turn it on. The machine will create a vacuum, and the low pressure and temperature will sublimate the water molecules out of the buds.
- Cure your buds: After freeze-drying, store your buds in an airtight jar in a cool, dark place for 2-4 weeks. Burp the jar every day to release any remaining moisture and to allow for gas exchange. This will help stabilize the humidity levels and allow your buds to cure properly.
- Test your buds: After curing, test your buds to ensure they have reached the desired moisture content. If the buds are too dry, add a humidity pack to the jar to increase the humidity level. However, if the buds are too moist, remove them from the jar and let them dry for a few more hours before returning them to the curing jar.
Freeze-drying cannabis can be a time-consuming process, but its benefits are worth the effort. The final product will have a longer shelf life and a more intense, concentrated flavor. However, it is important to note that freeze-drying requires specialized equipment, which can be costly. It is also crucial to remember that cannabis should always be handled with care, and never stored or transported in a way that could compromise its potency or quality.
Microwave drying
One unconventional method for drying cannabis is microwave drying. This method is quick and efficient, but it can damage the quality of the cannabis buds if not done carefully.
To microwave dry your cannabis, start by removing any large leaves or stems from the buds. Place the buds on a microwave-safe plate, making sure not to overcrowd them. Place a paper towel on top of the buds to absorb moisture.
Set your microwave to low power, or around 10-20% of its maximum power. Heat the buds in the microwave for about 30 seconds at a time, checking them after each interval. The buds should feel dry to the touch but still slightly pliable. Be careful not to overheat the buds, as this can damage their potency and flavor.
Once the buds are dry enough, let them cool to room temperature before storing them in an airtight container. It is important to note that microwave drying can significantly reduce the potency and flavor of your cannabis, so this method should only be used as a last resort if other drying methods are not available.
Here is a table summarizing the pros and cons of using microwave drying for cannabis:
| Pros | Cons |
|---|---|
| Quick and efficient | Can damage potency and flavor |
| Requires minimal supplies | Inconsistent results |
| Does not require special equipment | Not suitable for large quantities |
Proper Curing Techniques for Cannabis
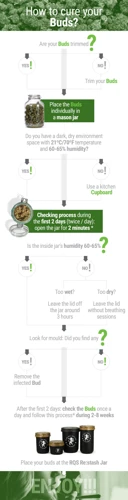
After you’ve harvested and dried your cannabis, it’s time for the critical process of curing. Proper curing techniques are essential for producing potent, flavorful buds that burn smoothly. The curing process involves placing your dried cannabis buds in jars and allowing them to slowly release any remaining moisture while also developing their unique flavor and aroma. The curing process can take anywhere from two weeks to two months, depending on various factors. In this section, we’ll discuss the proper techniques for curing cannabis, including how to monitor humidity levels, when to burp your jars, and other crucial considerations.
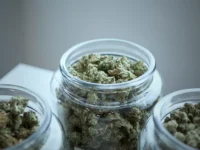
Curing buds in jars
One of the most popular and effective ways to cure cannabis is by using jars. This method involves placing the dried buds into glass jars and sealing them tightly. The goal is to create an environment where the buds can slowly release any remaining moisture, while also allowing them to develop their unique flavors and aromas over time.
To properly cure your buds in jars, follow these steps:
Step 1: Choose the right kind of jars
When selecting jars for curing, choose ones that are made of glass and have an airtight seal. Mason jars are a popular choice because they are readily available, come in a variety of sizes, and have an easy-to-use screw-top lid. You can also opt for other types of glass jars, such as those with a clamp or swing-top lid.
Step 2: Prepare the jars
Before placing the buds inside the jars, make sure that they are clean and dry. Wash them with warm soapy water and rinse thoroughly. Dry them completely with a clean towel or by air-drying. Then, sterilize the jars by boiling them in water for 10-15 minutes. Let them cool and dry completely before use.
Step 3: Fill the jars with buds
Take your dried and trimmed buds and place them loosely in the jars, filling them up to about 75% capacity. Do not pack them tightly, as this can result in unwanted moisture retention and affect their quality.
Step 4: Seal the jars
Once the jars are filled with buds, seal them tightly to create an airtight environment. The lack of airflow will encourage the buds to release moisture slowly, allowing them to develop their unique flavors and aromas.
Step 5: Store in a cool, dark place
Store the sealed jars in a cool, dark place with low humidity. A basement, closet, or pantry can be a good option. Avoid storing your jars in areas that are exposed to direct sunlight or heat, as this can cause the buds to degrade quickly.
Step 6: Burp the jars
After the first 24 hours, open the jars for a few minutes to release any excess moisture that has built up inside. Repeat this process once or twice a day for the first week or two, gradually reducing the frequency as the buds continue to cure.
| Steps | Description |
|---|---|
| Step 1 | Choose the right kind of jars |
| Step 2 | Prepare the jars |
| Step 3 | Fill the jars with buds |
| Step 4 | Seal the jars |
| Step 5 | Store in a cool, dark place |
| Step 6 | Burp the jars |
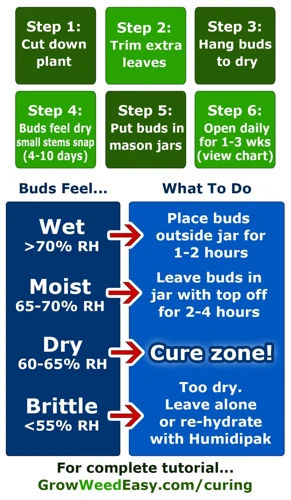
Burping jars and checking humidity
After placing your cannabis buds in airtight jars, the next step is to “burp” them. This means opening the jar for a short period of time each day to release any excess moisture or gases that may have built up inside. Failure to do so could lead to mold or mildew growth, ruining your precious harvest.
To properly burp your jars, simply open them for about 5-10 minutes each day. While they are open, take the opportunity to check the humidity levels inside. Ideally, the humidity should be between 55-65%. Anything higher than this could indicate excess moisture and the need for further drying, while anything lower could mean that the buds are too dry and may require additional moisture.
Checking humidity levels is crucial to ensure that your buds are curing properly. Invest in a hygrometer to get accurate readings, and monitor it regularly to make sure that the humidity is within the desired range.
While burping and checking humidity, also inspect your buds for any signs of mold or mildew. If you notice any black or dark spots, it could be a sign of mold growth. Remove any affected buds immediately and take steps to prevent the spread of mold to other buds.
Don’t rush the curing process. Proper curing takes time, and trying to speed up the process could lead to overdrying or other issues. Be patient and allow your buds to cure slowly over the course of several weeks.
Finally, consider adding moisture packs to your jars if you are concerned about excess moisture or dryness. These packs can help maintain a consistent humidity level and prevent the growth of mold or mildew.
By following these steps and taking the time to properly burp your jars and monitor humidity levels, you can ensure that your cannabis buds are properly cured and ready for consumption.
Adding moisture packs
In order to maintain the ideal level of moisture in your cured cannabis, you may choose to use moisture packs. These packs will add or absorb moisture as needed, ensuring that your buds stay fresh and flavorful.
Moisture packs can be purchased at most hydroponics stores or online, and come in various sizes and humidity levels. It’s important to choose a pack that is appropriate for the amount of cannabis you’re curing and the humidity levels in your storage area.
When adding moisture packs to your jars of cured buds, be sure to place them directly on top of the cannabis and seal the jar tightly. It’s also important to regularly check the humidity levels in your jars, especially during the first few days after adding the moisture packs. Use a hygrometer to ensure that the humidity levels stay within the recommended range of 59-63%.
It’s worth noting that overuse of moisture packs can lead to excessively moist buds, which can in turn lead to mold and other issues. Make sure to only use moisture packs as needed, and monitor the humidity levels regularly to ensure that your cannabis is curing properly.
Here’s a table summarizing the key points of using moisture packs in cannabis curing:
| Steps | Details |
|---|---|
| Choose the right pack | Select a pack appropriate for the amount of cannabis and humidity levels |
| Place the pack | Put the pack directly on top of the cannabis and seal the jar tightly |
| Check humidity levels | Use a hygrometer to ensure humidity levels stay between 59-63% |
| Avoid overuse | Overuse of moisture packs can lead to excessively moist buds and mold |
By using moisture packs properly, you can ensure that your cured cannabis stays fresh and flavorful for months to come.
Curing with terpenes and flavonoids
Curing with terpenes and flavonoids involves using natural compounds found in cannabis to enhance the flavor and aroma of your buds. Terpenes are essential oils that give each strain its unique scent and flavor profile. Flavonoids are pigments that contribute to the plant’s color and may have therapeutic benefits.
Here are some tips for curing with terpenes and flavonoids:
- Choose a curing jar that allows for some airflow to prevent your buds from getting too moist.
- Place a Boveda humidity pack in the jar to maintain a consistent humidity level.
- Open the jar daily to “burp” it and release any built-up moisture.
- Consider adding fresh orange peels or other citrus fruits to the jar to infuse the buds with natural terpenes.
- Avoid handling the buds too much, as this can cause the trichomes (which contain terpenes and cannabinoids) to break off.
- Pay attention to the curing time and don’t rush the process, as this can affect the potency and taste of your buds.
Curing with terpenes and flavonoids can result in a more complex flavor profile and a richer aroma. However, it’s important to be careful not to overdo it, as too much manipulation can damage the delicate trichomes and affect the quality of your final product. With some patience and careful attention to detail, you can create a truly unique and flavorful cannabis experience.
Common Curing Mistakes to Avoid
Curing cannabis is a crucial step in the cultivation process that greatly affects the final product’s quality. However, many growers make mistakes during this step that can significantly impact the potency, aroma, and overall goodness of their harvest. Knowing what to avoid can save you from a lot of frustration and disappointment. Below, we’ll explore some of the most common mistakes growers make during the curing process and how to avoid them. So, if you want to ensure a successful and tasty harvest, be sure to pay attention to the following missteps!
Overdrying
Overdrying your cannabis is a common mistake that can ruin the quality of your buds. It’s important to monitor the humidity levels in your drying and curing process to prevent your buds from becoming too dry. Here are some tips to avoid overdrying:
- Don’t rush the drying process: Many growers make the mistake of trying to speed up the drying process by increasing the temperature or air flow. However, this can cause your buds to dry out too quickly and lose their potency and flavor.
- Use a hygrometer: A hygrometer is a tool that measures the relative humidity in the air. This can help you determine when your buds are at the optimal humidity level for curing. Keep the humidity between 55-65% during curing.
- Use a slow drying method: Air drying your buds slowly is the best way to avoid overdrying. Hang your buds upside down in a cool, dry, and dark place. This will slow down the drying process and allow your buds to retain their flavor and potency.
- Check on your buds regularly: Check on your buds every day to monitor their moisture level. You can touch the buds to feel if they are dry or use the snap test to determine if they are still too moist or if they have already overdried.
By taking the time to properly dry and cure your cannabis, you can avoid overdrying it and ensure that your buds are of the highest quality.
Storing in plastic bags
Storing your cured cannabis in plastic bags is a common mistake that should be avoided. Although it may seem like a convenient and easy option, plastic bags are not suitable for long-term storage of cannabis due to several reasons:
- Mold and mildew: Plastic bags do not allow air to flow freely, which creates a perfect environment for mold and mildew to grow. When you store your cannabis in a plastic bag, the moisture and humidity that are released from the buds are trapped inside the bag, providing a breeding ground for mold spores. This can result in a loss of potency and flavor, and could potentially be harmful to your health.
- Loss of potency: When stored in plastic bags, the buds are exposed to light and oxygen, which can cause a degradation of cannabinoids and terpenes. The exposure to light can also break down chlorophyll, which can lead to an unpleasant taste and harsh smoke.
- Dryness: Over time, plastic bags can cause the buds to become dry and brittle due to the lack of humidity control. This can result in a harsh smoke that is difficult to inhale.
- Static buildup: Plastic bags can create static, which can cause trichomes (the resin glands on the cannabis plant that contain cannabinoids and terpenes) to fall off. This can result in a loss of potency and flavor.
To avoid these issues, it’s best to store your cured cannabis in airtight glass jars. This will allow for proper air flow while also providing protection from the harmful effects of light and oxygen. Additionally, using humidity control packs can help maintain the ideal moisture level inside the jars, preserving the potency, flavor, and aroma of your buds for longer periods.
Not monitoring humidity
One common mistake that growers make when curing cannabis is not properly monitoring the humidity levels. This can lead to a range of issues that can affect the quality of the buds. Here are some of the potential problems that can arise from not monitoring humidity:
- Overdrying: If the humidity levels drop too low during the curing process, the buds can become too dry and lose their potency and aroma. This can also make them harsh and unpleasant to smoke.
- Mold: On the other hand, if the humidity levels are too high, it can create an environment that is conducive to mold growth. This can ruin the entire batch of buds and make them unsafe to consume.
- Uneven curing: If the humidity levels fluctuate throughout the curing process, it can lead to uneven curing. Some buds may be over-dried while others are still too moist. This can lead to inconsistencies in the quality and flavor of the buds.
- Terpene loss: Fluctuations in humidity levels can also cause the loss of terpenes, which are responsible for the aroma and flavor of the buds. If the humidity is too low, the terpenes can evaporate too quickly. If it’s too high, they can degrade or be destroyed by mold.
- Inconsistent moisture: Without proper monitoring, it can be difficult to ensure that all of the buds are curing at the same rate and have a consistent moisture level. This can lead to buds that are too wet, which can be difficult to smoke and prone to molding.
To avoid these issues, it’s important to monitor the humidity levels throughout the curing process. This can be done with a hygrometer or by using humidity packs to maintain a stable environment. Keeping the humidity levels within a specific range (around 60% to 65%) can help ensure a smooth and consistent curing process with high-quality buds.
Curing too quickly or slowly
Proper curing of cannabis requires patience and attention to detail. Curing too quickly or slowly can result in a less than desirable final product. Here are some things to keep in mind to avoid this mistake:
- Avoid rushing the process: Curing cannabis too quickly can cause it to lose important flavors and aromas. It’s important to resist the urge to speed up the process by using high heat or other shortcuts. The slow and steady approach is best to ensure the best possible product.
- Don’t drag out the process: On the other hand, curing cannabis too slowly can also be detrimental. Leaving buds in jars for too long can result in mold or a harsh, unpleasant smoke. It’s important to monitor progress and not let the process drag on longer than necessary.
- Pay attention to humidity: Proper humidity is key when it comes to curing cannabis. If the humidity is too high, mold can start to form. If it’s too low, the process will slow down too much. It’s important to monitor the humidity level regularly and adjust as needed.
- Keep an eye on temperature: High temperatures can also cause the curing process to speed up too much. It’s important to keep the temperature in the curing environment between 60-70 degrees Fahrenheit for optimal results.
By avoiding the mistakes of curing too quickly or too slowly, you can ensure that your cannabis has the proper flavors, aromas, and smoothness for an enjoyable smoking experience.
Conclusion
In conclusion, curing your cannabis properly is essential to maintain its potency, aroma, and flavor while reducing the risk of bacterial growth and mold. It’s important to harvest at the right time by monitoring trichomes, considering growing conditions and humidity levels. Once harvested, be sure to trim and manicure your buds before drying and curing them to perfection.
When it comes to drying your cannabis, there are several techniques to choose from, including air drying, water cure, hydrogen peroxide wash, freeze-drying, and microwave drying. Each method has its pros and cons, so it’s important to choose the one that works best for you.
After drying, proper curing techniques ensure that your buds will have a smoother smoke and a better flavor. This includes curing buds in jars, burping the jars, and monitoring the humidity levels to prevent overdrying or excess moisture. You can also add moisture packs or use terpenes and flavonoids to enhance the flavor of your cannabis.
Finally, it’s important to avoid common curing mistakes such as over-drying, storing in plastic bags, not monitoring humidity, and curing too quickly or slowly. By following these tips and techniques, you can ensure that your cannabis harvest is of the highest quality and provide a better smoking experience for you and your friends.
In short, curing your cannabis properly can make a big difference in the quality of your harvest. It takes time and patience, but the end result is worth the effort. Remember to consider the various drying and curing options available, and to avoid common mistakes. With the right approach, you can enjoy high-quality cannabis that’s packed with potent aromas, flavors, and effects.
Frequently Asked Questions
How long does the curing process take?
The curing process typically takes between two to eight weeks, depending on the method used and the desired outcome.
What temperature should I keep my drying room at?
The ideal temperature for drying cannabis is around 60-70°F (15-21°C) with humidity levels between 45-55%.
Can I dry cannabis by hanging it upside down?
Yes, this is a common method for drying cannabis. Hang the plants upside down in a well-ventilated room with low humidity.
What is the purpose of burping the curing jars?
Burping the jars helps release any excess moisture and replenishes oxygen in the container, which can prevent molding and improve the overall quality of the buds.
Can I cure my cannabis in plastic containers?
No, using plastic containers for curing can cause the buds to sweat and trap moisture, which can lead to mold growth. It’s best to use glass jars or metal containers.
How often should I burp my curing jars?
You should burp your curing jars at least once a day for the first week, and then gradually decrease to once a week over the next few weeks, depending on the moisture level of the buds.
What is the purpose of adding moisture packs to curing jars?
Moisture packs help regulate the humidity level inside the curing jars, keeping the buds at an optimal moisture level and preventing them from drying out or becoming too moist.
Can I use a food dehydrator to dry my cannabis?
No, using a food dehydrator can cause the buds to dry too quickly, which can negatively impact their potency and flavor. It’s best to use a slow and steady air-drying method.
How do I know if my buds are properly cured?
Properly cured buds should have a consistent moisture level, a smooth smoke, and a strong aroma and flavor. They should also burn evenly and leave a white ash.
Can I cure my cannabis for too long?
Yes, over-curing can cause the buds to lose potency and flavor, and they may become too dry and brittle. It’s important to monitor the curing process closely and stop when the buds are at their optimal moisture level.

