
Why Flushing is Important for Harvesting Cannabis
As a cannabis grower, you’ve put in countless hours and effort to cultivate your plants with care and precision. But as harvest approaches, you may wonder if there’s anything else you can do to maximize the quality of your crop. The answer is yes- flushing your cannabis plants before harvesting can make a significant difference in taste, aroma, and overall potency. Flushing is a process of giving your plants only water in the final days before harvest, allowing the plants to use up any remaining nutrients and minerals they have stored. In this guide, we’ll cover everything you need to know about the importance of flushing, how to prepare your plants, and how to flush properly to ensure the best possible results.
What is Flushing?
Contents

When it comes to growing cannabis, flushing refers to the process of feeding your plants only water for a period of time before harvest. This is done to remove any excess nutrients, salts, or minerals that may have built up in the plants over time. Flushing is crucial to producing high-quality buds, as it can improve flavor, aroma, and smoothness of the smoke. But how do you know when and how to flush your cannabis plants? We’ll explore the answers to those questions in this section, so you can prepare your plants for a successful harvest. And if you want to learn more about timing your harvest, check out our article on when to harvest your cannabis plants.
Why is Flushing Important?
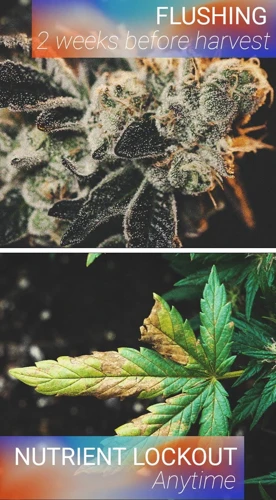
Flushing is an essential step in the cannabis cultivation process that involves feeding plants only water in the last two weeks before harvest. This process flushes out excess nutrients and minerals from the soil or growing medium and ensures that the final product is smooth, potent, and safe to consume.
The importance of flushing can be broken down into several key reasons:
- Improves taste and aroma: Flushing removes excess nutrients and salts that can cause harsh and unpleasant flavors or aromas in the final product. By flushing, you can ensure that your cannabis plants produce the best possible flavors and smells.
- Prevents health issues: If you don’t flush your plants before harvesting, excess nutrients and minerals can build up in the plant’s tissues. Consuming cannabis with high levels of these compounds can cause health issues such as headaches, nausea, or even vomiting.
- Increases potency: By removing excess nutrients, flushing can help increase the potency of your cannabis buds. This is because excess nutrients can lead to a lower concentration of THC, the primary psychoactive compound in cannabis.
- Avoids residual chemicals: If you use chemical fertilizers or nutrients in your grow, flushing ensures that there are no residual chemicals left in your plants, making your final product safer and healthier to consume.
Flushing is an essential step in ensuring the quality, safety, and potency of your cannabis plants. By flushing, you can produce high-quality, flavorful, and potent buds that are safe and healthy to consume.
When Should You Flush?
Flushing is a crucial step in preparing your cannabis plants for harvest. When you flush, you stop giving your plants nutrients and give them only water. This process removes any leftover nutrients or chemicals that may be in the plant, resulting in a smoother and better-tasting product.
But the question is, when should you flush? Here’s a breakdown:
| Timing | Reason |
|---|---|
| 1-2 Weeks Before Harvest | Flush for organic soil growers or those using supplements with a slow-release of nutrients. This allows the plant to use up excess nutrients that are stored in the soil, resulting in a smoother, less harsh smoke. |
| 1 Week Before Harvest | Flush for hydroponic growers or those using synthetic nutrients. This allows the plant to eliminate any built-up mineral salts or chemicals that could affect the taste and aroma of the final product. |
| Last Few Days Before Harvest | For those who want the highest levels of THC possible, you can stop watering altogether. This dehydrates the plant and concentrates THC levels, but it can also affect the overall taste and quality of the product. |
Knowing when to flush your plants can make a significant impact on the overall quality of your product. It’s essential to follow the correct timing and technique to ensure the best results.
How to Prepare Your Plants for Flushing

Taking the time to properly prepare your cannabis plants for flushing is an essential step in ensuring a high-quality harvest. In order to maximize the benefits of flushing, it is important to carefully consider your watering and nutrient strategies leading up to the process. By paying attention to your plants and making the necessary adjustments, you can help to guarantee a successful flush and a superior end product. Let’s take a closer look at some key considerations when preparing your plants for flushing.
Watering Your Plants
Before you begin flushing your cannabis plants, you need to prepare them. One of the most important steps in this process is watering your plants. Proper watering ensures that your plants are hydrated and ready for the flushing process. Here are some important tips to keep in mind when watering your plants.
| Tip | Description |
| 1 | Water your plants thoroughly a few days before you plan to start the flushing process. This will help to ensure that all of the nutrients have been absorbed by the plant. |
| 2 | Stop fertilizing your plants at least one to two weeks before you plan to start the flushing process. This will help to ensure that there are no leftover nutrients in the soil that could affect the taste or quality of your final product. |
| 3 | Check the soil moisture level before watering your plants. Overwatering can lead to root rot, which can be detrimental to the health of your plants. To check the soil moisture level, stick your finger about an inch deep into the soil. If it feels dry, it is time to water your plants. |
| 4 | Use pH-balanced water when watering your plants. The ideal pH level for cannabis plants is between 6.0 and 7.0. If the pH level is too high or too low, your plants may not be able to absorb the necessary nutrients. |
| 5 | Water your plants slowly and evenly, making sure to saturate the soil. Avoid getting water on the leaves or buds as this can promote the growth of mold or mildew. |
| 6 | Allow the soil to dry out slightly between waterings. This will help to prevent overwatering and ensure that your plants are not sitting in waterlogged soil. |
By following these tips, you can ensure that your plants are properly watered and ready for the flushing process. Remember, taking the time to properly prepare your plants can have a significant impact on the taste and quality of your final product.
Adjusting Nutrient Levels
When preparing to flush your cannabis plants, it’s important to adjust the nutrient levels in the soil or growing medium. This is because flushing will remove any excess nutrients from the plant’s system, leaving a cleaner and smoother smoke.
The first step in adjusting nutrient levels is to understand the current state of your plant’s soil or growing medium. This can be done through soil testing, which can be done using a pH meter or testing kit. These tools will enable you to determine the pH levels and nutrient content of your soil, which will help you determine the right approach to take.
Once you have determined the current state of your soil, you can begin to adjust the nutrient levels accordingly. This can be done through a few different methods, including:
| Method | Description |
|---|---|
| Watering | By watering your plants with plain water for a few days before flushing, you can help remove excess nutrients from the soil. This will make the flushing process more effective. |
| Reducing Nutrient Amounts | You can also reduce the amount of nutrients you give your plants in the days leading up to flushing. This will help to gradually reduce the amount of nutrients in the soil and make the flushing process easier. |
| Using Flushing Agents | Flushing agents are products designed to help remove excess nutrients from the soil. They can be added to your plant’s water during the flushing process to help speed up the process and ensure that all excess nutrients are removed. |
It’s important to note that reducing nutrient levels too drastically can cause stress on your plants, which can affect their overall health and growth. It’s important to take a measured approach when adjusting nutrient levels, and to monitor your plants carefully throughout the process. With the proper approach, you can ensure that your plants are in the best possible state before the flushing process begins, which will result in a cleaner and smoother smoke when it comes time to harvest.
Checking Trichomes
When preparing your cannabis plants for flushing, it’s important to check the trichomes to determine when to start the process. Trichomes are small, mushroom-shaped structures that appear on the buds and leaves of cannabis plants. They contain the cannabinoids and terpenes that give the plant its potency and flavor.
To check the trichomes, you’ll need a magnifying tool such as a jeweler’s loupe or a digital microscope. Hold the tool up to the trichomes and look for their color and shape. Trichomes go through different stages of maturity, and the optimal time to harvest depends on the desired effect.
Clear Trichomes – If most of the trichomes appear clear, it’s too early to harvest. The plant is still developing and needs more time to produce more potent compounds.
Milky Trichomes – If most of the trichomes appear milky, it’s an indication that the plant is ready to harvest. The potency will be at its peak, and the overall effect will be more heady than couch-lock.
Amber Trichomes – If most of the trichomes appear amber, it’s a sign that the plant is overripe. The harvest will produce a more sedative and relaxing effect, with less potency and flavor.
Checking the trichomes is an essential step in preparing your cannabis plants for flushing. It allows you to harvest at the optimal time and produce a product with the desired effect and flavor.
How to Flush Your Cannabis Plants
When it comes to harvesting high-quality cannabis, flushing is a crucial step that can make all the difference. Flushing involves purging your plants of any excess nutrients that might interfere with the taste, aroma, and overall quality of your buds. This process can seem daunting at first, but with the right tools and techniques, it’s easy to flush your cannabis plants like a pro. In this section, we’ll guide you through the steps of flushing your plants, from gathering your supplies to checking pH levels and knowing when your plants are ready for harvest.
Gather Your Supplies
Before you start flushing your cannabis plants, it is important to gather all the necessary supplies. This will ensure that you have everything you need on hand, and you can easily carry out the process without any interruption.
Here is a table summarizing the supplies you need for flushing your cannabis plants:
| Supply | Description |
|---|---|
| Clean Water | You will need a good amount of clean water to flush your plants with. Make sure that the water is free from any contaminants such as chlorine or fluoride that can affect the taste of your buds. |
| pH Up and pH Down | You will need these pH adjusting solutions to make sure that the pH of the water you use for flushing is within the recommended range. pH levels higher than 7 could lead to nutrient lockout, while pH levels below 6 could make nutrients more available than required, damaging the plant. |
| Bucket or Container | You will need a large container or bucket to hold the water you are using to flush your plants. Make sure that the container is clean and free of any chemical residues from previous use. |
| pH Meter | A pH meter is used to measure the pH levels of the water in which you are preparing to flush your plants. This will help ensure that the water’s pH is within the recommended range. |
| Nutrient Partitioner Solution | This solution helps to break down and remove excess nutrients from the plants, ensuring that the plants receive only the necessary nutrients during the flushing process. However, this solution should only be used on matured plants with a well-established root system, as it can damage the plant roots if not used correctly. |
| Pruning Scissors | You’ll also need pruning shears to remove any yellow or dead leaves that may be blocking healthy growth, allowing water to penetrate both the foliage and the roots of the plants. This will ensure thorough flushing during the process. |
| Magnifying Glass | A magnifying glass can be used to check the trichomes’ color, which will guide you when flushing to ensure the correct timing. |
| Time | Flushing takes time, usually about two weeks. So, make sure you have enough time before you embark on the process. |
By gathering these supplies, you’ll be well-prepared to flush your plants correctly and ensure that your cannabis buds turn out perfectly.
Watering Your Plants
To prepare your cannabis plants for flushing, you need to start by adjusting your watering schedule. You want to gradually reduce the amount of water so that your plants are not retaining excess moisture. This will ensure that your plant’s nutrient uptake slows down and the flushing process is more effective. Here are some tips on how to adjust your watering:
| Step 1 | Start by reducing the amount of water you give to your plants. Instead of watering frequently, you should water your plants every other day for the last week before flushing. This will allow the plant to use up excess nutrients and start the process of flushing. |
| Step 2 | During the second-to-last day before flushing, you should give your plants a good watering. This will help to flush out any remaining nutrients in the soil. |
| Step 3 | On the day of flushing, you should give your plants a final, heavy watering. This will help to flush out any remaining nutrients, and will ensure that your plant is hydrated during the flush. |
Remember that it’s important not to overwater your plants during the flushing process, as this can cause stress and damage to the plant. By gradually reducing the amount of water and giving a final heavy watering, you can ensure that your plant is well-hydrated and ready for flushing.
How Much Water to Use
When it comes to flushing your cannabis plants, it’s important to use the right amount of water to ensure that you remove any excess nutrients from the soil. Using too much water can drown your plants, while using too little will not effectively flush out the nutrients. So, how much water should you use during the flushing process? Here are some tips to help you get started:
- Calculate the amount of water you need based on your container size. As a general rule, you should aim to use 2-3 times the volume of your container in water during the flushing process.
- Measure the pH level of your water before flushing to make sure it is within the recommended range of 6.0-7.0.
- Take into account the size of your plant and adjust the amount of water accordingly.
- Start by giving your plants a small amount of water and monitor them closely to ensure they are not being overwatered.
- Continue to water your plants with the appropriate amount of water until you see the desired results in your trichomes.
Keep in mind that the amount of water you need may vary based on the specific strains you are growing, as well as the environment in which your plants are being grown. It’s important to pay close attention to your plants and adjust accordingly to ensure a successful flush. By using the appropriate amount of water, you can help to ensure a high-quality, potent product when it comes time to harvest.
How Long to Flush For
During the flushing process, it’s important to know how long to flush for in order to ensure the best possible flavor and potency from your cannabis plants. The length of time you should flush for ultimately depends on a variety of factors including the strain of plant, the size of the plant, and the growing conditions.
One general rule of thumb is to flush your plants for approximately two weeks. However, some growers may opt for a longer or shorter flush period depending on their individual preferences and plant conditions.
When determining how long to flush for, keep in mind that the objective of flushing is to remove any excess nutrients and minerals that may have accumulated in the plant tissue during the growing process. This process allows for a smoother smoking experience and prevents any harsh or unpleasant flavors from developing.
To make sure you’re flushing your plants for the appropriate amount of time, keep a close eye on the leaves of your plant. As you flush, you’ll notice that the leaves begin to yellow and eventually fall off. This is a sign that the plant is using up the remaining nutrients in the soil as it approaches the end of its life cycle.
Additionally, it’s important to note that some strains may require a longer flushing time than others. Sativa strains, for example, may require a longer flushing time due to their longer flowering period.
The length of time you should flush your plants for may vary, but it’s important to pay close attention to your plant’s individual needs and adjust your flushing time accordingly.
Checking pH Levels
During the flushing process, it’s crucial to regularly check the pH levels of your plants’ soil or growing medium. This is because the pH levels can have a significant impact on the effectiveness of the flushing process, as well as the overall quality of your cannabis plants.
The Importance of pH Levels During Flushing
The pH level of your plants’ growing medium or soil affects how effectively they are able to absorb nutrients. If the pH level is too high or too low, the plants will be unable to take in the necessary nutrients, which can lead to nutrient deficiencies and other issues.
During the flushing process, it’s essential to ensure that the pH level is within the appropriate range for your plants. If the pH level is too high, you may need to adjust it by adding some acidic nutrients or other materials to the soil. If the pH level is too low, you may need to add some alkaline materials to the soil.
How to Check pH Levels
To check the pH level of your plants’ growing medium or soil, you can use a pH testing kit. These kits typically include pH strips or a pH meter.
To use a pH strip, simply insert it into the soil or growing medium and wait for a few seconds. The strip will then change color, indicating the pH level.
If you’re using a pH meter, dip the probe into the soil or growing medium and wait for a few seconds for the reading to stabilize. The meter will display the pH level on the screen.
What pH Level Should You Aim For?
During the flushing process, you should aim to maintain a pH level between 6.0 and 7.0. However, the ideal pH level can vary depending on the type of plants you are growing and the specific growing conditions.
To ensure that you are maintaining the appropriate pH level, it’s a good idea to test the pH level of your plants’ growing medium or soil multiple times throughout the flushing process.
| pH Level | Effect on Plants |
|---|---|
| Less than 6.0 | Can lead to nutrient deficiencies and other issues. |
| 6.0-7.0 | Ideal pH range during flushing. |
| Greater than 7.0 | Can lead to nutrient uptake problems and nutrient deficiencies. |
By regularly checking and maintaining the appropriate pH level during the flushing process, you can ensure that your cannabis plants are able to effectively absorb the necessary nutrients and produce high-quality buds.
After Flushing
As the flushing process comes to an end, it’s important to take the next steps to ensure the quality of your cannabis harvest. The post-flushing period is crucial for achieving the desired taste, aroma, and potency of your buds. To do this, you will need to pay close attention to the drying and curing process of your plants. Post-harvest care is just as important as the growth and flowering stages, and it’s important to take the right steps to preserve the quality of your cannabis buds. In this section, we will discuss the necessary steps to take once you have completed the flushing process.
Drying and Curing Your Plants
After you have successfully flushed your cannabis plants, the next step is to dry and cure them. This process is crucial in ensuring that your buds are of the highest quality. Here are some important steps to follow for drying and curing your cannabis plants:
- Cut and Hang Your Plants: After flushing your plants, you will need to cut them down and hang them to dry. Trim off any extra leaves and branches, leaving only the buds attached to the stems. Hang them upside down in a dark, cool and dry place, such as a closet or a grow tent. This will allow them to dry out slowly, while also preventing any mold or mildew from growing on the buds.
- Monitor the Temperature and Humidity: It is important to monitor the temperature and humidity levels during the drying process. Keep the temperature between 60-70 degrees Fahrenheit and the humidity below 60%. This will prevent the buds from drying out too quickly or becoming overly moist.
- Cure your Buds: After the buds have dried out completely, place them in an airtight container, such as a mason jar, for the curing process. This is where the flavors and aromas of the cannabis buds really begin to develop. It is important to open the jars daily to release any excess moisture and to allow fresh air to circulate. Continue this process for at least two weeks, or up to a few months, depending on your preference.
- Test Your Product: Once your buds have been cured properly, it is time to test them out. Take a small amount and smoke it, paying attention to the taste, aroma, and effects. This will allow you to determine if your buds are ready for consumption or if they need more time to cure.
Remember, drying and curing your cannabis plants is just as important as growing and flushing them properly. With a little patience and attention to detail, you can produce high-quality buds that will provide you with a potent and enjoyable smoking experience.
Testing Your Product
Once you’ve successfully harvested and dried your cannabis plants, it’s time to test the final product. Testing your cannabis is important to ensure that it’s safe for consumption and to gauge its potency. Here are some steps you can take to properly test your cannabis:
- Get a testing kit: There are several testing kits available on the market that can help you determine the potency of your cannabis. These kits typically use a colorimetric analysis to detect the presence of THC, the psychoactive compound in cannabis.
- Prepare a sample: To test your cannabis, you’ll need to prepare a small sample for analysis. Grind up a small amount of the dried plant material and place it in a test tube or another container.
- Perform the test: Follow the instructions on your testing kit carefully to perform the analysis. This will typically involve adding a solution to your test tube and watching for a color change.
- Interpret the results: Once you’ve performed the test, you’ll need to interpret the results to determine the potency of your product. Most testing kits will provide you with a range of THC percentages. If your cannabis falls within this range, it’s likely safe for consumption. If it falls outside the range, it may be too potent or not potent enough.
- Consider other factors: Remember that THC content isn’t the only factor that affects the potency and quality of your cannabis. Factors like the strain, growing conditions, and curing process can also influence the final product.
By properly testing your cannabis, you can ensure that you’re getting a safe, high-quality product that meets your needs and preferences. Keep in mind that testing kits vary in accuracy, so it’s a good idea to use multiple methods to verify your results.
Conclusion
As a cannabis grower, it’s important to understand the significance of flushing your plants before harvest. By flushing, you can ensure that any excess nutrients and other compounds are removed from your plants, allowing for a smoother smoking experience.
Additionally, flushing your plants can enhance the flavor, aroma, and overall quality of your buds. It’s crucial to prepare your plants for flushing by watering them properly and monitoring nutrient levels. Checking trichomes is also an essential step in determining when to start flushing.
When it’s time to flush your plants, make sure to gather all the necessary supplies beforehand. Using the right amount of water and flushing for the appropriate duration are critical factors that can affect the end results.
Once you’ve completed the flushing process, it’s important to properly dry and cure your plants. This step can significantly impact the potency and quality of your buds. You should also test your product to ensure it meets your expectations and is free of contaminants.
Overall, flushing is a crucial step in growing high-quality cannabis plants. By following the steps outlined in this guide, you can prepare your plants for harvest and produce buds that provide an exceptional smoking experience.
Frequently Asked Questions
What are the benefits of flushing cannabis plants?
Flushing removes excess nutrients from the plant, improving the taste and aroma of the final product. It also prevents harshness and makes for a smoother smoking experience.
How long should I water my plants before flushing?
You should water your plants with plain water for at least a week before flushing to ensure that there are no excess nutrients in the soil.
What is the best pH level for flushing?
The pH level of the water used to flush should be between 6.0-7.0 for soil and 5.5-6.5 for hydroponic systems. This ensures that the plant is not stressed during the flushing process.
Should I flush even if I use organic nutrients?
Yes, organic nutrients can still build up in the soil and cause nutrient burn if not properly flushed before harvest.
Can I use any water to flush my plants?
No, it’s important to use clean water free of chlorine or other additives that could affect the pH balance of the soil or damage the plant.
Can I still use the runoff from flushing?
No, the runoff from flushing will contain excess nutrients and should not be used for other plants or collected for reuse.
How do I know when it’s time to flush?
Check the trichomes on your buds to determine when it’s time to harvest, then begin flushing at least two weeks before harvesting.
What should I do if my pH levels are off during flushing?
You can adjust the pH levels using pH up or pH down solutions until the water used for flushing is within the appropriate range.
How often should I water during the flushing process?
You should water as often as necessary to maintain consistent moisture levels in the soil or medium.
When is the best time to harvest after flushing?
You should wait at least a week after flushing to allow the plant to fully recover from the stress of flushing before harvest.

