
A Comprehensive Guide to Germinating Cannabis Seeds with Peat Pellets
Embarking on the journey of growing cannabis can seem daunting, especially for new growers. However, with the right methods and materials, it can be a rewarding experience. One important step in the process is germinating the cannabis seeds. There are several methods for doing this, but one that has proven to be effective is the peat pellet method. This method involves using compressed peat moss pellets as a medium for germination. In this comprehensive guide, we will walk you through the materials needed and the steps involved in the peat pellet method, as well as provide some useful tips and tricks for successful germination. So, let’s dive in and learn how to germinate cannabis seeds using peat pellets.
Materials
Contents
In order to successfully germinate cannabis seeds with the peat pellet method, you will need a few essential materials. These materials include peat pellets, cannabis seeds, a container, a light source, and a watering tool. Each of these materials plays a crucial role in ensuring that your cannabis seeds grow into healthy seedlings. Here, we will delve into each of these materials and discuss their importance in detail.
Peat Pellets
Peat pellets are compressed discs made from peat moss, which provide a convenient and efficient way to start cannabis seeds. They are widely available at garden centers and online stores.
Advantages of Peat Pellets:
| Advantages of Peat Pellets |
| – Peat pellets are easy to use and eliminate the need for traditional seed-starting soil mixtures. |
| – They provide a sterile environment that reduces the risk of seedling diseases. |
| – The compressed form of the peat pellets saves space and makes them easy to store. |
| – Peat pellets have a neutral pH, which is optimal for cannabis seed germination. |
Disadvantages of Peat Pellets:
| Disadvantages of Peat Pellets |
| – Peat pellets are not environmentally friendly as they are made from non-renewable resources. |
| – They can be difficult to rehydrate once they dry out, which can harm the seedlings. |
| – Peat pellets may contain high levels of salt, which can be harmful to cannabis seedlings. |
Preparation: Before using peat pellets, it is recommended to soak them in water for at least 30 minutes to expand and hydrate. Squeeze out the excess water afterward to ensure the peat pellets are not too wet. This process will also help flush out any excess salts that may be present in the pellets.
Size: The size of the peat pellets can vary, but it is recommended to use 1 to 1.5-inch pellets for cannabis seed germination as they provide enough space for the roots to develop.
Quantity: The number of peat pellets needed will depend on the number of cannabis seeds being germinated and the available space in the container. It is recommended to place one seed per pellet to avoid overcrowding and competition for resources.
Peat pellets serve as a practical and easy-to-use option for cannabis seed germination. Understanding their advantages and disadvantages can help ensure successful seedling development.
Cannabis Seeds
One of the essential materials required for the peat pellet method of cannabis seed germination is high-quality cannabis seeds. The success of germination mainly depends on the quality of the seed, which should be viable and healthy.
Here are some essential factors to consider when choosing cannabis seeds:
| Factor | Description |
|---|---|
| Genetics | The genetics of the cannabis seeds play a crucial role in determining the quality and potency of the plants. It is essential to choose high-quality seeds from reputable breeders to ensure that you get the desired traits. |
| Appearance | Look for seeds that are firm and healthy, with a dark color and no visible cracks or damage. Avoid seeds that are too small or greenish in color, as they are less likely to germinate successfully. |
| Age | Freshness is a key factor in seed viability. Look for seeds that are no more than a year old, as older seeds may have reduced germination rates. |
| Storage | Proper storage is essential to maintain seed viability. Look for seeds that have been stored in a cool, dark, and dry place, as exposure to heat, light, and moisture can reduce germination rates. |
When purchasing cannabis seeds, be sure to research the strain and the breeder to ensure that you are getting high-quality seeds. It is also important to choose a strain that is suitable for your growing conditions and preferences in terms of effects and flavors. With the right seeds, you can start your cannabis growing journey on the right foot.
Container
When it comes to selecting a container for the peat pellet method of cannabis seed germination, there are a few options to consider. Choosing the right container is crucial for ensuring that the seeds have enough space to grow and develop properly. Here are some of the most common container options and their pros and cons:
| Container Type | Pros | Cons |
|---|---|---|
| Seedling Tray |
|
|
| Plastic Cup or Pot |
|
|
| Paper Towel or Coffee Filter |
|
|
Ultimately, the container you choose will depend on your personal preferences and the resources you have available. However, it’s important to make sure that the container is light-proof and has drainage holes for excess water to escape. Without proper drainage, the roots can become waterlogged and potentially suffocate.
Light Source
When it comes to germinating cannabis seeds, providing the right amount of light is crucial for healthy growth. Here are some tips on choosing a suitable light source:
- Choose the right type of light: There are several types of light sources available, including fluorescent, LED, and HID lights. LED lights are the most efficient and cost-effective, emitting low heat and using minimal electricity. Fluorescent lights, on the other hand, are affordable and provide a broad spectrum of light. HID lights are the most powerful but also the most expensive and energy-consuming.
- Consider the light spectrum: Different types of light bulbs produce different spectrums of light, including blue, red, and full spectrum. Blue light promotes vegetative growth, while red light stimulates flowering. Full spectrum lights provide a balance of both types of light and are ideal for seed germination.
- Determine the required intensity: The intensity of light required for germination is typically lower than what is needed for mature plants. A light with a low to medium intensity is sufficient for seedlings.
- Set the light timer: Seedlings require approximately 16-18 hours of light per day. It is important to set a timer for the light source to ensure consistency in the light cycle.
- Adjust the height of the light source: The distance between the light source and the seedlings should be adjusted as the plants grow. In general, the light source should be kept 2-3 inches away from the seedlings at the beginning and gradually moved further away as they grow.
Choosing the right light source is essential to ensuring successful cannabis seed germination. By considering the type of light, light spectrum, intensity, light timer, and height adjustment, you can provide optimal growing conditions for your seedlings.
Watering Tool
When it comes to choosing a watering tool for the peat pellet method, there are a few options to consider. Here are some popular choices:
- Watering Can: A watering can is a traditional tool that allows for gentle watering of the peat pellets. Look for a can with a small spout that can easily fit into the container.
- Spray Bottle: A spray bottle is a popular choice for watering seedlings. Choose a bottle with a fine mist setting to avoid overwatering and damage to the delicate seedlings.
- Pipette: A pipette can be used for precise watering of individual pellets. This option can be time-consuming, but is useful for ensuring each pellet receives the right amount of water.
Regardless of the watering tool you choose, be sure to use distilled water to avoid any potential contaminants that could harm the seedlings. Also, be careful not to overwater the pellets, as this can lead to mold growth or root rot. Finally, keep in mind that the temperature and humidity of the grow area can also affect the amount of water the seedlings need, so be sure to monitor their progress regularly.
Step-by-step Guide
Navigating the world of cannabis seed germination can be daunting for even the most seasoned grower. However, with a comprehensive guide, you can successfully germinate your cannabis seeds using the peat pellet method. In this section, we will provide a step-by-step guide to help you through the process. Follow these simple instructions carefully, and you’ll be on your way to growing healthy, robust cannabis plants in no time.
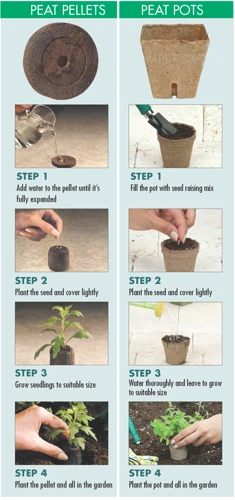
Step 1: Prepare the Peat Pellets
Before beginning the seed germination process, it is important to properly prepare the peat pellets. Peat pellets come in a dehydrated state, which means they need to be rehydrated before use. Below are the steps to prepare the peat pellets for use:
| Step | Instructions |
|---|---|
| 1 | Decide on the number of peat pellets needed for the project. Soak the peat pellets in warm water for 10-15 minutes. |
| 2 | Remove the peat pellets from the water and squeeze out any excess water. |
| 3 | Place the peat pellets in the container that will be used for seed germination. |
| 4 | Fluff the pellets with a fork or similar tool to loosen them up and create space for the cannabis seeds to be inserted. |
Properly preparing the peat pellets in this way will ensure that they are the right consistency and texture for the cannabis seedlings to thrive. It is important to avoid over-saturating the peat pellets with water, as this can lead to mold growth and other issues. Going through this process carefully will help ensure successful germination of cannabis seeds.
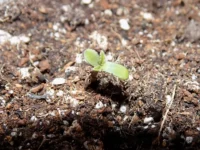
Step 2: Insert the Cannabis Seeds
Once you have prepared your peat pellets, it’s time to insert your cannabis seeds in them. Make sure you handle the seeds carefully to avoid damaging them during the insertion process. Here’s a step-by-step guide on how to insert cannabis seeds in peat pellets:
| Step | Description |
|---|---|
| Step 1 | Fill a container with water and let your peat pellets soak in the water for a few minutes until they expand and become soft. |
| Step 2 | Using a toothpick or a small tool, create a small hole in the center of each peat pellet. The hole should be about 1/4 inch deep. |
| Step 3 | Place one cannabis seed in each hole. Make sure the seed is placed pointy side up and is not buried too deep, as this will inhibit germination. |
| Step 4 | Using tweezers or your fingers, gently cover the seed with peat moss by pressing down lightly on the surface of the pellet. Make sure the seed is covered with a thin layer of peat moss, but not too much as it will prevent light from reaching the seed, hindering germination. |
After following these steps, you should have a fully prepared peat pellet with a cannabis seed inserted and securely covered. Move on to the next step to learn how to properly water and cover the container.
Step 3: Water and Cover the Container
Before proceeding with step 3, make sure that the peat pellets are sufficiently hydrated. Each pellet should be moistened with water before placing them in the container. Once the pellets are ready, it’s time to water and cover the container.
Step 3: Water and Cover the Container
1. Fill the container with distilled water until it reaches the halfway point.
2. Place the peat pellets in the container, ensuring that they are fully submerged in water.
3. Leave the peat pellets to soak for 5-10 minutes, or until they have fully expanded and absorbed the water.
4. Once fully expanded, carefully remove any excess water from the container by gently pressing down on the pellets with your fingers.
5. Cover the container with a plastic wrap or a humidity dome to create a humid environment for the seeds to germinate.
6. Ensure that the container is placed in a warm and bright location to encourage optimal growth conditions.
By keeping the container covered, you are creating a microclimate that will help to retain moisture and promote healthy seedling growth. It’s important to check on the container regularly and monitor the moisture levels of the peat pellets. Use a spray bottle or a watering tool to add water as needed, ensuring that the peat pellets remain evenly moist but not waterlogged. With proper care and attention, your cannabis seeds should begin to germinate within 5-10 days.
Step 4: Place the Container Under a Light Source
After covering the container, the next step is to place it under a light source. This is a critical step in the germination process as it provides the seedlings with the necessary energy for growth. Here are some important points to consider when placing the container under a light source:
- Choose the right light source: When it comes to growing cannabis seedlings, not all light sources are created equal. You will need a light source that provides a full spectrum of light and emits the right amount of intensity. LED grow lights are a good option as they are energy-efficient and emit very little heat, which could damage the seedlings.
- Position the container correctly: The container should be positioned just a few inches below the light source. As the seedlings grow taller, you can adjust the height of the light source accordingly to keep it just a few inches above the plants’ canopy.
- Choose the right light cycle: When germinating cannabis seeds, it is important to provide the right amount of light. A good rule of thumb is to provide 18-24 hours of light per day during the early growth stage. After a few weeks, you can reduce the light cycle to 12 hours of light and 12 hours of dark to encourage the plants to enter the flowering stage.
By following these tips, you can ensure that your seedlings receive the necessary light and energy for growth. Keep in mind that proper lighting is just one of the factors that contribute to successful cannabis seed germination. Other factors such as temperature, humidity, and watering also play a crucial role in ensuring healthy growth.
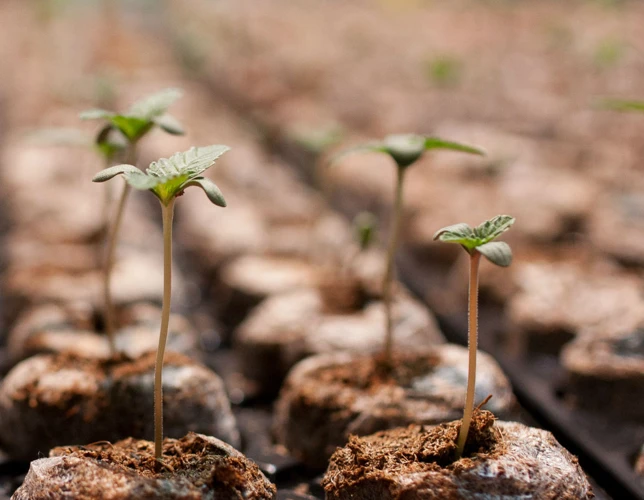
Step 5: Monitor and Water the Seedlings
Once your cannabis seeds have germinated and started their journey towards becoming mature plants, it’s important to keep a close eye on them and ensure they’re getting the care they need. Here’s a breakdown of how to monitor and water your seedlings:
| Task | Frequency | Details |
|---|---|---|
| Monitor growth progress | Daily | Observe the growth of your seedlings on a daily basis, noting any changes in size, color, or appearance. This can help you diagnose any potential issues and adjust your care accordingly. |
| Watering | As needed | Inspect the peat pellets daily to see if they need water. Check the soil moisture by pressing your finger about 1-2 inches deep into the pellet. If it’s dry, water the seeds until they’re moist but not waterlogged. Use a spray bottle or gentle watering tool to avoid disturbing the seeds. |
| Provide optimal temperature and humidity | Consistently | Keep the temperature in the range of 70-80°F (21-27°C) during the day and 65-75°F (18-24°C) at night. Maintain a relative humidity level of 60-70% to prevent the seedlings from drying out. Use a thermometer and hygrometer to monitor these levels. |
| Adjust lighting conditions | As needed | If you notice your seedlings stretching towards the light or becoming stunted, adjust the position and intensity of your grow lights accordingly. Aim for at least 16 hours of light each day. |
By following these guidelines for monitoring and watering your seedlings, you’ll be well on your way to growing healthy, robust cannabis plants. Keep in mind the importance of consistency and attention to detail when caring for your plants, and don’t hesitate to seek assistance or advice from experienced growers if you encounter any issues.
Tips and Tricks
As you embark on your journey of cannabis seed germination using the peat pellet method, there are some tips and tricks that can help ensure the success of your endeavor. These little pearls of wisdom can make all the difference in the growth and health of your seedlings. So, let’s take a look at some of the useful techniques that can help you throughout this process. From the importance of distilled water to the optimal temperature and humidity levels, we’ll cover everything you need to know. Let’s dive in!
Tip 1: Use Distilled Water
When it comes to watering your cannabis seedlings during the germination process, it’s important to ensure that the water you’re using is of good quality. Using tap water can be detrimental to your seedlings as it contains chemicals and minerals that can harm them. Instead, we recommend using distilled water to give your seedlings the best chance to grow and thrive.
Distilled water is free from impurities and contaminants, making it ideal for watering cannabis seedlings. It lacks the minerals and chemicals found in tap water, which means it won’t cause salt buildup or nutrient imbalances in your plants. Using distilled water also reduces the risk of bacterial and fungal growth, which can be assisted by tap water’s dissolved minerals.
Here are some further reasons to use distilled water when germinating your cannabis seeds:
- It is pH-neutral, which means it won’t affect the pH levels of the soil or medium you’re using to grow your seedlings.
- It helps to prevent the buildup of potentially harmful minerals and salts in your soil, which can lead to nutrient deficiencies or toxicity.
- Distilled water is also free from chlorine, and other chemicals found in tap water, which may harm your seedlings.
While any water source can cause flooding, which can prevent your seeds from germinating, contaminants such as chlorine will further reduce your germination rates. Using distilled water is an excellent choice as it will provide your seedlings with the purest and cleanest water to grow up to be healthy, strong plants.
Tip 2: Avoid Overwatering
Maintaining the right moisture level is crucial for the success of the peat pellet method. Overwatering your cannabis seeds can lead to drowning which kills the sprouting seedlings. It’s important to strike the right balance in watering your cannabis seeds. Here are some tips to avoid overwatering:
- Observe the pellets: Before watering, check the pellets for moisture level. If they are still wet, hold off watering for a day or two.
- Water sparingly: Only water the pellets enough to moisten the surface. Over saturation of the pellets leads to excess moisture in the container.
- Avoid waterlogging: Waterlogging is the excess accumulation of water in the container, and is one of the most damaging conditions for seedlings. Make sure that the container you are using has proper drainage.
- Water from below: Another way to prevent overwatering is to water the peat pellets from the bottom up. Place the container in a small amount of standing water, and allow the peat pellets to soak up water from the bottom.
By following these tips, you can ensure optimal conditions for your cannabis seeds and allow them to thrive. Avoiding overwatering is just one of the many important steps in the peat pellet method for cannabis seed germination.
Tip 3: Maintain Optimal Temperature and Humidity
Maintaining optimal temperature and humidity is crucial for the success of cannabis seed germination. Here are some tips to ensure you create the best environment for your seeds.
- Use a thermometer: It’s important to know the exact temperature of the room or area where you are germinating your cannabis seeds. Invest in a thermometer to monitor the temperature, as it can have a significant impact on seed germination success.
- Keep the temperature between 20-25 °C: This temperature range is optimal for cannabis seed germination. Anything lower than 20 °C can slow down the germination process, while anything higher than 25 °C can damage the seeds.
- Ensure humidity: The humidity level also plays a crucial role in seed germination success. A lack of moisture in the air can dry out seeds, while too much moisture can lead to mold growth. Aim for a humidity level of 70% during the germination process.
- Use a humidity dome: A humidity dome is a great tool to help maintain the ideal humidity level for your cannabis seeds during the germination process. It creates a humid environment and prevents moisture loss.
- Regularly check and adjust: Keep an eye on the temperature and humidity levels, and adjust as needed. This will ensure the best possible environment for your cannabis seeds to germinate.
By keeping a close eye on the temperature and humidity levels, you can create the perfect environment for successful cannabis seed germination.
Tip 4: Transplant the Seedlings Promptly
Transplanting the seedlings into their permanent homes is a crucial step in the growing process. It’s important to do it promptly, as delaying the transplant can lead to stunted growth and damage to the plants. Here are some tips and guidelines to follow when transplanting your seedlings:
| When to transplant: | Wait until the seedlings have developed their first true leaves, which are the second set of leaves that appear after the initial cotyledons. This usually happens within 1-2 weeks after germination. |
|---|---|
| Choosing the right containers: | When transplanting, choose containers that are at least 4-6 inches deep and have drainage holes to prevent water from accumulating at the roots. |
| Preparing the soil: | Use well-draining soil that’s rich in nutrients. Mix in some perlite or vermiculite to ensure good drainage and aeration. |
| Transplanting technique: | Be gentle when removing seedlings from their peat pellets. Handle them by their leaves, not their fragile stems. Make a small hole in the soil and bury the peat pellet up to the first set of true leaves. Water thoroughly after transplanting. |
| After-transplant care: | Keep the soil moist but not waterlogged. Provide adequate light and keep the temperature and humidity levels consistent. Avoid disturbing the plants for the first few days after transplanting. |
Following these tips will ensure that your seedlings have the best chance of thriving after transplanting. Remember, the goal is to give them a healthy start so they can grow into strong, robust plants that will yield a bountiful harvest.
Conclusion
In conclusion, the Peat Pellet Method for cannabis seed germination is a reliable and effective way to start your cannabis garden. By following the step-by-step guide, you can ensure that your cannabis seeds germinate successfully and grow into healthy seedlings.
It is important to use high-quality peat pellets, cannabis seeds, and a suitable container with proper drainage. Additionally, providing adequate light and moisture is key to the success of the germination process.
Remember to follow the provided tips and tricks to avoid common mistakes such as overwatering or using tap water. Maintaining optimal temperature and humidity is also crucial to ensure healthy growth of the seedlings.
Once the seedlings have grown large enough, it is important to transplant them promptly into larger containers or your garden. With proper care and attention, your cannabis plants will thrive and provide a bountiful harvest.
Now that you have a comprehensive guide to the Peat Pellet Method, you can confidently start your cannabis garden and enjoy the benefits of homegrown cannabis. Happy germinating and happy growing!
Frequently Asked Questions
How many cannabis seeds should I use for germination?
It’s recommended to use around 2-3 seeds per peat pellet. This allows for a higher chance of success and ensures that at least one seed will germinate.
Do I need to soak my cannabis seeds before germination?
It’s not necessary to soak cannabis seeds before germination, but some growers claim that soaking them for 12-24 hours in water can help speed up the process.
Can I use any type of container for the peat pellet method?
Yes, you can use any type of container as long as it can hold the peat pellets securely and has drainage holes to prevent overwatering.
How long does it take for cannabis seeds to germinate using peat pellets?
Depending on the strain and environmental factors, cannabis seeds can take anywhere from 1-2 days to 2 weeks to germinate using the peat pellet method.
Do I need a specific type of light for the seedlings?
Any type of grow light, whether it’s fluorescent, LED, or HID, can be used for the seedlings as long as it provides enough light intensity and the proper spectrum for vegging plants.
How often should I water the seedlings?
You should water the seedlings when the top of the peat pellet feels dry to the touch. Be careful not to overwater as this can lead to root rot.
Can I use tap water to water the seedlings?
It’s preferable to use distilled or filtered water to water the seedlings as tap water can contain chlorine and other chemicals that may harm the young plants.
What is the ideal temperature and humidity for cannabis seed germination?
The ideal temperature for cannabis seed germination is around 72-78°F (22-26°C) and the ideal humidity is around 70-80%. Using a humidity dome can help maintain proper levels.
When should I transplant the seedlings?
You should transplant the seedlings once they have developed their first set of true leaves and are tall enough to be transplanted into their final growing container.
Can I reuse the peat pellets for future plantings?
It’s possible to reuse peat pellets, but they may not provide the same level of nutrition and water retention as new pellets. It’s generally recommended to use new peat pellets for each planting.

