
How to Grow Marijuana Indoors For Under $100
How to build an entire grow setup for under 100 bucks? Easy, this budget will also include soil and nutrients as well! I’ll take you guys to step by step through the whole process and talk about what my plans are to maximize this growth.
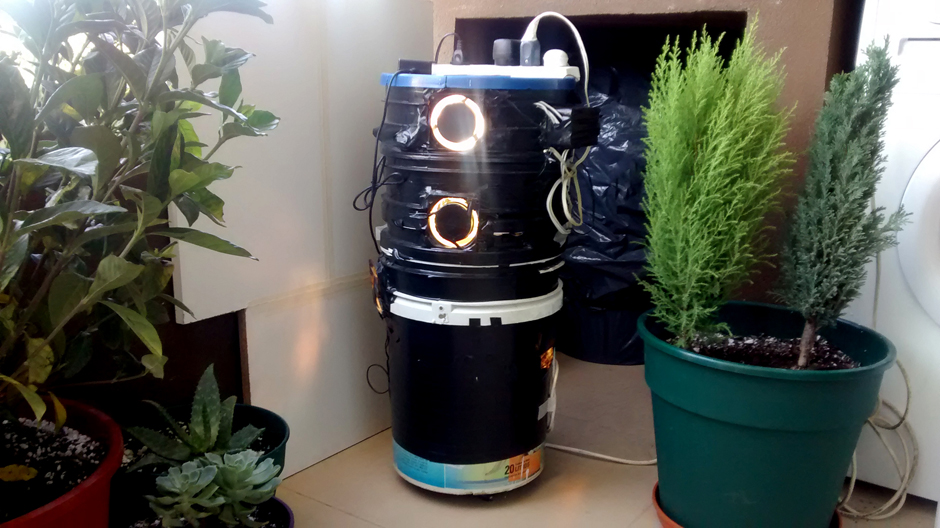
After thinking long and hard about the approach to this growth, I ended up deciding on a space bucket design.
Space buckets are a great option for those on a budget and are small enough to hide in many places around the house, and they can also be stacked as well. Let’s go through all the components of this build:
- 3 on 19 liters buckets with one lid.
- 4 Phillips, 23 Watts, 6500K CFL bulbs, four E27 sockets which will hold the bulbs,
- 1 lamp cord to supply power,
- 2 120 millimeter PC fans,
- 1 12 volt power adapter to get them spinning,
- some thin mylar sheets,
- 1 plug timer,
- the cheapest bag of soil I could find at Amazon,
- and for nutrients, I’ll be using One-Shot by Nectar of the Gods.
To start the build, I first cut two of my buckets in half right below the plastic ribs. I gave myself about two to three inches below the ribs so it would still stack inside the other buckets. I’m using a dremel to create a pilot cut and then I finish the cuts with a jigsaw. If you don’t have access to a jigsaw or a dremel, you can do this with a hot knife, but please make sure to be careful.
You can see how easy it is to gain more vertical height with this design. If my plant does become crowded, I can easily add another section to the space bucket to gain a few more inches, and in veg, I won’t use any so I can keep my CFLs closer to my plant, which should reduce stretching. Next, I’m going to drill some holes on the base of my lowest bucket. This will allow water to easily pass through my medium and drain out. Standing water can lead to root rot, so I’m adding in quite a few just to be safe.
It’s now time for one of the most tedious parts of this build, and that is securing the mylar. At first, I tried securing either side with a piece of tape, but that ended up in utter failure. So instead I rolled the mylar up and moving little by little, I secured it down with glue. Once the mylar was laid out, I then squeegeed the bubbles with a business card. Before I secured the mylar on the uppermost section of the space bucket, I drilled the holes for my E27 light sockets and proceeded to test the fitment of my CFLs. To secure the sockets, I removed the two screws that hold the rear metal bracket and the ceramic housing together.
Next, I lined up the ceramic housing with screws to my pre-drilled holes and finally re-tightened them once I had the bracket on the other side. Don’t make the same mistake that I did and place the CFLs at the same height. You need to stagger them slightly so they can all fit inside the bucket without touching each other. I opted to use four 6500K bulbs, which is a suitable light spectrum for both veg and flower. However, I’d recommend picking up some warmer temperature CFLs for the flowering stage, which will help promote bigger and denser buds. I might swap out a few bulbs later in this grow, but for now, I’m just going to stick with what I got. Each bull pulls 23 watts, which means we have around a hundred true watts for this one plan, which isn’t bad at all.
The next step is to install the exhaust fan onto the lid. You can use the lid as it is, but I modified mine by attaching one of the plastic bucket bases to the rim of the lid to gain a few extra inches and clearance above my CFLs. I then cut out a small section of the lid and drilled four holes so I could attach the PC exhaust fan. For the lower intake, I cut a square that matches the dimensions of the fan. After it was cut, I simply wedged the fan into the hole and sealed the inside gap with some metal tape.
Now with all my electrical components installed, it’s time to wire everything up. For the lights, it’s pretty straight forward. Black goes to black and white goes to white. I brought all the cords to one point on the bucket and then I attached them to the lamp wire. I also made sure to cover each connection carefully with some electrical tape and also secured the wires to the bucket using some zip ties.
Wiring up the fans is also pretty straight forward. I first cut the end of my 12-volt power supply and separated the hot neutral wire. I then cut and strip both wires on my PC fans and attached them to the power supply. Before attempting any of this at home, keep in mind you can easily hurt yourself or potentially start a fire if this is done incorrectly. Ask someone for help if you don’t know what you’re doing and always remember to proceed at your own risk.
Now that everything is wired up, I can add in my soil, which has been premixed with a small amount of One-Shot. The last thing to do now is to get everything plugged in and test it out. One benefit of using CFL bulbs is they don’t produce a ton of heat. With my intake and exhaust fans, I’m keeping the internal temperature of the bucket at a consistent 75 degrees Fahrenheit, which is perfect for growing. Having the fans integrated into this build does introduce some light leaks. I would suggest keeping the space bucket in a dark closet or a cabinet during the time of your growth. This will not only make it more discreet but can reduce the chance of a plant re-vegging or harming because it’s exposed to light during a plant’s rest period.
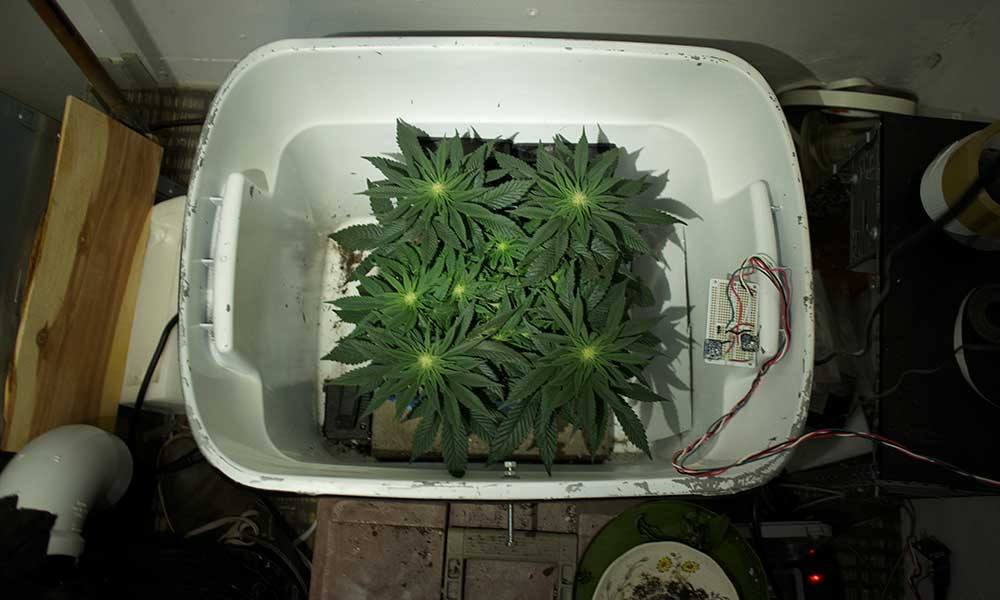
All in all, I’m completely stoked for this growth. My plan to maximize my yields and use my space effectively is running a single photoperiod and mainlining it low and close to the soil. Once I have four to six tops produced, I’ll send her into flower almost immediately to get her finished up. Don’t think you’re run some eight-week veggies in a setup like this. Because space is so limited, it’s optimal to flower a plant as soon as you can. At the same time, if I do run into issues with space, I’ll just add in my extension section and even possibly make another.
What do you think about the space bucket growth? If you had a hundred dollar budget, how would you spend it? Let me know in the comment section below. I’m not expecting any amazing yields out of this bucket, but if anything it’ll be a fun and challenging growth that will truly test the limits of a micro-budget build. If I even pull an ounce off this grow, it’ll pay for itself within the first cycle.

