
How to Create a DIY Temperature and Humidity Control System for Cannabis
Maintaining ideal temperature and humidity levels is crucial for a successful cannabis grow, yet it can be challenging for beginners. Fluctuations in these conditions can cause various problems, including slow growth, pests, and mold. It’s essential to create a temperature and humidity control system to ensure a healthy and bountiful cannabis crop. While there are many commercial options available, a cost-effective and customizable solution is a DIY system. In this article, we’ll guide you through the process of building a DIY temperature and humidity control system for your cannabis grow, step-by-step. Whether you have a small closet or a large grow room, this guide will provide a comprehensive overview of the components required and the steps involved in building an efficient and effective system.
Why Temperature and Humidity Control is Important for Cannabis Grow
Contents
Maintaining the proper temperature and humidity levels is crucial for a successful cannabis grow. Temperature and humidity control affect the growth rate, yield, and potency of the cannabis plants. If the temperature and humidity are not well-maintained, it can lead to various problems such as mold, mildew, and bacteria growth.
Optimal Temperature and Humidity Levels for Cannabis
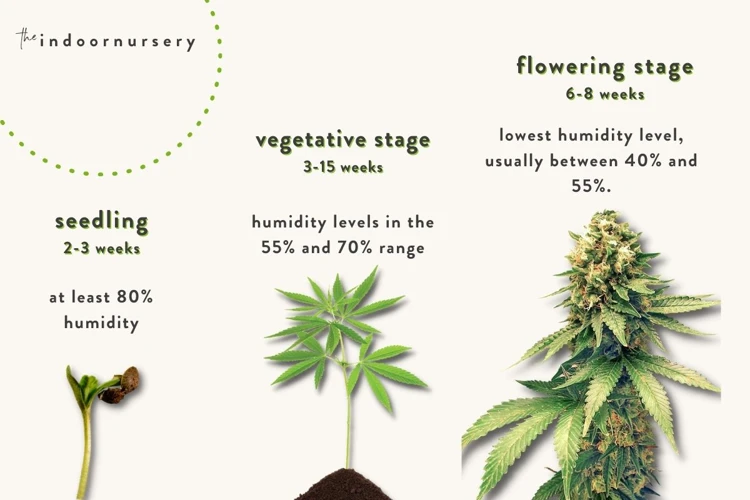
Cannabis plants thrive in a temperature range of 68-77°F (20-25°C) during the day and 58-70°F(14-21°C) at night. The humidity level should be maintained between 45% to 55% during the vegetative stage and 40% to 50% during flowering. These optimal levels can provide a favorable environment for the cannabis plants to grow and reach their full potential.
Challenges Faced in Temperature and Humidity Control
One of the biggest challenges cannabis growers face is controlling the temperature and humidity levels in their grow room. The temperature can fluctuate throughout the day, depending on the outside climate and the heat generated by the grow lights. Humidity levels can fluctuate due to factors such as watering, transpiration, and ventilation.
Another challenge is identifying temperature and humidity imbalances. If the temperature is too high, it can cause the cannabis plants to wilt and the leaves to curl. If the temperature is too low, it can slow down the growth rate, reduce yield, and leave the plants vulnerable to diseases. Similarly, if the humidity is too high, it can lead to mold and mildew growth, while low humidity can cause the plants to dry out and stunt their growth.
Conclusion
Maintaining the proper temperature and humidity levels is critical for a successful cannabis grow. Growers should be aware of the optimal ranges for temperature and humidity and the challenges that arise in controlling these factors. By using a DIY temperature and humidity control system, you can help maintain the ideal environment for your cannabis plants and avoid common mistakes. If you want to learn more about temperature and humidity control for your cannabis grow, check out our guide on the topic or explore some common mistakes to avoid.
Optimal Temperature and Humidity Levels for Cannabis
The optimal temperature and humidity levels for cannabis are crucial for healthy plant growth and optimal yields. When it comes to temperature, cannabis plants thrive in a range of 68-77°F (20-25°C) during the day and slightly cooler temperatures of 58-70°F (14-21°C) at night.
Maintaining proper humidity levels is equally important. During the vegetative stage, the ideal humidity level ranges from 40-70%. During the flowering stage, it should be around 40-50% to discourage mold growth on the buds. High humidity levels can lead to mold growth and other diseases, while low humidity can cause the plant’s leaves to become dry and brittle.
It’s important to note that these optimal temperature and humidity levels can vary depending on the strain and genetics of the plant. Some strains may require slightly higher or lower temperatures and humidity levels to thrive. It’s essential to research the specific needs of your strains before setting up your DIY temperature and humidity control system.
By maintaining the ideal temperature and humidity levels throughout the entire growth cycle, you can significantly improve the overall health and yield of your cannabis plants. A DIY temperature and humidity control system can help you achieve these optimal conditions and cultivate healthy and robust plants.
Challenges Faced in Temperature and Humidity Control
Maintaining the proper temperature and humidity levels in a cannabis grow can be a challenging task for many growers. One of the main challenges faced in temperature and humidity control is achieving the perfect balance between the two variables.
If temperatures get too high: cannabis plants can become stressed and may even die. High temperatures also increase the risk of pests and diseases. Additionally, high temperatures can cause the plant to stretch, which can lead to weaker stems and reduced yields.
If temperatures get too low: cannabis plants can also become stressed and growth may slow down. This can result in stunted growth and reduced yields.
If humidity levels get too high: it can lead to the growth of mold, mildew, and other harmful pathogens. Humidity levels that are too high can also cause plants to become stressed and may lead to loss of flower quality.
If humidity levels get too low: cannabis plants can start to wilt, and growth may slow down. Low humidity can also lead to an increase in transpiration, causing the plant to lose more water than it can take up, which can cause wilting and stunted growth.
Another challenge faced in temperature and humidity control is maintaining consistency. Temperature and humidity levels can fluctuate throughout the day and night, and even small changes can have a significant impact on cannabis plants.
Finally, environmental factors can also affect temperature and humidity levels. For example, the outside temperature and humidity, as well as the amount of sunlight that enters the grow space, can impact the internal environment. This means that growers need to monitor and adjust their temperature and humidity control system regularly to ensure that their plants are growing in the optimal environment.
Components of a DIY Temperature and Humidity Control System
When building a DIY temperature and humidity control system for your cannabis grow, there are several components that you will need to consider. These components play a critical role in regulating the environment that your cannabis plants will grow in, keeping them healthy and promoting optimal growth.
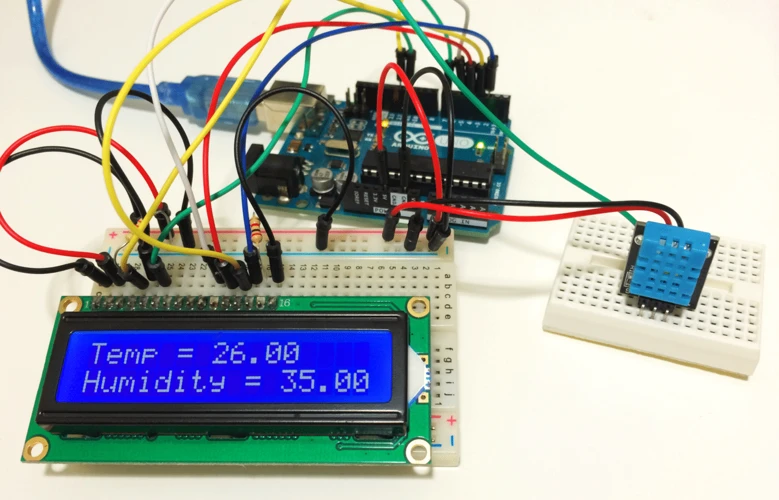
Thermometer and Hygrometer: The thermometer and hygrometer are essential tools for monitoring the temperature and humidity levels in your grow space. The thermometer measures the temperature while the hygrometer measures the humidity. It is important to keep a close eye on these readings, as they can greatly affect the health of your plants.
Heater and Humidifier: Depending on where you live and the time of year, you may need to add heat or humidity to your grow space. A heater can help to maintain the optimal temperature range for your cannabis plants, while a humidifier can add moisture to the air when necessary.
Exhaust Fan and Dehumidifier: In addition to adding heat and humidity, you may also need to remove excess heat and humidity from your grow space. An exhaust fan can help to vent out hot and stale air, while a dehumidifier can help to remove excess moisture from the air.
Controllers and Timers: To automate your temperature and humidity control system, you will need to install controllers and timers. These devices will help you to set and maintain the ideal temperature and humidity levels for your cannabis plants. You can set specific temperature and humidity ranges and the controllers will adjust the heater, humidifier, exhaust fan, and dehumidifier as needed.
Together, these components form the basis of a DIY temperature and humidity control system for your cannabis grow. By carefully selecting each component and installing them properly, you can create an environment that will promote optimal growth and help you achieve a successful harvest.
Thermometer and Hygrometer
Two essential components of a DIY temperature and humidity control system for your cannabis grow are the thermometer and hygrometer. The thermometer is responsible for measuring the temperature in your grow space, while the hygrometer measures the humidity levels. Both of these devices are important for ensuring that your cannabis plants receive the right conditions for optimal growth.
It’s important to choose a high-quality thermometer and hygrometer for accuracy. You can choose from digital or analog options, depending on your personal preference. Digital options tend to be more precise, while analog options provide a classic aesthetic.
When installing your thermometer and hygrometer, be sure to place them at plant level in a central location in your grow space. This will provide the most accurate readings of the temperature and humidity levels that your plants are experiencing.
You can also choose to invest in a combination thermometer and hygrometer, which will measure both temperature and humidity levels. This is a convenient option if you want to simplify your set up.
The thermometer and hygrometer are crucial components of your DIY temperature and humidity control system. Accurate and reliable measurements of these factors will provide optimal growing conditions for your cannabis plants, leading to healthy development and higher yields.
Heater and Humidifier
Maintaining the optimal temperature and humidity levels for your cannabis grow can be a challenge, especially if you live in an area with fluctuating weather conditions. This is where a heater and humidifier come in handy. A heater helps to maintain a warm environment for the plants, especially during the colder months when temperatures can drop drastically. On the other hand, a humidifier helps to regulate the moisture levels in your grow space.
Before purchasing a heater or humidifier, it’s important to consider the size of your grow space. If you have a small grow tent, a portable heater and humidifier should suffice. However, for larger grow rooms, you may need to invest in more powerful heaters and humidifiers.
When choosing a heater, look for one with a built-in thermostat that can control the temperature automatically. This will help to prevent overheating and ensure that the temperature stays within the optimal range for your plants. It’s also important to choose a heater with a fan to help circulate warm air within the grow space.
Similarly, when choosing a humidifier, look for one with a built-in hygrometer that can measure the level of humidity in the air. This will prevent over-humidifying or under-humidifying your grow space. A humidifier with adjustable settings is also recommended so that you can customize the humidity level to suit your plants’ needs.
When installing your heater and humidifier, make sure they are placed in a safe and secure location. Keep them away from the reach of your plants to prevent accidental damage or fire hazards. It’s also important to regularly check them and ensure they are functioning properly.
A heater and humidifier are essential components of a DIY temperature and humidity control system for your cannabis grow. By investing in these tools, you can create a stable environment for your plants to thrive and produce high-quality buds.
Exhaust Fan and Dehumidifier
Maintaining proper humidity levels in a cannabis grow space can be a difficult task. This is where the exhaust fan and dehumidifier come into play.
The Exhaust Fan: An exhaust fan pulls the hot and humid air out of the grow space, allowing fresh air to enter. This helps to control the temperature and humidity levels in the space. You can choose the size of the fan according to the size of your grow space.
The Dehumidifier: While the exhaust fan helps to regulate temperature, the dehumidifier comes in handy to regulate the humidity levels. A dehumidifier works by drawing in humid air and removing excess moisture before circulating the dry air back into your grow space.
It is important to note that when using an exhaust fan and dehumidifier together, the exhaust fan should be turned on before the dehumidifier. This allows the fan to remove the moist air before the dehumidifier works to remove excess moisture from the air.
When purchasing an exhaust fan and dehumidifier, it is important to pay attention to their capacity and power usage. These components tend to use large amounts of energy, so it is important to select the right-sized unit for your grow space. An improperly-sized exhaust fan or dehumidifier can lead to wasted energy and ineffective humidity control.
The combination of an exhaust fan and dehumidifier can help maintain proper temperature and humidity levels in a cannabis grow space, ensuring healthy plant growth and maximizing yield.
Controllers and Timers
Controllers and timers are essential components in a DIY temperature and humidity control system for your cannabis grow. They help regulate the temperature and humidity levels by turning the heater, humidifier, exhaust fan, and dehumidifier on and off based on pre-set conditions.
One type of controller commonly used in cannabis grows is a thermostat controller. It works by sensing the temperature in the grow room and activating the heater or the exhaust fan as needed to maintain the desired temperature. Some more advanced thermostats allow for programming multiple temperature set points for different stages of the plant’s growth cycle.
Another type of controller is a hygrostat, which regulates the humidity levels in the grow space. It uses a sensor to measure the relative humidity levels and activates the humidifier or dehumidifier as needed to achieve the desired humidity range.
Timers are also crucial in a control system as they enable you to determine how long the devices should operate. Timers can be used to set the duration that the heater or humidifier should be on or off. For example, a timer can be set so that the heater turns off for 30 minutes every hour to avoid overheating the grow space.
When selecting controllers and timers, there are various options available to suit different needs and budgets. Some controllers have digital displays that show the current temperature or humidity levels in the room, while others use LED lights or audible alarms to indicate changes in environmental conditions.
It’s important to make sure that the controllers and timers you choose are compatible with the devices they will be controlling. Some controllers come with built-in relays that can handle high voltages, while others require additional relays to be wired in.
Controllers and timers are critical components in a DIY temperature and humidity control system for your cannabis grow. By accurately regulating these environmental factors, you can create optimal conditions necessary for your plants’ growth and development.
How to Build a DIY Temperature and Humidity Control System
Building a DIY Temperature and Humidity Control System can be done in a few easy steps. Here is how you can do it:
Step 1: Determine the Size of Your Cannabis Grow Space
The first step is to determine the size of your cannabis grow space. This will help you determine the size and type of equipment you will need. You can measure the dimensions of your grow space and calculate the square footage.
Step 2: Install the Thermometer and Hygrometer
Next, install a thermometer and hygrometer in your grow space. This will help you monitor the temperature and humidity levels. Place the thermometer and hygrometer at plant level for accurate readings.
Step 3: Install the Heater and Humidifier
Install a heater and humidifier in your grow space. The heater will keep the temperature at the desired level and the humidifier will maintain the correct humidity level. Make sure to choose equipment that is sized appropriately for your grow space.
Step 4: Install the Exhaust Fan and Dehumidifier
Install an exhaust fan and dehumidifier in your grow space. The exhaust fan will help remove stale air and bring in fresh air, while the dehumidifier will help control excessive moisture. Again, choose equipment that is sized appropriately for your grow space.
Step 5: Install the Controllers and Timers
Install controllers and timers for your equipment, so they can operate automatically. Controllers will help maintain consistent temperature and humidity levels, while timers will control when the equipment turns on and off. This is important for energy savings and to prevent overworking the equipment.
Once you have installed all the equipment and controllers, test your system to make sure everything is working together as intended.
Troubleshooting Your DIY Temperature and Humidity Control System
In the event that your DIY Temperature and Humidity Control System is not working properly, there are a few common issues that you can troubleshoot. Some problems might include equipment that is too small for your grow space, malfunctioning equipment or incorrect settings on your controllers. Ensure that all equipment is operating optimally, and adjust settings as necessary.
Building a DIY Temperature and Humidity Control System for your cannabis grow is a great way to maintain optimal conditions for healthy plant growth. With proper planning and installation, you can create a system that is customized to your specific grow space needs.
Step 1: Determine the Size of Your Cannabis Grow Space
To build an effective DIY temperature and humidity control system for your cannabis grow, you must first determine the size of your grow space. This step is critical as it impacts the size and type of components you need to gather for your system.
Start by measuring the square footage of your grow area. This could be a closet, tent, room, or any other designated space for cannabis cultivation. You can use a tape measure or a laser measuring device to determine the length, width, and height of your area.
Once you have these measurements, calculate the total cubic feet of your grow space by multiplying the length, width, and height. This will help you determine the appropriate capacity for the heater, humidifier, and dehumidifier you’ll need for optimal temperature and humidity control.
Keep in mind that different strains of cannabis may require slightly different conditions, so consult with a professional or do your research on the optimal temperature and humidity levels for your particular strain. It’s better to err on the side of caution and invest in a system that can handle a slightly larger capacity than what is necessary to ensure optimal growth and yield.
By taking the time to accurately determine the size of your cannabis grow space, you can ensure that you have the right components in the right capacity to build an effective DIY temperature and humidity control system. This will set you up for success in achieving optimal growth and high-quality yields.
Step 2: Install the Thermometer and Hygrometer
The thermometer and hygrometer are essential tools for monitoring the temperature and humidity levels in your cannabis grow space. Before installing them, it’s important to determine the optimal temperature and humidity levels that your plants need to thrive.
Optimal Temperature and Humidity Levels for Cannabis
The optimal temperature range for cannabis plants is between 68°F and 77°F during the day and 10°F cooler at night. The optimal humidity range is between 40% and 60%.
Thermometer and Hygrometer
There are many types of thermometers and hygrometers available, but it’s important to choose ones that are accurate and easy to read. Digital meters are a popular choice because they are easy to read and provide accurate readings.
When installing the thermometer and hygrometer, it’s important to place them at plant height to ensure that you are monitoring the conditions that your plants are experiencing. You can use hooks or mounts to attach them to a nearby wall or to the inside of your grow tent. Make sure they are easily visible and accessible for regular readings.
It’s also important to calibrate your thermometer and hygrometer periodically to ensure that they are providing accurate readings. To do this, follow the manufacturer’s instructions or use a calibration kit.
Once your thermometer and hygrometer are installed and calibrated, regularly check the readings and adjust your grow environment as necessary to maintain optimal temperature and humidity levels. This will help ensure healthy and productive cannabis plants.
Step 3: Install the Heater and Humidifier
To create a comfortable environment for your cannabis plants, you will need to install a heater and humidifier in your grow space. The heater is used to maintain the temperature at the desired level, while the humidifier can help to increase the humidity levels.
1. Choose the Right Heater
Before purchasing a heater, you need to consider the size of your grow space. A common rule of thumb is to use around 30 watts of power per square foot of grow space. You can choose between different types of heaters, such as ceramic, oil-filled or electric heaters. Ceramic heaters are a popular choice, as they are energy-efficient and effective at maintaining a consistent temperature.
2. Install the Heater
When installing the heater, make sure to place it in a location that won’t be obstructed by other equipment. You may want to consider using a reflective material to help distribute the heat throughout the grow space evenly. It is also important to ensure that the heater is positioned away from any flammable materials, such as curtains or paper.
3. Choose the Right Humidifier
Just like with the heater, you need to consider the size of your grow space before choosing a humidifier. A good rule of thumb is to use at least a 1-gallon humidifier for each 100 square feet of grow space. You may want to consider using a humidifier with a built-in hygrometer, so you can monitor the humidity levels within the grow space easily.
4. Install the Humidifier
To install the humidifier, place it in a location that will distribute humidity evenly throughout the grow space. You can also use a fan to help circulate the humid air. Make sure to fill the humidifier with distilled water and clean it regularly to avoid any bacterial growth.
5. Use the Heater and Humidifier in Conjunction with the Thermometer and Hygrometer
To ensure that the temperature and humidity levels stay within the desired range, it is important to use the heater and humidifier in conjunction with the thermometer and hygrometer. Adjust the settings on both the heater and humidifier as necessary to maintain optimal conditions for your cannabis plants.
By following these steps, you can effectively install and use a heater and humidifier in your DIY temperature and humidity control system for your cannabis grow.
Step 4: Install the Exhaust Fan and Dehumidifier
Once the temperature and humidity levels are under control with the help of the heater and humidifier, the next step in building a DIY temperature and humidity control system for your cannabis grow is to install the exhaust fan and dehumidifier.
The Exhaust Fan
An exhaust fan helps expel stale air and excess heat from the grow space. It also provides fresh air that your plants need for efficient photosynthesis. To install an exhaust fan, first find an appropriate location for it. This is usually at the highest point of the grow space. Next, mount the fan securely using the manufacturer’s instructions. Finally, connect it to the ventilation ducting with the help of duct clamps.
The Dehumidifier
A dehumidifier removes excess moisture from the air, especially during the flowering stage when the plants are more susceptible to mold and mildew. To determine the ideal size of the dehumidifier for your cannabis grow, consider the size of your grow space and the desired humidity level. Once you’ve purchased the appropriate dehumidifier, place it in a location where it can easily access the air in the grow space. Be sure to follow the manufacturer’s instructions for operating and maintaining the dehumidifier.
It’s important to note that the exhaust fan and dehumidifier should work together to maintain optimal temperature and humidity levels in the grow space. The exhaust fan expels hot, stale air while the dehumidifier removes excess moisture. Both devices should be connected to a controller or timer, which will enable you to set the desired temperature and humidity levels and automate the process.
Installing an exhaust fan and dehumidifier is an important step in building a DIY temperature and humidity control system for your cannabis grow. With the right equipment and setup, you can ensure that your plants are growing in an environment that promotes healthy growth and higher yields.
Step 5: Install the Controllers and Timers
Now that you have installed the thermometer, hygrometer, heater, humidifier, exhaust fan, and dehumidifier, it’s time to add the controllers and timers to complete your DIY temperature and humidity control system.
Controllers: A controller is a device that allows you to set specific temperature and humidity ranges and then adjusts the connected devices (heater, humidifier, fan, dehumidifier) to maintain those levels. There are many types of controllers available, but for a DIY system, a basic digital controller with a temperature probe and humidity sensor is sufficient. Simply plug in your devices to the controller’s outlets and set your desired temperature and humidity levels.
Timers: Timers are used to control when your devices (heater, humidifier, fan, dehumidifier) turn on and off. This is important because you don’t want your devices running 24/7, as this can waste electricity and potentially damage your plants. A timer can be used to set a schedule for when your devices turn on and off based on the specific needs of your plants. For example, you may want your fan to turn on for 15 minutes every hour to circulate air, or your dehumidifier to turn on for 30 minutes every four hours to maintain the desired humidity level.
When installing your controllers and timers, it’s important to place them in a location that is easily accessible and close to your devices. You may also want to consider using surge protectors or power strips to ensure safe and organized power distribution. Once you have everything set up, test your system and make any necessary adjustments to ensure it’s functioning properly.
Remember to regularly monitor your temperature and humidity levels, and adjust your controllers and timers as needed to maintain optimal growing conditions for your cannabis plants. With a DIY temperature and humidity control system, you can have peace of mind knowing that your plants are in a controlled environment that will help them thrive.
Troubleshooting Your DIY Temperature and Humidity Control System
If you have built a DIY temperature and humidity control system for your cannabis grow, there’s a chance that you may face some issues. However, troubleshooting these issues is not rocket science, and with a little bit of effort, you should be able to get your system up and running smoothly.
Common Issues and Solutions:
Issue: Temperature is too high or low.
Solution:
Check the position of your thermometer and adjust it if necessary. Also, make sure that you have installed the heater or fan correctly and that there is no obstruction in their way. If the issue persists, you may need to invest in a higher-quality heater, fan or air conditioning unit to regulate the temperature more precisely.
Issue: Humidity is too high or low.
Solution:
Check your hygrometer’s calibration and adjust it if necessary. Also, ensure that your humidifier and dehumidifier are working correctly, and that the exhaust fan is running correctly to ventilate the room. If you live in an area with high humidity, you may need to install a dehumidifier, and if you live in a dry area, you may need to invest in a humidifier.
Issue: Controllers and timers are not working.
Solution:
Check the wiring of your controllers and timers, and adjust the settings if necessary. You may also want to try resetting the device to its factory settings. If the issue persists, you may need to replace the device or contact the manufacturer for additional guidance.
Issue: Noise is too loud.
Solution:
Make sure that all components are installed correctly and securely in their positions. You may also want to invest in sound attenuation materials like acoustic foam or noise-reducing curtains. If the issue still persists, you may need to replace the components with alternatives that generate less noise.
Issue: Electrical interference.
Solution:
Check the electrical grounding of your system to eliminate any interference. Also, ensure that the components are not placed too close to each other and check that there is no faulty wiring. You may also want to consider investing in a surge protector to safeguard your setup from electrical fluctuations.
Building a DIY temperature and humidity control system for your cannabis grow is an excellent way to ensure optimal growth conditions for your plants. However, it’s important to be prepared to troubleshoot any issues that may arise. By following the guidelines and solutions mentioned above, you should be able to overcome most of the common issues with ease.
Common Issues and Solutions
Even with careful planning and installation, there may be issues that arise with your DIY temperature and humidity control system. Here are some common problems and their solutions:
Issue 1: Inconsistent Temperature or Humidity
If you notice that your temperature or humidity levels are fluctuating, it may be due to inadequate insulation or air leaks in your grow space. Check for any gaps in your walls, windows or doors, and use weather stripping or caulking to seal them up. Additionally, make sure your exhaust fan or dehumidifier is properly sized for your space and is running at the correct setting.
Issue 2: Equipment Malfunctions
If any of your equipment, such as the heater or humidifier, is not functioning properly, there may be wiring issues or a defective component. Double-check all wiring connections and make sure the power source is working correctly. If the problem persists, consider replacing the faulty equipment.
Issue 3: Overheating or Overhumidification
If your temperature or humidity levels are consistently above the optimal range for cannabis growth, it can lead to stunted plants, mold, or other issues. First, double-check that your controller is set to the correct temperature and humidity levels. If that is not the issue, try adjusting the settings on your heater or humidifier or adding a fan to improve air circulation.
Issue 4: Excessive Noise
Some components of your temperature and humidity control system, such as the exhaust fan, may produce excessive noise. Try moving the fan to a different location or adding sound-absorbing materials, such as acoustic foam, to reduce the noise level.
Issue 5: Electrical Safety
It is important to ensure that your DIY temperature and humidity control system is safe and does not pose a fire hazard. Make sure all components are grounded and use surge protectors to prevent electrical overload. Never overload an electrical circuit, and always follow product instructions when wiring or installing equipment.
By understanding and addressing these common issues, you can ensure that your DIY temperature and humidity control system works effectively and efficiently, providing ideal growing conditions for your cannabis plants.
Conclusion
In conclusion, creating a DIY temperature and humidity control system for your cannabis grow can be a cost-effective and rewarding project. By maintaining optimal temperature and humidity levels, you can ensure that your plants grow healthy and produce high-quality buds.
The key components of a DIY system include a thermometer and hygrometer to measure temperature and humidity, a heater and humidifier to increase levels, and an exhaust fan and dehumidifier to reduce levels. Controllers and timers can also be used to automate the system and maintain precise levels.
When building your system, it’s important to carefully consider the size of your grow space and to properly install each component. Troubleshooting common issues, such as temperature fluctuations and excess humidity, can also be critical to the success of your system.
With some planning and effort, a DIY temperature and humidity control system can be a valuable tool for any cannabis grower. Not only can it improve your yields and plant health, but it can also give you a greater understanding and appreciation for the intricacies of cannabis cultivation. So, roll up your sleeves and get ready to build a better grow!
Frequently Asked Questions
What is the best temperature for growing cannabis?
The optimal temperature range for cannabis cultivation is between 68-77°F (20-25°C) during the day, and 59-68°F (15-20°C) during the night.
What is the best humidity level for growing cannabis?
The ideal humidity range for cannabis cultivation is between 40-60% RH. During the vegetative stage, humidity can be slightly higher, around 50-70%, and during the flowering stage, lower, around 40-50%.
Why is temperature and humidity control important for cannabis growth?
Temperature and humidity control is crucial for cannabis growth, as it helps to ensure the plants maintain optimal conditions for photosynthesis and respiration, while also reducing the risk of pathogens and mold.
What are the challenges faced in temperature and humidity control?
The key challenges include maintaining consistent temperature and humidity levels throughout different stages of the plant’s life cycle, and preventing excess humidity that can lead to mold and mildew.
What is a hygrometer and why is it important?
A hygrometer is a device used to measure humidity levels. It is important for cannabis cultivation to ensure that the plants are in the optimal humidity range, as excessive humidity can lead to mold and mildew.
What is a controller and how does it help in temperature and humidity control?
A controller is a device that allows you to set and maintain specific temperature and humidity levels. It can be programmed to turn on or off other devices such as heaters and humidifiers, helping to maintain consistent conditions.
What is the purpose of an exhaust fan and how does it work?
An exhaust fan helps to remove moist air and excess heat from the grow space, promoting better air circulation and reducing the risk of mold and mildew. It works by pulling air out of the grow space and venting it outside.
What is a dehumidifier and how does it help?
A dehumidifier is a device used to reduce excess moisture in the air. It helps to prevent mold and mildew growth, while also creating a more comfortable and healthy environment for the plants to grow in.
How can I troubleshoot my temperature and humidity control system?
If your system is not maintaining the desired temperature or humidity levels, you can check for any malfunctioning components such as the thermometer or heater. You can also adjust the settings on the controller or timer to see if this improves conditions.
Can I use a DIY temperature and humidity control system for other plants?
A DIY temperature and humidity control system can be used for other plants as well, as long as you adjust the settings to accommodate their specific needs. Different plants can have different temperature and humidity preferences, so it’s important to research their requirements before setting up your system.

