
How to Make DIY LST Tools for Cannabis
As a cannabis grower, you may have heard of Low Stress Training (LST) techniques to improve your plant’s growth and yield. LST involves gently bending or tying down the branches of your plant to create a more even and uniform canopy, allowing for better light penetration and ultimately, bigger buds. While there are many tools available in the market to aid in LST, they can come with a hefty price tag. That’s why as a budget-conscious gardener, you might want to consider making your own plant benders and clips. Not only can you save money with this DIY approach, but you can also customize your tools and even improvise with household items. In this article, we’ll discuss step-by-step instructions on how to create your own LST tools and how to use them to maximize your cannabis yield.
Why Make Your Own LST Tools?
Contents
Are you wondering whether it’s worth the effort to make your own LST tools instead of simply buying them? It’s a valid question, but there are several reasons why you might want to consider taking on this DIY project. Let’s explore some of the benefits of making your own LST tools. From saving money to customizing your tools to suit your needs, there are plenty of advantages. Plus, you’ll find that you can even improvise and create tools using household items. Keep reading to find out more. And if you’re new to LST, be sure to check out our guide on getting started with LST and our comparison of LST vs. HST training techniques.
Save Money
One of the main benefits of making your own LST tools is that it can save you money in the long run. Instead of buying expensive commercial tools, you can create your own for a fraction of the cost. Here is a breakdown of potential cost savings:
| Commercial LST Tools | DIY LST Tools | Potential Cost Savings |
|---|---|---|
| Plant Benders: $10-$20 each | DIY Plant Benders: <$5 each | $5-$15 per bender |
| Plant Clips: $0.50-$1 each | DIY Plant Clips: <$0.10 each | $0.40-$0.90 per clip |
As you can see, making your own LST tools can save you significant amounts of money, especially if you have a large garden. You can customize your tools to fit the specific needs of your plants without breaking the bank.
Customization
One of the great advantages of making your own LST tools is the ability to customize them to your specific needs. When you buy pre-made plant benders and clips, they may not fit your plants or your grow space perfectly. By making your own tools, you can create them in the exact size and shape you need. This not only makes it easier to train your plants, but also helps to optimize your yield.
Here are some ways you can customize your LST tools:
| Customization Option | Explanation |
|---|---|
| Size | You can adjust the length and width of your benders and clips to fit your specific plants and grow space. |
| Shape | You can mold your plant benders into any shape that works best for your plants. This could include a simple curve or a more complex shape to accommodate multiple branches. |
| Strength | You can adjust the strength of your benders and clips by using different materials or changing the thickness of the wire or plastic. This allows you to use the right amount of pressure to train your plants without damaging them. |
| Color | If you want your LST tools to blend in with your plants or grow space, you can choose a color that matches the surroundings. Alternatively, you can use a bright color to make it easier to spot your tools and avoid accidentally damaging your plants. |
These are just a few of the ways you can customize your LST tools. By making your own benders and clips, you have the flexibility to create tools that work best for you and your plants.
Improvise with Household Items
When it comes to creating LST tools, you don’t necessarily need to invest in expensive or specialized equipment. With some creativity, you can create your own tools using common household items. Here are a few ideas to get you started:
- Bobby pins: These simple hair accessories can double as plant clips. Gently manipulate them to create a hook shape, which makes it easy to attach them to your plant’s branches without causing damage.
- String: If you need to pull down a branch but don’t have a proper bender, you can use string to tie it down instead. Just be sure to loop the string through your pot to keep it anchored in place.
- Paperclips: Similar to bobby pins, paperclips can be bent into small hooks that are perfect for gently holding back branches. You can also use them to anchor string in place.
- Chopsticks: Wooden chopsticks can be used to gently prop up or manipulate branches. They are also useful for creating small trenches in your soil, which can be used to train roots to grow in a specific direction.
- Twist ties: The kind of twist ties that come with bread bags or produce can be repurposed as plant ties. They’re strong enough to hold up heavy branches but can be twisted off easily once you’re ready to remove them.
By getting creative with household items, you can save money and still achieve great results with your LST techniques. As with any improvised tool, be sure to test it out gently on your plants to ensure you’re not causing any damage.
Supplies Needed
Before we start making our own LST tools, we need to gather the necessary supplies. Here is a list of items that you will need to make your own plant benders and clips:
For Plant Benders:
- Wire Cutters: You will need a good quality set of wire cutters to shape your bender.
- Wire: You can choose between steel or copper wire in varying thicknesses; make sure the wire is pliable enough to bend without breaking.
- Pliers: Needle-nose pliers will come in handy for shaping your bender.
- Pen or Marker: This will be used to mark the wire where you want to create a bend.
For Plant Clips:
- Wire Cutters: Wire cutters will be needed to cut the wire to the desired length.
- Wire: Thin gauge wire is ideal for making plant clips. You can use craft or floral wire from your local hardware or craft store.
- Scissors: Scissors will be needed to cut the tubing or straws.
- Tubing or Straws: You will need some sort of tubing or straws to serve as a protective coating for the wire once it is bent.
By gathering these basic supplies, we can move on to the next steps of making our own plant benders and clips. Don’t worry if you don’t have all of these items on hand – many can be purchased inexpensively from your local hardware or craft store, or improvisations can be made with household items.
How to Make Plant Benders
As we all know, Low Stress Training (LST) is a great way to promote bigger yields in your cannabis plants. And a key component of LST is using plant benders to gently shape and train your plants’ branches. But did you know that you can easily make your own plant benders using basic supplies you may already have at home? It may seem daunting at first, but with some simple steps and a bit of creativity, you’ll be bending and shaping like a pro in no time. So, let’s dive into this DIY project and learn how to make your own plant benders!
Step 1: Gather Materials
To make your own plant benders and clips, you will need to gather some basic materials. Here’s a list of what you will need:
| Plant Benders | Plant Clips |
| Pliers | Wire cutters |
| 1/8-inch aluminum rod | 1/8-inch aluminum wire |
| Pen or pencil | Scissors |
| Ruler or measuring tape | Cloth tape or electrical tape |
For the plant benders, you will need pliers, 1/8-inch aluminum rods, and a pen or pencil. Aluminum rods can be found at most hardware stores and are inexpensive. You will also need a ruler or measuring tape to ensure that you cut the aluminum rod to the correct size.
For the plant clips, you will need wire cutters, 1/8-inch aluminum wire, and scissors. You will also need cloth tape or electrical tape to hold the clips in place.
Gathering these materials before beginning the DIY process will make the process smoother and more efficient.
Step 2: Shape Your Bender
Step 2: Shaping Your Bender
Now that you have gathered all the necessary materials, it’s time to shape your plant bender. Follow these detailed steps to make the perfect bender for your LST needs:
- Prepare your pliers: Begin by taking your pliers and covering the jaws with electrical or duct tape. This is to avoid any damage to the metal when bending it.
- Bend the wire: Take the wire and start bending it into a “U” shape. You want the wire to measure about 6 inches in length, so make sure to mark it off before bending. With your pliers, grasp the wire at the top of the bend and begin forming the loop of the “U” shape. Make sure that the loop is centered and that both sides of the wire are of equal length.
- Bend the ends: Once you have formed the loop, use your pliers to bend the two ends upwards at a 90-degree angle. You want the ends to be about an inch in length. This is where you will wrap the wire around the stem of your plant, so make sure that the ends are strong enough to hold in place.
- Bend the curves: Using your pliers or your hands, gently shape the curves of the “U” shape to resemble a horseshoe. This will make it easier to wrap around your plant stem without causing any damage.
- Secure the ends: Take some more electrical or duct tape and wrap it tightly around the two ends of the wire. This will create a smooth surface and prevent any scratching or damage to your plant when you wrap it around the stem.
By following these steps, you will be able to create your own LST bender that is customized to fit your specific plant and growing situation. Not only will this save you money, but it will also give you a sense of pride and accomplishment as you watch your plants grow and flourish with your homemade tools.
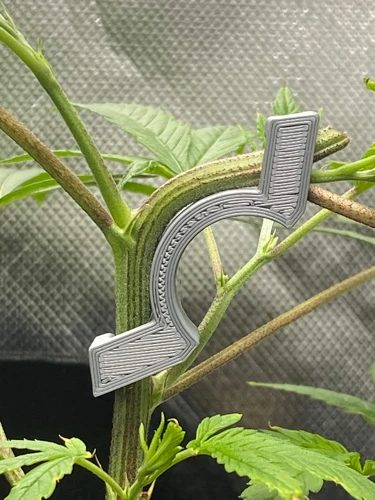
Step 3: Use Your Bender
After you have shaped your plant bender, it is time to put it to use! Here are the steps for using your DIY plant bender:
| Step | Instructions |
|---|---|
| 1 | Select the branch that you want to train. It’s best to choose a branch that is still young and flexible, as it will be easier to bend without causing damage. |
| 2 | Gently bend the branch to the desired angle using your bender. Be careful not to break or damage the branch in the process. If it feels too stiff to bend, try applying some pressure with your fingers or a pair of pliers first to soften it up. |
| 3 | Secure the branch in place using plant clips or twine. This will prevent it from snapping back into place or falling over. You can also use another plant bender to hold it in place if necessary. |
| 4 | Monitor the branch over time to make sure that it is maintaining its desired shape. As the plant grows, you may need to adjust the placement of your clips or benders accordingly. |
By following these steps, you can effectively train your cannabis plant to grow in the way that you want it to, resulting in a higher yield and better overall quality. However, it is important to be patient and gentle with your plant as you work with it, as rough handling can cause stress and damage that may hinder its growth.
How to Make Plant Clips

As we continue our exploration of DIY LST tools for training cannabis, let’s turn our attention to plant clips – an essential tool for securing your plants in the desired position without damaging them. Whether you’re dealing with heavy colas or delicate stems, having a reliable set of clips is crucial for successful LST. Don’t worry if you think you need to go out and buy expensive clips – we’ll show you how to make them yourself with just a few household materials! Keep reading to learn the step-by-step process for creating your own DIY plant clips.
Step 1: Gather Materials
Before you start making your own plant benders and clips, let’s ensure you have all the materials needed. Here’s a list of everything you’ll need to make your DIY LST tools:
| Plant Benders | Plant Clips |
|---|---|
| Wire coat hangers | Paper clips |
| Pliers | Small zip ties |
| Small towels or washcloths | Thin plastic tubing |
| Gloves (optional) | Scissors |
Tip: When choosing wire hangers, try to find the ones with the thinnest and most pliable wire, as these will be easier to shape into benders. And for plastic tubing, you can use materials such as aquarium air tubing or even bendy straws.
By gathering all the necessary materials beforehand, you can ensure that you have everything you need to make your DIY LST tools and avoid any unnecessary trips to the store.
Step 2: Cut Your Materials
To make your DIY plant clips, you will need to start by gathering your materials. Once you have collected all the necessary supplies, it is time to move on to the next step: cutting your materials.
Materials Needed:
- Wire hangers or heavy gauge wire
- Garden tape or rubber tubing
- Nail clippers or wire cutters
Cutting Your Materials:
- Using your nail clippers or wire cutters, cut the wire hangers or heavy gauge wire into pieces that are about 5-6 inches in length. You will need one piece for each clip that you plan to make.
- Next, cut a small piece of garden tape or rubber tubing that is about 1 inch in length.
Tips:
- Be sure to use caution when cutting the wire, as it can be sharp and cause injury.
- It may be helpful to wear gloves while handling the wire and cutting it.
With your materials cut and ready to go, you can now move on to the next step: assembling your clips.
Step 3: Assemble Your Clips
Now that you have your materials cut to the appropriate sizes, it’s time to assemble your plant clips. This step requires some attention to detail to ensure that your clips are both effective and durable.
Step 3: Assemble Your Clips
To do this, lay out all of your materials in front of you, and follow these steps:
| Step | Action |
| 1 | Take one of the 2-inch pieces of tubing and two of the ¾-inch pieces of tubing. Insert each ¾-inch piece into the ends of the 2-inch piece to create a “T” shape. |
| 2 | Take one of the small sections of wire and bend it into a “U” shape using your pliers. Insert one end of the wire through one of the ¾-inch tubes on the “T” shape. |
| 3 | Bend the other end of the wire so that it loops over the opposite ¾-inch tube on the “T” shape. |
| 4 | Thread the straight end of the wire through one of the holes in the binder clip. |
| 5 | Bend the wire around the base of the binder clip to secure it in place. |
| 6 | Repeat steps 2-5 with the second piece of wire and the second binder clip. |
When you’ve finished assembling your clips, take a moment to make sure that each binder clip can be easily opened and closed. Adjust them as necessary to ensure that they are easy to manipulate.
Making your own plant clips allows for customization to your specific grow setup and saves money on the cost of pre-made clips. By following these simple steps, your plants will have the support they need to thrive during LST.
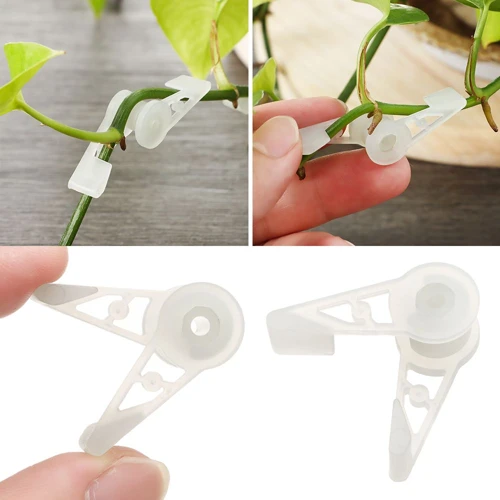
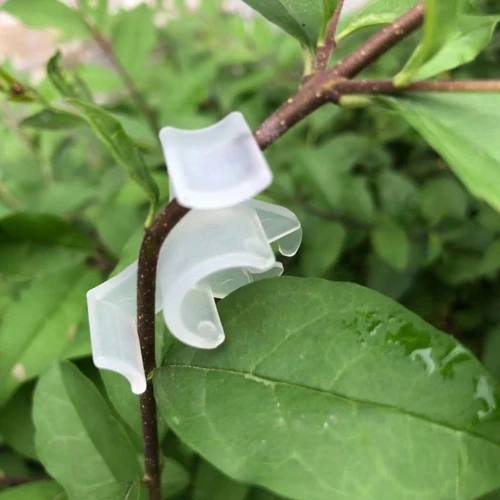
Step 4: Use Your Clips
Once you have made your plant clips, it’s time to start using them to train your cannabis plants. Here are the steps to follow:
- Identify the branches to clip: Look for branches that are growing too tall or unevenly in comparison to the rest of the plant.
- Clip the branches: Using your strong and sturdy clips, gently pinch the base of the identified branches, then secure it to the stake or trellis. Be sure not to pinch too tightly as this can damage the branch.
- Monitor the plant: Keep a close eye on the plant as it grows to ensure the clips aren’t causing any damage or stress. If you notice any problems, adjust the clips accordingly.
- Maintain the clips: Check the clips regularly to ensure they haven’t come loose or caused damage to the plant. Replace any damaged or slack clips as necessary.
Using plant clips will help you train your cannabis plants to grow in a more optimal way, which can ultimately lead to a higher yield. However, it’s important to use them correctly and consistently to avoid any unnecessary damage or stress to the plants. With a little bit of practice, you’ll soon become an expert at using these DIY clips for LST purposes.
Using Your DIY LST Tools
After crafting your own DIY LST tools, it’s time to put them to use. But where do you start? Utilizing these tools requires an understanding of best practices for training cannabis and maximizing yield. By discovering how to use your plant benders and clips effectively, you can ensure that your plants will grow in the direction you desire, ultimately maximizing your harvest. Let’s explore the best approaches for using your DIY LST tools.
Best Practices for Training Cannabis
Proper training of your cannabis plants is crucial to maximize your yield. Here are some best practices to consider when training your plants:
| Technique | Description |
|---|---|
| Low Stress Training (LST) | This technique involves gently bending and tying down the branches of your plant to encourage the growth of multiple colas instead of just one main cola. LST should be started while the plant is still young and flexible and continued throughout the vegetative stage. |
| TOPPING | By cutting off the top of your plant’s main stem, you encourage the growth of two main colas instead of just one. This can be done during the vegetative stage and can result in a bushier plant with more potential for larger yields. |
| FIMMING | This technique is similar to topping, but involves only cutting off part of the main stem instead of the entire top. By using this method, you can encourage even more branches to grow and potentially increase your yield even further. |
| SCROGGING | SCROG stands for “Screen of Green”. This technique involves setting up a screen above your plants and weaving the branches through it to encourage horizontal growth and create an even canopy of buds. SCROGGING can result in higher yields, but requires more time and effort. |
| PRUNING | Regular pruning of your plants can encourage air circulation and prevent the growth of small, popcorn buds. You should remove any leaves or branches that are blocking light from reaching lower branches, as well as any dead or dying material. |
Implementing these training techniques can result in a higher yield and a more bountiful harvest. However, it is important to remember that proper timing and technique are crucial to avoid damaging or stunting your plant’s growth. Be sure to research each method thoroughly and be gentle when handling your plants.
Maximizing Your Yield
If you’re looking to maximize the yield of your cannabis plants, utilizing LST techniques with your homemade benders and clips can greatly increase your success. Here are some tips to help you get the most out of your DIY LST tools.
1. Be patient: LST takes time and patience, so don’t rush the process. Gradual bending of the stems over the course of several weeks will produce the best results.
2. Focus on lower branches: By bending and tying down the lower branches, you can help promote upward growth and increase the overall yield of your plant.
3. Don’t stress your plants: While LST can be beneficial for your plants, it’s important not to over-stress them. Avoid bending the branches too aggressively, as this can damage the stem and potentially harm the plant.
4. Use discretion: Each plant is unique, so it’s important to assess the individual needs of your plants as you’re implementing LST techniques. Some plants may require more bending and training than others.
5. Stay consistent: Consistency is key when it comes to LST. By consistently bending and training your plants, you can help promote healthy growth and optimize your yield.
By following these best practices, you can ensure that your DIY LST tools are being used to their fullest potential and help you achieve the maximum yield from your cannabis plants.
Conclusion
In conclusion, making your own LST tools can be a cost-effective and creative way to train your cannabis plants. By using household materials and a little ingenuity, you can create customized plant benders and clips that suit your individual needs.
Remember to always prioritize safety when making and using DIY LST tools. Wear protective gloves and eyewear when cutting and shaping materials, and ensure that your tools are secure and stable before using them on your plants.
When training your cannabis plants, it is important to be patient and observant. Monitor your plants regularly to ensure that they are responding well to your training techniques. Adjust your methods as needed to achieve the desired shape and maximize your yield.
By using these DIY LST tools, you can also develop a deeper understanding of your plant’s growth patterns and how they respond to stress. This can lead to a more intimate and rewarding growing experience overall.
In summary, making your own LST tools is a great way to save money, exercise your creativity, and optimize your cannabis cultivation. With a little experimentation and technique, you can train your plants into the desired shape, and enjoy a bountiful harvest. Happy growing!
Frequently Asked Questions
What is LST and why is it important for cannabis growers?
LST stands for Low Stress Training, a technique used by cannabis growers to manipulate the shape of the plant and increase yield. It involves bending and manipulating the plant as it grows to maximize light exposure and increase the number of bud sites.
What are the benefits of making your own LST tools?
By making your own LST tools, you can save money, customize the tools to fit your specific needs, and improvise with household items to create effective tools without spending a lot of money.
What supplies do I need to make my own plant benders?
To make plant benders, you will need a sturdy wire, pliers, and a ruler or measuring tape.
Can I use any wire to make plant benders?
No, it is important to choose a sturdy wire that can hold the weight of the plant without breaking or bending out of shape.
What supplies do I need to make my own plant clips?
To make plant clips, you’ll need a strong paper clip or a thin wire, a small piece of PVC pipe, and pliers.
Do I need to use PVC pipe to make plant clips?
No, you can use any small, durable item that is easy to grip and can hold the wire or paper clip in place.
How do I use plant benders?
To use plant benders, gently curve the wire around the stem of the plant and adjust it as needed to manipulate the shape of the plant as it grows.
How do I use plant clips?
To use plant clips, line up the stem of the plant with the piece of PVC pipe and use the wire or paperclip to secure the plant to the pipe. This will help support the weight of the plant and open up bud sites to improve yield.
What are the best practices for training cannabis with LST techniques?
When using LST techniques to train cannabis, it’s important to start early and be gentle with the plant. Avoid manipulating the stem too aggressively, as this can cause damage and slow down growth. Be patient and monitor the plant’s progress regularly.
How can I maximize my yield with LST techniques?
To maximize yield with LST techniques, focus on spreading out the bud sites and manipulating the plant to maximize light exposure. Regularly monitor the plant and adjust your techniques as needed to promote even growth and reach the desired yield.

