
How to Build an Affordable Cooling System for Your Cannabis Grow Room
As a cannabis grower, one of the most crucial aspects of your crops is maintaining the proper environmental conditions for growth. The temperature and humidity levels in your grow room play a vital role in your plants’ health and yield. If you’re struggling to keep your grow room’s temperature and humidity levels within the optimal range, it might be time to consider building yourself an affordable cooling system. In this DIY guide, we will explore the various cooling system options available to you and provide step-by-step instructions for building budget-friendly systems, such as a DIY bucket air conditioner, a swamp cooler, and a water chiller. With the help of this guide, you can take a proactive approach to ensuring your plants are growing in the best possible environment.
Why Do You Need a Cooling System?
Contents
Maintaining proper temperature and humidity levels is crucial for the successful growth of cannabis plants. If the temperature and humidity levels in your grow room are too high, it can lead to a host of problems, including stunted growth, mold, and mildew. This is where a cooling system comes in handy. It can help regulate the temperature and humidity levels in your grow room, helping your plants grow healthy and strong. But with so many cooling system options available, it can be overwhelming to know which one to choose. Let’s take a closer look at the importance of a cooling system and explore the different options available.
Temperature and Humidity in a Cannabis Grow Room
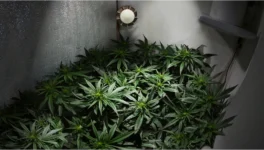
When it comes to growing cannabis, maintaining proper temperature and humidity levels in your grow room is essential for ensuring healthy plants and a successful harvest. Temperature and humidity are two critical factors that play a crucial role in the growth and development of your cannabis plants.
Temperature is a measure of how hot or cold the air in your grow room is. Different stages of plant development require different temperature ranges. Generally, when plants are in the vegetative stage, they prefer temperatures between 70-85°F (21-29°C). When plants reach the flowering stage, temperatures should be reduced to around 65-80°F (18-27°C). High temperatures in the grow room can cause several issues like stunted growth, reduced yield, and even the death of your plants.
Humidity, on the other hand, is a measure of the amount of water vapor in the air. Optimal humidity levels for cannabis vary depending on the stage of growth. In the vegetative stage, humidity levels should be between 40-70%, while in the flowering stage, levels should remain lower at 40-50%. High humidity levels can lead to mold and mildew growth on the plants and lower humidity levels can result in slowed growth.
Ensuring optimal temperature and humidity levels in your grow room can be challenging, but it is necessary for a healthy and successful harvest. A cooling system is an essential investment to regulate the temperature and humidity levels effectively.
How High Temperature and Humidity Can Affect Your Plants
Maintaining the optimal temperature and humidity levels in a cannabis grow room is crucial for the health and yield of your plants. High temperature and humidity can cause various issues that could harm your plants. Here are some of the ways high temperature and humidity can affect your plants:
- Stunted growth: If the temperature in your grow room is too high, your plants’ growth will be stunted. They may stop growing altogether or grow very slowly, which can affect their yield.
- Bud rot: High humidity levels can cause bud rot. If the buds are wet for an extended period, the moisture can encourage mold growth, which will rot the buds.
- Mold and mildew: High humidity can also cause mold and mildew growth on your plants. These problems can be difficult to get rid of and can ultimately kill your plants.
- Lower potency: High temperature and humidity can affect the potency of your plants. The terpenes, flavonoids, and other compounds that contribute to the flavor and effects of your cannabis can be degraded by high temperatures.
- Reduced yield: High temperatures can cause the fruits and flowers of your plants to dry up and fall off prematurely, ultimately leading to a reduced yield.
- Pest infestations: High humidity can encourage pest infestations, such as spider mites and thrips. These insects can cause damage to your plants and reduce their yield.
To avoid these issues, it’s essential to keep the temperature and humidity levels in your grow room at optimal levels. This is where a cooling system comes in handy.
The Benefits of a Cooling System
A cooling system for your cannabis grow room can provide numerous benefits to your plants and overall yield. Here are some of the top benefits of implementing a cooling system:
- Better Temperature Control: With a cooling system in place, you can ensure that the temperature in your grow room stays within the ideal range for cannabis plants. Overly high temperatures can cause stress and damage to your plants, while excessively low temperatures can slow growth and development.
- Reduced Humidity Levels: High humidity levels can also negatively impact your plants, promoting the growth of mold and mildew. A cooling system can help regulate humidity levels and prevent excess moisture from accumulating.
- Improved Quality and Quantity of Yield: When your plants are able to grow in an ideal environment without being subjected to excessive heat or humidity, the result is typically a higher quality and quantity of yield.
- Energy Efficiency: Some cooling options are more energy efficient than others, which can help save on electricity costs over time.
- Cool Plants = Happy Plants: Simply put, a cooler environment can help keep your plants happy and healthy throughout the grow cycle.
Implementing a cooling system in your grow room can help create a stable and optimal growing environment for cannabis plants, resulting in healthier plants and a better yield.
Cooling System Options
When it comes to keeping your cannabis grow room at the right temperature and humidity levels, there are several cooling system options available. Each option has its pros and cons, and choosing the right one can be a daunting task. In this section, we’ll take a closer look at some of the most popular cooling system options and explore their features and benefits. From air conditioning units to DIY bucket air conditioners and water chillers, you’re sure to find an option that suits your needs and budget. So, let’s dive into the world of cooling systems and discover which one is best for you.
Air Conditioning Unit
An air conditioning unit is an effective way to cool a large cannabis grow room. It uses a refrigerant to absorb heat from the air and then expels that heat outside. The cooled air is then blown back into the room. This system can be expensive and may require professional installation. Here are some pros and cons of using an air conditioning unit in your grow room:
| Advantages | Disadvantages |
|---|---|
| Can effectively cool larger grow rooms | Expensive to purchase and operate |
| Offers precise control over temperature and humidity | May require professional installation |
| Can improve yields and plant health | Can be noisy |
| May increase electricity costs |
Keep in mind that an air conditioning unit is a long-term investment, and it may save you money in the long run by reducing the risk of plant damage caused by high temperatures and humidity. However, if you have a small grow space or are on a tight budget, there are other options to consider.
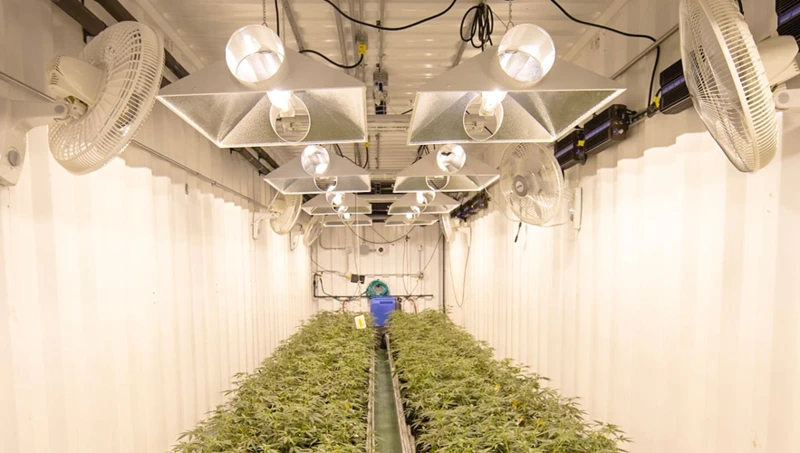
Air Cooled Reflector
One option for a cooling system in a cannabis grow room is an air cooled reflector. This type of cooling system is designed to remove excess heat from the grow lights, which is a major source of heat in any grow room. The reflector itself is typically made of metal, with a reflective inner surface that helps to direct the grow light over your plants.
To cool the air that flows over the grow lights, an air cooled reflector features a built-in ventilation system. This typically includes an inline fan and ducting, which draws hot air away from the grow lights and expels it outside of the grow room. As the hot air is removed, fresh air is drawn into the grow room through passive vents or another intake duct. This helps to maintain a stable temperature and humidity inside the grow room.
One advantage of an air cooled reflector is that it can be highly effective at removing excess heat from your grow lights. Since the reflector sits directly above the lights, it can draw heat away from the source of the problem. Additionally, this type of cooling system is relatively easy to set up and use, since many air cooled reflectors come with all the necessary components already installed.
However, there are some potential drawbacks to using an air cooled reflector as your primary cooling system. For one, this type of cooling system may be relatively expensive to purchase, especially if you opt for a high-quality model. Additionally, the ventilation system used by an air cooled reflector can generate additional noise and require more space in your grow room.
An air cooled reflector can be a highly effective way to reduce the temperature in your cannabis grow room. By removing heat at the source, an air cooled reflector can help to keep your plants healthy and flourishing. However, you’ll need to weigh the costs and potential downsides before deciding if an air cooled reflector is the right choice for your particular grow setup.
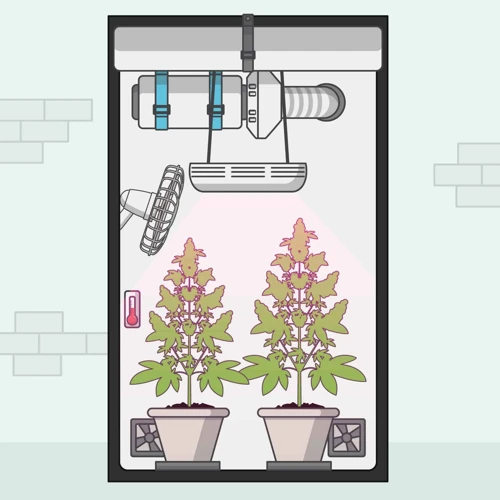
Inline Fans and Ducts
Inline Fans and Ducts are a popular choice for cooling down a cannabis grow room. This option involves the use of fans and ducts to exhaust hot air out of the room and bring in fresh, cooler air from outside.
Using inline fans and ducts is a great way to maintain proper temperature and humidity levels in your grow room, but it can be a bit more complicated than some of the other options on this list. Here’s a breakdown of what you need to know:
| Pros | Cons |
|---|---|
| Efficient at cooling down hot grow rooms | Can be more complicated to set up than other options |
| Helps maintain consistent temperature and humidity levels | May require professional installation |
| Can be combined with other cooling methods for more effective results | Large ducting and fans can take up space in smaller grow rooms |
Before choosing this option, it’s important to consider the size of your grow room and the amount of heat your lights and other equipment generate. You’ll need to choose a fan and ducting system that can handle the amount of hot air you need to exhaust out of the room.
You’ll need to ensure that you have a proper intake system to bring in fresh, cooler air from outside. Some growers choose to use a carbon filter to clean the air before it enters the room, while others simply use a screened vent to prevent pests and debris from entering.
Inline fans and ducts can be an effective way to cool down your grow room, but they do require a bit more planning and installation than some of the other options on this list. If you’re comfortable with some DIY work and have the space and budget for this option, it’s definitely worth considering.
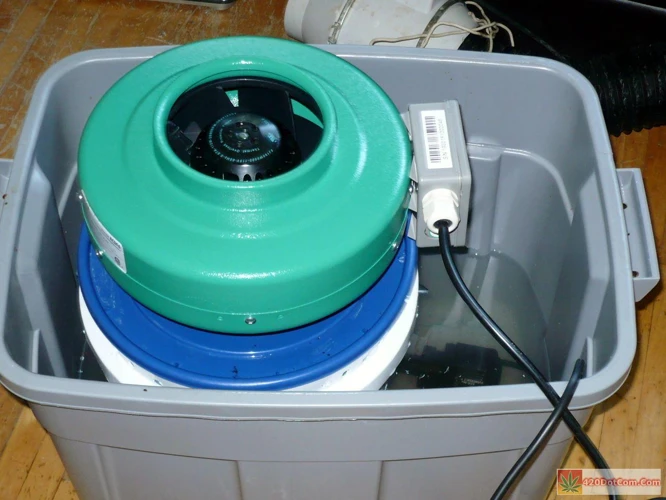
DIY Bucket Air Conditioner
A DIY bucket air conditioner is an affordable and easy way to cool down your cannabis grow room. It uses a basic thermoelectric cooling technology that is available at most hardware or electronics stores. The main components needed to build a bucket air conditioner are listed in the table below:
| Component | Description |
|---|---|
| 5-gallon bucket | A standard 5-gallon bucket with a lid will suffice. |
| Thermoelectric cooling unit | This is the main component of the air conditioner, which can also be called a Peltier device. It can be found in various sizes and capacities, but a 12-volt unit with a power of at least 120 watts is recommended. |
| Fans | You will need two computer fans, one for blowing air into the bucket, and one for blowing the cool air out. |
| 12V power supply | A 12V DC power supply is needed to power the cooling unit. |
| Copper tubing | A small amount of copper tubing is needed to create a heat sink for the cooling unit. |
| Zip ties and duct tape | These will be necessary to secure the fans, power supply, and copper tubing into place. |
| Ice or cold water | To achieve maximum cooling, you will need to fill the bucket with ice or cold water. |
To build the DIY bucket air conditioner, follow these step-by-step instructions:
- Prepare the bucket: Drill two holes in the lid of the bucket. One hole should be large enough for the copper tubing to fit through, and the other should be large enough for the fans to fit through. Cut a hole in the side of the bucket near the bottom for the power supply cord to fit through.
- Attach the fans: Secure one fan to the lid of the bucket over the fan hole using zip ties. Attach the other fan to the side of the bucket over the power supply hole using zip ties.
- Attach the cooling unit: Attach the cooling unit to the inside of the lid of the bucket using duct tape. Make sure that the hot side of the unit is on the outside of the bucket and the cold side is on the inside.
- Create the heat sink: Attach the copper tubing to the hot side of the cooling unit using duct tape. Coil the tubing into a spiral shape and duct tape it to the top of the bucket lid.
- Power the unit: Connect the power supply to the cooling unit and fans. Plug the power supply into a wall outlet or power strip.
- Add ice or cold water: Fill the bucket with ice or cold water, and replace the lid. Turn on the fans and wait for the cool air to circulate.
With these simple steps, you can easily build your own DIY bucket air conditioner to keep your cannabis grow room cool and comfortable.
DIY Swamp Cooler
One of the affordable options for a cooling system in your cannabis grow room is a DIY Swamp Cooler. This type of cooling system uses the concept of evaporative cooling to bring down the temperature and humidity in your grow room.
To build a DIY Swamp Cooler, you will need the following materials:
| 5-gallon bucket | Styrofoam liner | Fan |
| Battery-operated air pump | PVC pipe | PVC end caps |
| Ice | Water | Sharp knife or saw |
Once you have all the materials ready, follow these step-by-step instructions to build your own DIY Swamp Cooler:
- Take your 5-gallon bucket and cut a hole in the center of the lid that is the same size as your fan.
- Insert the fan into the hole and secure it in place using duct tape. Make sure that the fan is facing downwards and is sealed tightly to avoid any air leakage.
- Place the Styrofoam liner inside the bucket. This will help insulate the water and ice from the heat outside the bucket.
- Using a sharp knife or saw, cut two small holes near the top of the bucket. These will be used for the PVC pipes.
- Insert the PVC pipe into one of the holes and add a PVC end cap to the inside of the bucket. Make sure that the end cap is sealed tightly to avoid water leakage.
- Place the battery-operated air pump inside the bucket and attach one end of the air hose to the pump and the other end to the PVC pipe inside the bucket.
- Fill the bucket with water until it reaches just below the PVC pipe.
- Add ice to the water until the bucket is almost full.
- Insert the other PVC pipe into the other hole on the lid of the bucket and add a PVC end cap to the inside of the bucket. Make sure that the end cap is sealed tightly to avoid water leakage.
- Turn on the fan and the air pump. The air from the fan will blow across the ice and cool down, while the air pump will continually push water up through the PVC pipe and create a mist that cools the air even further.
With your DIY Swamp Cooler up and running, you can enjoy a cooler and less humid environment for your cannabis plants to thrive in. It’s an affordable and effective option for growers on a budget.
DIY Water Chiller
If you’re growing cannabis in warm climates, you may find it challenging to maintain a suitable temperature for your plants. One option to consider is building a DIY water chiller. This will help to reduce the temperature of your nutrient solution.
Before you start building your water chiller, make sure you have all the necessary equipment. Here’s what you’ll need:
| Equipment | Description |
| Fish tank or cooler | You’ll use this as a reservoir for your chilled water. |
| Small submersible pump | This will pump the water from the reservoir into the chiller. |
| Copper tubing | You’ll need about 10 feet of this tubing to make your chiller. |
| Heavy-duty zip ties | You’ll use these to hold your copper tubing together. |
| Insulation material | This will help to maintain the temperature of the water. |
| Ice | You’ll need this to initially cool the water in the reservoir. |
Now that you have all the necessary equipment, it’s time to start building your water chiller. Follow these steps:
- Unroll the copper tubing and wrap it around a cylindrical object such as a plastic bottle or PVC pipe. Make sure that the copper tubing is tightly coiled, without any gaps.
- Use heavy-duty zip ties to secure the copper tubing in place.
- Insert one end of the copper tubing into the inlet of your submersible pump and attach the outlet of the pump to the end of the copper tubing.
- Place the submersible pump and copper tubing into the reservoir of water.
- Add ice to the reservoir to cool the water down to the desired temperature.
- Plug in the submersible pump and allow it to circulate the water through the copper tubing. The water will be actively cooled as it passes through the tubing.
- Wrap the copper tubing in insulation material to help maintain the temperature of the water.
Congratulations! You’ve built your very own water chiller. Now you can use this to keep your nutrient solution at the desired temperature for your cannabis plants. Remember to monitor the temperature of the water and adjust the ice or insulation as needed.
How to Build a DIY Bucket Air Conditioner
Are you looking for an affordable and easy-to-build cooling system for your cannabis grow room? Look no further than a DIY bucket air conditioner! With just a few materials and simple steps, you can create a reliable cooling system to keep your plants at optimal temperature and humidity levels. In the following section, we will guide you through the process of building your own DIY bucket air conditioner, highlighting the necessary materials and step-by-step instructions. Don’t let high temperatures compromise your cannabis yields – follow along and learn how to build your own cooling system today!
What You Will Need
To build the DIY cooling system, you will need a few items. Here is a list of what you’ll need:
- A 5-gallon plastic bucket with a lid: This will serve as the main container for the system.
- A small fan: You can use a computer fan or any small fan that can fit inside the bucket.
- PVC pipes and fittings: You will need these to create a duct system for the air to flow through. Make sure you get the size that matches the fan you are using.
- Ice packs or frozen water bottles: This will be the cooling agent for the system. You can use reusable ice packs or fill up plastic bottles with water and put them in the freezer.
- A drill with a hole saw attachment: You’ll need this to create holes in the lid of the bucket for the fan and ducts.
- A box cutter or scissors: This will be used to cut the PVC pipes to the desired length.
- Duct tape: You will need this to secure the PVC pipes and fittings in place.
- A marker: You’ll need this to mark where to drill the holes for the fan and ducts.
Having all of these items on hand will make the process of building your DIY cooling system much easier. Make sure to gather all of these materials before starting the project so that you don’t have to interrupt your work mid-process.
Step-by-Step Instructions
To build a DIY cooling system for your cannabis grow room, we have provided step-by-step instructions on how to build a bucket air conditioner, a swamp cooler, and a water chiller.
DIY Bucket Air Conditioner
What You Will Need:
| 5-gallon bucket | Small fan | PVC pipe | Ice pack or frozen water bottles | Hose or funnel |
Step 1: Drill a hole into the side of the bucket and attach a PVC pipe.
Step 2: Place the small fan on top of the bucket and secure it with zip ties.
Step 3: Fill the bucket halfway with ice or frozen water bottles.
Step 4: Using a hose or funnel, add water to the bucket until it is almost full.
Step 5: Turn on the fan and let the cool air circulate your grow room.
DIY Swamp Cooler
What You Will Need:
| 5-gallon bucket | Fan | PVC pipe | Cooling pad or sponge | Ice pack or frozen water bottles | Hose or funnel |
Step 1: Drill a hole into the side of the bucket and attach a PVC pipe.
Step 2: Cut the cooling pad or sponge to fit inside the bucket.
Step 3: Place the cooling pad or sponge inside the bucket and saturate it with water.
Step 4: Add ice or frozen water bottles on top of the cooling pad or sponge.
Step 5: Use the hose or funnel to add water until the bucket is almost full.
Step 6: Place the fan on top of the bucket and secure it with zip ties.
Step 7: Turn on the fan and let the cool air circulate your grow room.
DIY Water Chiller
What You Will Need:
| Large cooler or container | Aquarium water pump | PVC pipe | Ice | Hydroponic chiller coil or copper tubing | Hose or funnel |
Step 1: Drill a hole into the side of the cooler or container and attach a PVC pipe.
Step 2: Coil the hydroponic chiller coil or copper tubing inside the cooler or container.
Step 3: Fill the container with ice up to the level of the chiller coil or copper tubing.
Step 4: Use the hose or funnel to fill the container with water.
Step 5: Attach the aquarium water pump to the chiller coil or copper tubing.
Step 6: Run the PVC pipe from the container to your plant reservoir.
Step 7: Turn on the water pump and let the cool water circulate throughout your grow room.
By following these simple instructions, you can build an affordable DIY cooling system for your cannabis grow room.
How to Build a DIY Swamp Cooler
If you’re looking for a cost-effective way to cool your cannabis grow room, building your own DIY swamp cooler can be a great option. With basic materials and some simple steps, you can transform a few buckets into a functional system that can reduce the temperature and increase the humidity in your grow room. In this section, we’ll guide you through the process of building your own DIY swamp cooler, from the materials you’ll need to the step-by-step instructions. So, let’s get started and see how you can create a cool and comfortable environment for your plants.
What You Will Need
Before you start building your DIY cooling system, it’s important to make sure you have all the necessary materials. Here’s a list of what you will need for each type of cooling system:
Bucket Air Conditioner
| Materials | Image |
|---|---|
| 5-gallon bucket |  |
| PVC pipe |  |
| Small fan |  |
| Ice packs |  |
| Cutting tool (box cutter or saw) |  |
| Marker or pencil |  |
Swamp Cooler
| Materials | Image |
|---|---|
| Cooler |  |
| Pump |  |
| Fan | |
| Water hose or tubing |  |
| Cutting tool (box cutter or saw) | |
| Marker or pencil | |
Water Chiller
| Materials | Image |
|---|---|
| Reservoir |  |
| Water pump | |
| Copper tubing |  |
| Fittings and valves |  |
| Ice packs | |
| Insulation |  |
Make sure to gather all the necessary materials before starting your DIY project.
Step-by-Step Instructions
Creating a DIY cooling system for your cannabis grow room can seem like a daunting task, but with a little guidance, it is possible to create an affordable and effective solution. Here are the step-by-step instructions for building a DIY bucket air conditioner:
Step 1: Start by gathering all the necessary materials, which include a 5-gallon bucket, Styrofoam liner, PVC pipes, small fan, and ice.
Step 2: Cut out a hole in the lid of the bucket that is slightly smaller than the diameter of the PVC pipes.
Step 3: Using a drill, make holes in the side of the bucket, about 1 inch in diameter. The holes should be spaced evenly around the bucket’s sides.
Step 4: Insert the PVC pipes through the hole cut in the bucket lid. Cut the PVC pipes to length so that they are just below the top of the bucket. Ensure that the pipes have a tight fit in the hole, so outside air does not leak in.
Step 5: Place the Styrofoam liner inside the bucket, ensuring that it’s even on all sides.
Step 6: Insert the small fan into one of the holes drilled in the side of the bucket, ensuring that it’s pointed inward.
Step 7: Fill the bucket with ice, covering the Styrofoam liner. Do not fill the bucket with water, as it can cause the Styrofoam to dissolve.
Step 8: Plug in the fan and turn it on, ensuring that it’s blowing air through the ice and out the PVC pipes.
Step 9: Place the bucket air conditioner in your grow room, and enjoy the cooling effect.
Building a bucket air conditioner is just one of several DIY cooling solutions for your cannabis grow room. With a little creativity and some household materials, you can keep your grow room at optimal temperature and humidity levels to ensure your plants thrive.
How to Build a DIY Water Chiller
If you live in a warm climate, keeping your cannabis grow room cool can be a real challenge. One solution is to build a DIY water chiller, which can help you maintain a consistent temperature and keep your plants from overheating. With just a few basic supplies and some simple steps, you can create a water chiller that is both effective and affordable. In this section, we will guide you through the process of building a DIY water chiller from start to finish. So, let’s dive in and create a custom cooling solution for your cannabis grow room!
What You Will Need
To build a DIY cooling system, you’ll need some basic materials that can be easily acquired from any hardware or home improvement store. Here’s a list of the required items:
- 5-gallon bucket – you can use a new or recycled bucket, depending on your preference.
- Cooling pad – this is a specially designed pad that can absorb and hold water, allowing for evaporation and cooling. It can be found in home improvement stores and online.
- Small fan – choose a fan that can fit inside the bucket and has a strong airflow.
- Vinyl tubing – this will be used to direct airflow from the fan and cool air from the cooling pad. Make sure it fits snugly and is long enough to reach both the fan and cooling pad.
- Water pump – this will be used to circulate the water from the bottom of the bucket to the cooling pad on top. Make sure it has enough horsepower to move the water effectively.
- Plumbing elbow – this will be used to connect the vinyl tubing to the water pump.
- Plumbing tape – use this to seal any leaks or gaps in the connections to ensure efficient water flow.
- Ice packs or frozen water bottles – optional but can provide extra cooling power.
With these materials, you can easily build a DIY cooling system that will effectively cool your cannabis grow room and help your plants thrive.
Step-by-Step Instructions
To build a DIY bucket air conditioner, follow these step-by-step instructions:
Step 1: Gather all the necessary materials, including a 5-gallon bucket with lid, styrofoam liner, PVC pipe, small fan, and ice packs.
Step 2: Cut a hole in the lid of the bucket to fit the PVC pipe.
Step 3: Place the styrofoam liner inside the bucket.
Step 4: Cut a hole in the side of the bucket to fit the small fan.
Step 5: Attach the small fan to the hole in the side of the bucket.
Step 6: Insert the PVC pipe through the hole in the lid of the bucket.
Step 7: Fill the bucket with ice packs.
Step 8: Turn on the small fan and place it in a strategic location to circulate the cool air.
To build a DIY swamp cooler, follow these step-by-step instructions:
Step 1: Gather all the necessary materials, including a large bucket, PVC pipe, styrofoam liner, small fan, and ice packs.
Step 2: Cut a hole in the lid of the bucket to fit the PVC pipe.
Step 3: Place the styrofoam liner inside the bucket and cut a hole in the center to fit the small fan.
Step 4: Insert the PVC pipe through the hole in the lid of the bucket.
Step 5: Fill the bottom of the bucket with ice packs.
Step 6: Fill the bucket with water up to the level of the ice packs.
Step 7: Turn on the small fan and place it in a strategic location to circulate the cool air.
To build a DIY water chiller, follow these step-by-step instructions:
Step 1: Gather all the necessary materials, including a small water pump, copper tubing, insulated tubing, and a cooler.
Step 2: Coil the copper tubing and place it inside the cooler.
Step 3: Run the insulated tubing from the water pump to the copper tubing in the cooler.
Step 4: Fill the cooler with water.
Step 5: Turn on the water pump to circulate the chilled water through the copper tubing.
Step 6: Run the insulated tubing from the cooler to the grow room and attach it to the device you want to cool.
By following these step-by-step instructions, you can easily build affordable cooling systems for your cannabis grow room.
Conclusion
In conclusion, building an affordable cooling system for your cannabis grow room is not only possible, but also quite simple. By understanding the importance of maintaining a proper temperature and humidity level, as well as the negative effects that high temperatures and humidity can have on your plants, you can take the necessary steps to ensure the health and vitality of your cannabis crops.
There are various cooling system options available to suit different budgets and needs. While an air conditioning unit or air-cooled reflector may be the most efficient options, DIY solutions such as bucket air conditioners, swamp coolers, and water chillers are also effective and can be made with basic materials.
When building your own DIY cooling system, it’s important to follow the step-by-step instructions carefully and ensure that you have all the necessary materials before beginning. It’s also important to regularly monitor the temperature and humidity levels in your grow room to ensure that your cooling system is effective.
By investing time and effort in building a reliable and effective cooling system, you can help your cannabis plants reach their full potential and achieve a bountiful harvest. As with any DIY project, it may take some trial and error to find the right solution for your specific setup, but the end result will be well worth it. So don’t let high temperatures and humidity levels ruin your cannabis crops – take action and build your own affordable cooling system today.
Frequently Asked Questions
What is the ideal temperature and humidity range for a cannabis grow room?
The ideal temperature range is between 68°F to 77°F (20°C to 25°C) during the day and 10°F (6°C) less during the night. The ideal humidity range is between 40% to 60%.
What are the dangers of high temperature and humidity in a cannabis grow room?
High temperature and humidity levels can lead to the growth of mold and mildew, reduced plant growth, decreased yield, and even plant death.
What are the benefits of an affordable cooling system for a cannabis grow room?
An affordable cooling system can help maintain the ideal temperature and humidity levels in a cannabis grow room, leading to healthier and more productive plants, higher yield, and increased potency.
What is an air conditioning unit, and how does it work?
An air conditioning unit provides cool air by removing hot air from a room and transferring it outside through a compressor and a refrigerant system. It also removes humidity from the air.
What is an air-cooled reflector?
An air-cooled reflector is a type of device that attaches to the light bulb and uses ducts and inline fans to blow hot air out of the grow room, reducing the temperature and humidity levels.
What are inline fans and ducts, and how do they work?
Inline fans and ducts are types of devices that use a fan to move air through a duct system to and from the grow room to another location outside. They can be used to regulate temperature and humidity levels in a cannabis grow room.
What is a DIY bucket air conditioner, and how does it work?
A DIY bucket air conditioner is a simple and affordable cooling system that uses a bucket, ice, and a fan to blow cool air into the grow room. The cold water from melted ice cools the air inside the bucket, reducing the temperature and increasing the humidity.
What is a DIY swamp cooler, and how does it work?
A DIY swamp cooler uses a combination of water and air to cool a room. It works by blowing hot air through a moist medium, such as a wet sponge, which cools the air through evaporation before blowing it into the room. It is a more natural and affordable way to cool a grow room.
What is a DIY water chiller, and how does it work?
A DIY water chiller cools water down to a desired temperature level, which can then be circulated through the grow room to regulate the temperature and humidity levels. It works by using a refrigerant system to pump cold water through a copper coil, which cools the water down before it is released into the grow room.
What are the advantages of building a DIY cooling system for a cannabis grow room?
Building a DIY cooling system for a cannabis grow room is an affordable and effective way to control the temperature and humidity levels, leading to healthier and more productive plants, reduced risk of disease and pests, and increased potency.

