
Master the Art of Cannabis Curing: Tips for Maximum Potency and Flavor
As a cannabis enthusiast, you’ve likely invested quite a bit of time and energy into growing your beloved buds. So, when it comes time to harvest, you want to ensure that you’re getting the most out of your plants. That’s where curing comes in. But what exactly is curing, and why is it important? In this article, we’ll dive into the ins and outs of curing your buds for maximum potency and flavor, and we’ll provide you with some essential tips to make the process as seamless and successful as possible. So sit back, relax, and get ready to give your buds the love and attention they deserve.
Why is curing important?
Contents
As cannabis enthusiasts, we all want to enjoy the best possible experiences from the products we consume. That’s why curing the buds is such an important step in the overall cultivation process. By allowing the flowers to undergo a carefully controlled drying and aging process, we can enhance both the potency and flavor of our cannabis. But what exactly makes curing so vital? Let us dive deeper into the science behind it.
Preserving potency
When it comes to preserving the potency of your buds, there are a few things to keep in mind. The curing process is crucial for maintaining the terpene and cannabinoid profiles of your flower. Here are some factors to consider:
| Factor | Impact on potency |
| Avoid over-drying | Drying your buds too much can cause them to lose potency, making them less effective. |
| Control humidity levels | High humidity levels can cause mold growth and reduce potency, while low humidity can cause over-drying. |
| Give buds time to cure | The curing process can take several weeks to several months, and rushing it can lead to a loss in potency. |
| Store correctly | Storing buds in a cool, dark place with proper humidity levels will help maintain potency over time. |
By paying attention to these factors, you can help ensure that the buds you harvest maintain their potency and are effective for your desired use.
Enhancing flavor
Once you’ve harvested your buds, trimmed them, and dried them, the curing process can begin. One main reason why curing is so important is that it can greatly enhance the flavor of your buds. Here are a few ways that proper curing can help with flavor:
- Breaks down chlorophyll: When buds are first harvested and dried, they contain high levels of chlorophyll, which can give them a grassy, plant-like taste. Curing helps to break down the chlorophyll and other compounds, resulting in a smoother, more pleasant taste.
- Allows for terpene development: Terpenes are compounds that give cannabis its unique aroma and taste. Curing allows these compounds to fully develop, resulting in a more complex and flavorful profile.
- Reduces harshness: Over-dried buds can be harsh and unpleasant to smoke. By curing at the right humidity levels, buds can be brought to the optimal moisture content for a smoother smoking experience.
- Prevents mold and other contaminants: Curing helps to remove any remaining moisture from the buds and prevent the growth of mold or other contaminants that can negatively affect flavor.
A properly cured bud will not only be more potent but will have a better flavor. Take your time and follow the steps carefully to ensure maximum flavor and enjoyment from your harvest.
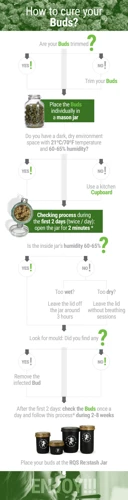
How to Cure Your Buds
Once you’ve harvested your cannabis plants, the key to achieving maximum potency and flavor lies in the curing process. This can be a daunting task for new growers, but fear not! With a few simple steps and some patience, you can cure your buds like a pro. So, let’s dive into the process of bringing out the best in your cannabis with proper curing techniques.
Step 1: Harvest at the right time
Harvesting cannabis is a critical step in the process of curing your buds for maximum potency and flavor. The timing of the harvest is crucial as it can significantly impact the overall quality of the final product.
Here are some key factors to consider when deciding when to harvest your cannabis plants:
| Factor | Considerations |
|---|---|
| Trichome development | The trichomes on your cannabis plants will change from clear to cloudy as they mature. Harvesting before they are fully cloudy can lead to lower potency. Waiting too long can lead to degraded flavor profile. |
| Pistil color | During the flowering stage, the pistils, or hairs, of the cannabis plant will change color. They will start out white and gradually turn dark orange or red. Harvesting too early can lead to less desirable effects, and harvesting too late can lead to decreased potency. |
| Strain characteristics | Each strain of cannabis has unique characteristics that can affect the timing of the harvest. Research and understand your strain to determine the ideal time to harvest. |
| Environment | The environment in which the cannabis plants are grown can impact the timing of the harvest. Outdoor plants may need to be harvested earlier due to weather conditions, while indoor plants can be harvested more precisely. |
When considering when to harvest your cannabis plants, it’s important to be patient and wait until the buds have reached their full potential. Rushing the harvest process can lead to lower potency and a less enjoyable experience overall.
Step 2: Trim the buds
Once you have harvested your buds at the right time, the next step is to trim them. This process involves removing any excess leaves and stems from the buds. Trimming your buds is essential for achieving maximum potency and flavor during the curing process.
Why is trimming important?
When you trim your buds, you remove any leaves that contain lower concentrations of cannabinoids and terpenes. This allows the buds to focus their energy on producing trichomes, which are responsible for producing the cannabis plant’s potent effects and flavor.
How to trim your buds
Trimming your buds can be a tedious process, but it is essential for achieving the best results. Here is a step-by-step guide on how to trim your buds correctly:
| Step 1: | Use scissors or trimming shears to cut off any large leaves that extend beyond the buds’ edges. |
| Step 2: | Use your fingers to gently remove any smaller leaves and stems from the buds. Be careful not to damage the trichomes or the buds. |
| Step 3: | Trim any remaining leaves or stems around the buds’ edges using the scissors or trimming shears. |
| Step 4: | Inspect the buds for any remaining leaves or stems and continue trimming until the buds are clean and free from excess plant matter. |
Trimming tips
Here are some helpful tips for trimming your buds effectively:
- Use sharp trimming shears or scissors to avoid damaging the buds.
- Trim in a clean and dry area to avoid introducing moisture or contaminants to the buds.
- Take breaks to avoid hand fatigue and maintain accuracy.
By following these steps and tips, you can ensure that your buds are properly trimmed and ready for the next stage of the curing process.
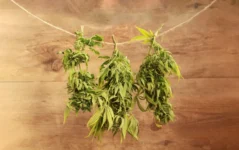
Step 3: Dry the buds
To begin the curing process, you must first dry your buds. This step is crucial in preparing your marijuana for long-term storage. Here are the steps you need to follow to dry your buds correctly:
- Trim the buds: Before drying your buds, you should trim any excess leaves and stems. This will improve the overall quality of your marijuana buds.
- Hang the buds: Once you have trimmed the buds, you can hang them up to dry. Use a string or a wire hanger to hang your buds upside down. This will help the buds dry evenly.
- Dry in a dark, cool place: Your drying area should be dark and cool. Avoid drying your buds in direct sunlight or anywhere that is too humid. Ideally, you want to maintain a temperature of around 70 degrees Fahrenheit and humidity levels of between 45-55%.
- Avoid over-drying: It is important not to over-dry your buds, as this can cause the trichomes to degrade and result in a lower-quality product. Keep an eye on your buds and check them regularly to make sure they are not becoming too dry.
- Cure the dried buds: Once your buds are dry, it’s time to move on to the curing process. Begin by placing your buds in glass jars.
Following these steps will ensure that your buds are dried evenly and at the optimal humidity. Avoiding over-drying is essential for maintaining the potency and flavor of your marijuana buds.
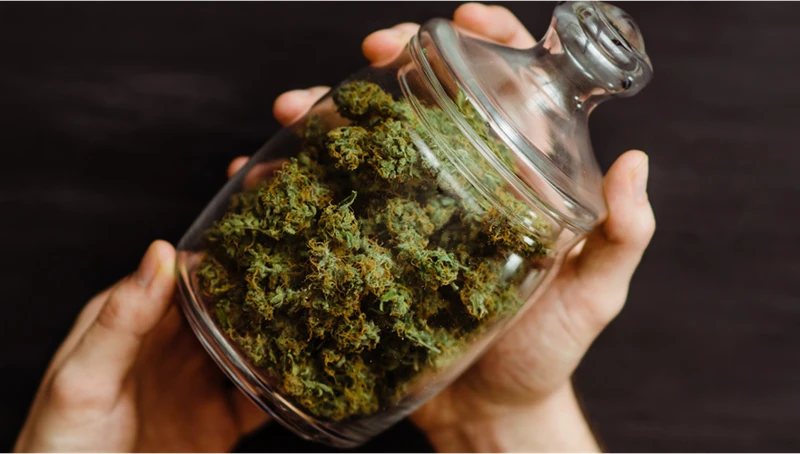
Step 4: Cure in glass jars
To begin the curing process, it is crucial to store your buds in airtight glass jars. Here’s how to do it:
- Fill the jar about ¾ of the way full: Gently place the trimmed buds into the jar, being careful not to over-pack them. You want the buds to have enough space to breathe.
- Label each jar: This step is important so that you can easily identify the strain and the date of when you began the curing process.
- Store the jars in a cool, dark place: Place the jars in a cool, dark environment such as a closet or a drawer. Make sure the temperature is consistent and that the area isn’t exposed to any excess light or heat.
- Keep the jars out of reach of children: As a precaution, make sure to store your jars in a location that is out of reach of children or anyone who shouldn’t have access to them.
After storing your buds in the airtight jars, the curing process can take anywhere from two weeks to several months. It is crucial during this time to regularly check on your buds and burp the jars to release any excess moisture and prevent mold growth.
Step 5: Burp the jars
After your buds have been in the glass jars for a few days, it’s important to “burp” them. What does this entail? Essentially, you’re allowing fresh air to circulate through the jar, which helps to prevent mold growth and ensure that the buds continue to cure properly.
Here are the details for how to burp your jars, step by step:
| Step | Action |
| 1 | Remove the lid from the jar. |
| 2 | Waft the air around the jar so that any built-up moisture can escape. |
| 3 | Leave the jar open for 5-15 minutes, depending on how “moist” the buds are. |
| 4 | Replace the lid on the jar, making sure it’s tightly sealed. |
| 5 | Repeat this process once a day for the first week of curing. |
| 6 | After the first week, you can start burping the jars less frequently (every 2-3 days), but it’s still important to make sure the buds are getting enough fresh air. |
It’s important to note that burping your jars too frequently can lead to over-drying, while not burping them enough can lead to mold growth. Pay close attention to the moisture level of your buds and adjust your burping schedule accordingly. Consistency is key when it comes to curing your buds for maximum potency and flavor.
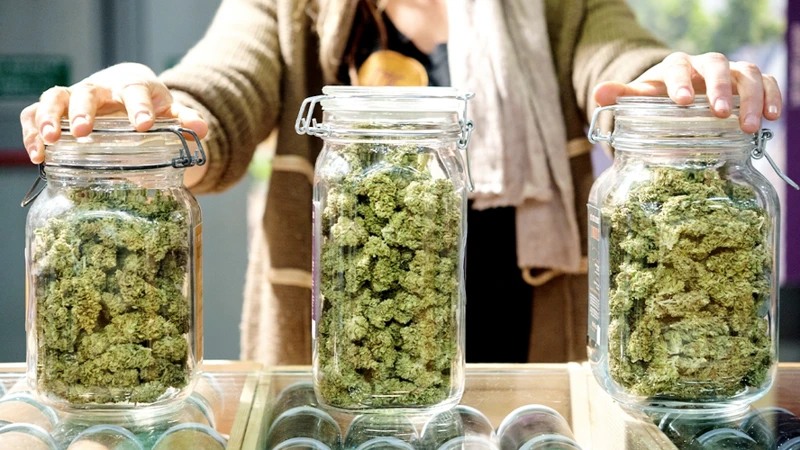
Step 6: Long-term storage
Once you have successfully cured your buds, you can store them for long-term preservation of their potency and flavor. Here are some tips on long-term storage:
| Do: | Don’t: |
|---|---|
|
|
Proper long-term storage will not only maintain the potency and flavor of your buds but also ensure that they remain safe to consume. It is worth investing in good quality storage containers and monitoring the storage conditions to keep your buds in optimal condition for as long as possible.
The Dos and Don’ts of Bud Curing
When it comes to curing your buds, following the right protocols is crucial in achieving the desired potency and flavor. However, it can be difficult to know what to do and what not to do during the process. To help you out, we’ve put together a list of some important dos and don’ts that you should keep in mind. By following these guidelines, you can ensure that you get the best possible results from your efforts. So, let’s dive in and explore what you should and shouldn’t do when curing your buds.
Do: Use humidity packs
To ensure that your buds are cured properly, it is recommended that you use humidity packs. These packs are specifically designed to maintain the optimal humidity levels within your curing jars. Here are some reasons why it’s important to use humidity packs:
- Maintain consistent humidity levels: Humidity packs will help to maintain a consistent level of humidity within your jars. This is important because fluctuations in humidity levels can cause your buds to dry out or become over-humidified, which can affect the potency and flavor of your buds.
- Prevent mold growth: Using humidity packs can help to prevent mold growth on your buds. When the humidity levels are too high, molds thrive and can proliferate on your buds, contaminating them with potentially dangerous toxins.
- Extend the shelf life: Humidity packs can also help to extend the shelf life of your cured buds. By maintaining the optimal humidity levels, your buds will remain fresh and potent for a longer period of time.
When using humidity packs, it’s important to follow the manufacturer’s instructions regarding the number of packs to use, depending on the size of your jars. It’s also essential to use high-quality packs specifically designed for curing cannabis. Cheap or low-quality packs may not provide the appropriate humidity levels or may release harmful substances into your buds.
Do: Store in a cool, dark place
One of the most important things to keep in mind when curing your buds is to store them in a cool, dark place. This is crucial to maintain the potency and flavor of your buds. Here are some reasons why:
- Protection from light: Light exposure can break down the cannabinoids in your buds and reduce their potency. So, it’s important to keep your buds in a dark place to preserve their potency.
- Temperature control: Temperature plays a crucial role in the curing process. If the temperature is too high, it can cause the buds to dry out too quickly and lose their flavor. If the temperature is too low, it can slow down the curing process. So, it’s best to store your buds in a cool place with a temperature between 60-70°F.
- Humidity control: Humidity is also important during the curing process. If the humidity is too high, it can cause mold growth on your buds. If the humidity is too low, it can cause the buds to become brittle and lose their flavor. By storing your buds in a cool, dark place, you can keep the humidity at an optimal level.
Storing your buds in a cool, dark place is an essential step in the curing process. It helps protect your buds from light exposure, maintains optimal temperature and humidity levels, and ultimately enhance their potency and flavor.
Don’t: Rush the process
It can be tempting to rush the curing process in order to get your hands on your freshly harvested buds, but this is a grave mistake that can significantly impact the potency and flavor of your end product. Here are a few reasons why you should not rush the curing process:
- Loss of potency: If you rush the curing process, you risk losing some of the potency of your buds. This is because the curing process allows the bud to further develop and maximize the levels of THC and other cannabinoids. Skipping or shortening this process can compromise the potency of your buds, resulting in a less potent end product.
- Harsh taste: Rushing the curing process can also result in a harsh taste that is unpleasant to smoke or consume. This is because the curing process breaks down chlorophyll and other compounds that contribute to a harsh taste. Skipping or shortening this process can result in an unpleasant aftertaste and harsh smoke.
- Increased risk of mold and bacteria: Proper curing helps to reduce the risk of mold and bacteria growth. When buds are not properly cured, there is a higher risk of mold growth, which can lead to health issues if consumed, and the loss of your entire harvest.
- Wasted time and investment: Rushing the curing process can result in an unsatisfactory product that you may not want to consume or share with others. This means that all the time and investment you put into growing your buds will go to waste.
In order to avoid these negative outcomes, it is important to be patient and take your time with the curing process. Good things come to those who wait, and this saying couldn’t be more true when it comes to curing your buds. By taking your time and allowing the buds to properly develop, you can maximize the potency and flavor of your end product and enjoy a smooth, satisfying smoke.
Don’t: Over-humidify
When curing buds, it’s crucial to maintain proper humidity levels to prevent the growth of mold and to preserve their potency and flavor. However, it’s also important not to over-humidify the buds, as this can lead to issues like mold growth and a harsh taste. Here are some tips to avoid over-humidification:
| Tip | Description |
| Avoid using too many humidity packs | While humidity packs are a great tool for maintaining consistent humidity levels, using too many can lead to over-humidification. Stick to the manufacturer’s recommended usage, and avoid adding packs if the humidity levels are already high enough. |
| Keep an eye on moisture levels | Investing in a hygrometer is a must to keep an eye on moisture levels. Make sure to check the levels regularly, and adjust the number of humidity packs if necessary. |
| Don’t store buds in a humid environment | Buds should be stored in a cool, dark place with low humidity levels. Avoid storing them in an area that is prone to high humidity, such as a bathroom or damp basement. |
| Avoid touching the buds excessively | The natural oils on your fingers can transfer to the buds, which can affect their moisture levels. Try to minimize touching buds as much as possible. |
Over-humidifying buds can be an expensive and frustrating mistake to make, but by following these tips, it’s easy to keep your buds at the perfect humidity levels for maximum potency and flavor.
Troubleshooting Common Curing Mistakes
As with any process, curing cannabis buds can sometimes go awry. Despite your best efforts, you may encounter unexpected results. Don’t panic! A few common mistakes can be easily remedied. Here are some tips to help you troubleshoot some of the most frequent issues you may encounter during the curing process. With a little patience and attention to detail, you can still achieve the desired results of potent, flavorful buds.
Over-drying
One common mistake in curing buds is over-drying them. This can happen if the buds are left to dry for too long or if the humidity is too low during the drying process. Over-drying can lead to harsh smoke, loss of potency, and a less desirable taste. To prevent over-drying, it’s important to monitor the humidity levels during the drying and curing process.
Symptoms
The buds will become overly dry and crispy. The stems will snap easily, and the buds may crumble when touched.
Solutions
If you’ve over-dried your buds, there are a few things you can do to try and bring back some moisture.
| Method | Description |
|---|---|
| Rehydrate with citrus peel | Place a piece of citrus peel (like lemon or orange) in a jar with your buds for a few hours. The moisture from the peel will transfer to the buds. |
| Add moisture packs | Humidity packs can be used to add moisture back to over-dry buds. Place the buds and pack in a jar and monitor the humidity levels closely. |
| Bury in damp soil | If your buds are extremely dry, bury them in damp soil for a few hours. The moisture from the soil will transfer to the buds. |
Prevention
To prevent over-drying your buds, make sure to monitor the humidity levels and not let them get too low. The ideal humidity range for drying and curing buds is between 55-65%. If you live in a dry climate, you may need to use a humidifier or keep a damp towel in the drying room to maintain the proper humidity levels. It’s also important to check your buds regularly and not let them dry for too long.
Mold growth
Mold growth is a common problem that can ruin a batch of carefully cured buds. The key to preventing mold growth is to maintain an optimal level of humidity. If the humidity is too high, it can create the perfect environment for mold to grow.
Causes of Mold Growth
Mold can grow on buds for a variety of reasons, including:
| Cause | Description |
|---|---|
| Poor airflow | If the air isn’t moving enough around the buds, it can create pockets of stagnant air that are perfect for mold growth. |
| High humidity | If the humidity is too high, it can create the ideal conditions for mold to proliferate. |
| Contaminants | If the buds are contaminated with bacteria or fungi, it can increase the likelihood of mold growth. |
Preventing Mold Growth
To prevent mold growth during the curing process, it’s important to take steps to maintain an optimal level of humidity. This means keeping the humidity between 55-65% and ensuring that there is good airflow around the buds. Some other tips for preventing mold growth include:
- Thoroughly inspecting buds for signs of mold before beginning the curing process
- Using humidity packs to regulate humidity levels
- Gently shaking the jars during the burping process to promote airflow
- Storing buds in a cool, dark place to prevent excess moisture from building up
- Disinfecting jars and other equipment before beginning the curing process
Dealing with Mold Growth
If mold does develop on buds during the curing process, it’s important to take action right away. This may involve removing any buds that are visibly contaminated, disinfecting jars and other equipment, and adjusting humidity levels to prevent further mold growth. It’s also important to identify the cause of the mold growth and take steps to correct the underlying issue.
Funky smell
One unpleasant issue that could arise during the curing process is a funky smell. This may indicate that something has gone wrong with the curing process, and it’s important to address the issue as soon as possible to prevent it from getting worse. Here are some possible causes and solutions:
| Possible Cause | Solution |
|---|---|
| High humidity | Check the humidity level in the jars – it may be too high. If so, remove the buds from the jars and let them dry for a few hours before returning them to the jars. Increase the frequency of burping to release excess moisture. |
| Presence of mold or bacteria | Inspect the buds for any signs of mold or bacteria. If any is found, it’s best to discard the affected buds. Wipe down the inside of the jars with a clean cloth and replace the buds with fresh ones. |
| Contamination from neighboring plants | Make sure that the buds are not in close proximity to other plants that could be producing an odor. Also, ensure that the buds are stored in a well-ventilated area to prevent any odors from being trapped inside the jars. |
| Improper drying or curing | If the buds were not properly dried or cured, they may develop a funky smell. Check the buds for any signs of moisture or stickiness – this could indicate that the buds were not fully dried before being placed in the jars. To fix this, remove the buds from the jars and dry them out for a few more days before starting the curing process again. |
Preventing a funky smell is all about closely monitoring the curing process and addressing any issues as soon as they arise. By taking the time to properly dry and cure your buds, you can ensure that they have a potent and delicious flavor that you’ll enjoy for weeks to come.
Conclusion
After following the tips for curing your buds, you should now have a well-preserved and flavorful stash of cannabis to enjoy. The curing process may seem tedious, but the results are well worth the effort. By preserving the potency and enhancing the flavor of your buds, you can enjoy a better smoking experience that will leave you satisfied and impressed.
If you have encountered any issues along the way or have made any mistakes, don’t worry. The curing process can be a bit finicky, and there are common mistakes that even experienced growers make. However, by understanding the dos and don’ts of bud curing, you can avoid making these mistakes and enjoy the best possible results.
Remember to use humidity packs and store your buds in a cool, dark place. Rushing the process or over-humidifying your buds will only lead to disappointment. If you encounter issues such as over-drying, mold growth or a funky smell, there are ways to troubleshoot and fix these problems.
Ultimately, curing buds is a necessary step in the growing process that requires patience and attention to detail. By following the tips outlined in this article and taking the time to properly cure your buds, you will be rewarded with potent, flavorful cannabis that will provide an enjoyable smoking experience.
Frequently Asked Questions
Can I cure my buds right after harvest?
No. To obtain maximum potency and flavor, you should dry and then cure your buds.
What is the ideal humidity level for curing buds?
The ideal humidity level for curing is between 55% and 62% relative humidity.
Can I cure buds in plastic containers?
No. Plastic containers can create static that damages trichomes and affects the flavor. Use glass jars instead.
How long should I cure my buds?
The curing process can last from two weeks to several months. Curing for at least a month will improve flavor and potency.
Why should I burp the jars during the curing process?
Burping the jars removes excess moisture and replenishes the air in the jar, which is necessary for the curing process.
Can I use the buds while they are curing?
While technically possible, it is not recommended as the flavors and potency will not have fully developed yet.
How can I tell if my buds are over-drying during the curing process?
Over-drying can be identified by buds that feel overly crispy and break apart easily. This results in a harsh flavor and less potency.
What can I do to fix mold growth during the curing process?
Remove any affected buds and increase ventilation in the curing area to prevent further mold growth.
Should I wash my buds before curing them?
No. Washing buds before curing can introduce excess moisture and harm the overall curing process.
How can I store my cured buds long-term?
After curing, store your cured buds in an airtight container in a cool, dark place to preserve potency and flavor.

