
The Importance of Proper Drying and Curing Techniques for High Quality Buds
As cannabis enthusiasts, we all strive for the finest product possible, seeking the ultimate high experience with incredible aroma and taste. However, the world of cannabis cultivation is complex, and it’s often easy to overlook or underestimate the importance of proper drying and curing techniques. Without these essential steps, the buds you’ve worked so hard to cultivate may not reach their full potential. In this article, we’ll explore why drying and curing is so crucial, dive into the different techniques for each stage, discuss the factors that affect drying and curing, and provide expert tips for storage after the fact. With this knowledge, you’ll be able to produce high-quality buds that will truly stand out.
Why Drying and Curing is Important
Contents
When it comes to harvesting cannabis, many growers focus solely on the quality of their buds on the plant. However, the drying and curing process is equally important in producing high-quality cannabis. Proper drying and curing techniques not only preserve the potency of the buds but also enhance their flavor and aroma. In this next section, we will explore the reasons why proper drying and curing is vital for producing top-quality cannabis.
Preserve Potency
One of the most important reasons for proper drying and curing techniques is to preserve the potency of your buds. If you don’t dry and cure your buds correctly, you can end up with a weak and ineffective product that won’t deliver the desired effects.
When you harvest your buds, they contain a lot of moisture and chlorophyll. If you smoke or consume the buds immediately after harvesting, you may not feel the full effects of the active compounds. This is because the moisture and chlorophyll can inhibit the cannabinoids and terpenes from releasing.
By properly drying and curing your buds, you can reduce the moisture content and break down the chlorophyll, allowing the active compounds to fully develop. This results in a more potent and effective product that delivers the desired effects and benefits.
Proper drying and curing techniques can prevent the loss of cannabinoids and terpenes. If you dry your buds too quickly or at too high of a temperature, the cannabinoids and terpenes can evaporate or degrade, leading to a less potent and less flavorful product. On the other hand, if you dry and cure your buds too slowly or at too low of a temperature, you can encourage the growth of bacteria and fungi, which can also degrade the quality of your buds.
Taking the time and effort to dry and cure your buds properly is crucial for preserving the potency and quality of your final product.
Enhance Flavour and Aroma
Proper drying and curing techniques not only preserve the potency of your buds, but also enhance their flavor and aroma. When cannabis is initially harvested, it has a grassy or “green” taste and smell. However, through the drying and curing process, the flavor and aroma become more complex and enjoyable. Let’s take a look at some of the factors that contribute to this improvement:
- Terpenes: Terpenes are the organic compounds that give plants their unique aroma and flavor. During the drying and curing process, terpenes are released gradually, resulting in more intense and varied flavors.
- Breakdown of Chlorophyll: Chlorophyll is the green pigment found in plants that helps them produce energy through photosynthesis. When cannabis is initially harvested, it is loaded with chlorophyll, which can give it a harsh taste. Through the drying and curing process, chlorophyll breaks down, resulting in a smoother smoke and a more pleasant taste.
- Oxidation: Oxidation occurs when the compounds in cannabis are exposed to air. This process can take place during the curing process, and it can contribute to the development of different flavor profiles.
By taking the time to properly dry and cure your buds, you can enhance their flavor and aroma and ultimately enjoy a more nuanced and enjoyable smoking experience.
Drying Technique
Proper drying technique is a crucial step in achieving the highest quality buds. This process requires patience and attention to detail in order to prevent mold or over-drying. There are different methods of drying buds, each with their own advantages and disadvantages. Let’s delve into the different techniques and explore how you can achieve perfectly dried buds for the ultimate smoking experience.
Air Drying
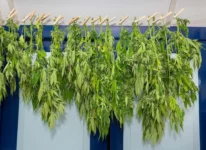
Air drying is the most popular and traditional way of drying cannabis buds after harvesting. It is a simple and cost-effective technique that can be done with minimal equipment. The process involves hanging the buds upside down in a dark, cool and well-ventilated room for several days. Here are the steps to proper air drying:
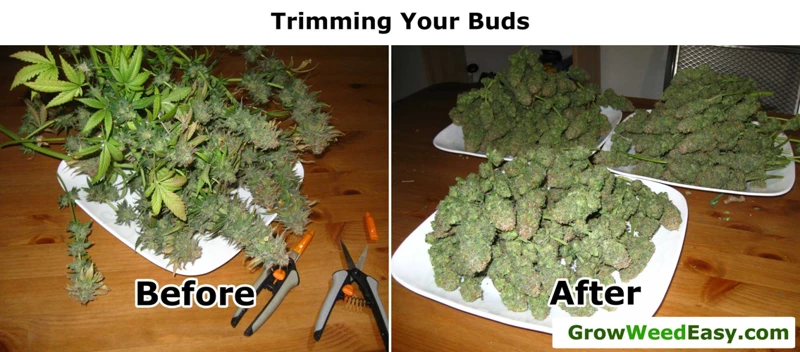
- Trimming: Before air drying, first, remove any excess leaves sticking out of the buds. This will help the buds dry quickly and prevent mold.
- Curing: After trimming, keep the buds in an airtight container for a few hours to let them sweat out any excess moisture. This process jumpstarts the curing process and creates a smoother smoke.
- Hanging: Next, hang the buds in a dark, cool and well-ventilated place. This allows the moisture to evaporate slowly and prevents mold and mildew growth. Make sure to hang the buds upside down to allow for better airflow.
- Monitoring: Keep an eye on the buds and check their progress regularly. Depending on the size and density, the drying process can take anywhere from 5 to 15 days. The buds are ready when they feel crispy to the touch, but not brittle.
- Curing: Once the buds are sufficiently dry, they should be cured in an airtight container such as a glass jar to allow for further moisture exchange.
Air drying is an effective technique for drying buds, but it requires patience and attention to detail. It is important to maintain a consistent temperature and humidity level throughout the drying process to prevent the growth of mold or mildew. Properly dried and cured buds will have a pleasant aroma, flavor, and texture that is sure to impress any cannabis connoisseur.
Water Curing
Water curing is a method of drying and curing cannabis buds that involves soaking them in water for a period of time before drying them. This technique is used to remove any impurities from the buds that could affect their flavour and potency.
The Process of Water Curing
The process of water curing involves soaking the buds in water for several days to remove any dirt, dust, and other impurities that may have accumulated on the surface of the buds during cultivation. To do this, you will need a large container filled with fresh water, and you should change the water every 24 hours or so to ensure that it remains clean and fresh.
After soaking the buds for several days, you will need to dry them in a well-ventilated area to prevent the growth of mold and mildew. The drying process can take several days to a week, depending on the climate and humidity levels in your area.
Once the buds are dry, you can then cure them using one of the techniques described in this article, such as jar curing or vacuum sealing.
The Benefits of Water Curing
Water curing can have several benefits for cannabis growers who want to produce high-quality buds. Some of these benefits include:
| Benefit | Description |
|---|---|
| Removes Impurities | Water curing can remove dirt, dust, and other impurities from the surface of the buds, resulting in a cleaner and more potent finished product. |
| Eliminates Harshness | Water curing can eliminate the harshness that is often associated with poorly cured buds, resulting in a smoother and more enjoyable smoking experience. |
| Reduced Drying Time | Water curing can reduce the overall drying time of the buds by removing excess moisture, resulting in a more efficient and quicker curing process. |
| Improves Flavor and Aroma | Water curing can improve the flavor and aroma of the finished buds by removing any impurities that could affect their taste or smell. |
Conclusion
While water curing may not be as common as other drying and curing techniques, it can be a useful method for growers who want to produce high-quality buds that are free from impurities and have a smooth, enjoyable smoking experience. By following the proper process for water curing and drying, you can produce buds that are potent, flavorful, and enjoyable to smoke.
Curing Technique
After you have finished drying your buds, the next important step in achieving a high-quality end product is the curing process. Curing involves storing your dried buds in a controlled environment for a period of time, allowing them to continue to break down chlorophyll and other compounds that can affect the flavor, aroma, and potency of your final product. This step is essential for producing smooth, flavorful, and potent buds that are enjoyable to smoke or vape. A proper curing process can take anywhere from a few weeks to several months, depending on your preference and how patient you are willing to be. In this section, we’ll explore various curing techniques and how to determine when your buds are ready for the next step.
Jar Curing
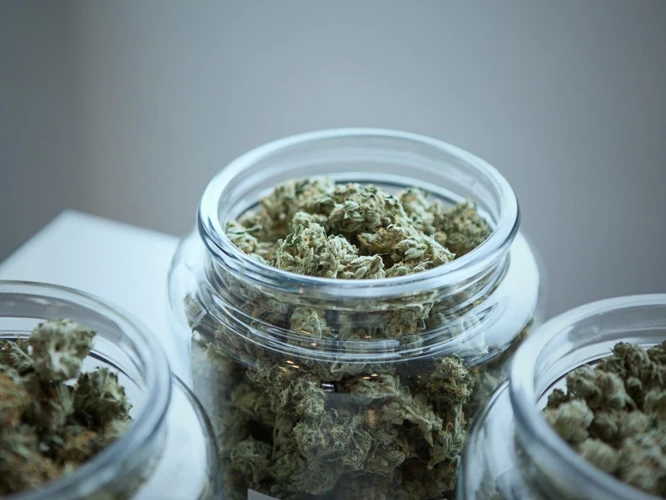
One of the most common and effective curing techniques is jar curing. This method involves placing your dried buds in airtight glass jars, which are then stored in a cool, dark and dry place. The jars can be opened periodically to release any excess moisture and to allow for airflow.
The benefits of jar curing are:
- Even moisture distribution: By storing the buds in a sealed container, the moisture is distributed evenly throughout the buds.
- Improved potency: During the curing process, the remaining chlorophyll in the buds breaks down, which enhances the potency and smoothness of the smoke.
- Enhanced flavor and aroma: As the buds cure in the jar, the terpenes are preserved, which results in a more pungent aroma and flavor profile.
To begin jar curing, make sure that your jars are clean and sterile to avoid introducing harmful bacteria or mold to your buds. Place your dried buds in the jars, filling them up to around 75% capacity. Seal the jars tightly and store them in a cool, dark and dry place.
Over the first several days, you should check your buds regularly and open the jars for a few minutes to release any excess moisture. You can also gently shake the jars to move the buds around and ensure even moisture distribution.
After the first week, you should start to check the buds less frequently, around once every few days. As the curing process progresses, you can reduce the frequency of jar opening to once a week or so.
One important thing to keep in mind: if you notice any signs of mold, such as a musty odor, white spots or a fuzzy texture, immediately remove the affected buds from the jar and discard them. Mold can quickly spread and ruin your entire crop if not dealt with promptly.
Jar curing is a simple yet effective method that can greatly enhance the quality of your buds. With a little patience and care, you can achieve a smooth, potent and flavorful smoking experience.
Vacuum Sealing
Vacuum sealing is another effective curing technique that involves placing your dried buds in an airtight bag or container and using a vacuum sealer to remove all the air from inside. This method creates a vacuum that will stop any bacteria or mold from growing inside the container.
Advantages:
- Prevents the oxidation process that can alter the flavor and potency of the buds.
- Extends the shelf life by keeping the buds fresh for longer periods.
- Protects the buds from moisture, heat, light, and air, which can all cause damage to the quality of the buds.
Disadvantages:
- Vacuum sealing can reduce the aroma of the buds, which can have an impact on the overall experience of using them.
- If the buds are not dried to the correct moisture level, vacuum sealing may cause the buds to become soggy or moldy inside the bag.
- It may take some trial and error to get the perfect level of air pressure inside the bag or container because too much pressure can crush the buds, while too little can leave them vulnerable to moisture and mold.
Vacuum sealing can be a good option for experienced growers who know how to properly dry and cure their buds. However, for beginners or those who want to preserve the aroma of their buds, jar curing is still considered the best method.
Factors That Affect Drying and Curing
When it comes to drying and curing your buds, there are several key factors that can impact the outcome. Understanding these factors is crucial for creating high-quality buds that preserve potency and enhance flavor and aroma. From humidity and temperature to airflow and light exposure, every element plays a critical role in the drying and curing process. So, let’s delve into the intricacies of the factors that affect drying and curing and explore how they can impact the end result.
Humidity and Temperature
The proper levels of humidity and temperature are crucial to the drying and curing process of high-quality buds. Keeping track of these factors will make a significant difference in the final product. Here are some points to consider:
| Humidity | Temperature |
|---|---|
| During Drying: Humidity should be between 45% and 55%. Don’t let it go above 65%. If the buds dry too fast, the final product may become harsh and lose its potency. During Curing: How to Control Humidity: |
During Drying: The ideal temperature range for drying is between 60°F and 70°F. Anything higher than this will dissipate the terpenes and cannabinoids, resulting in a subpar final product. During Curing: How to Control Temperature: |
Keeping a close eye on the humidity and temperature levels during the drying and curing process will ensure that your buds maintain their potency, flavor, and aroma. Don’t underestimate the importance of these factors in producing high-quality buds.
Airflow
Proper airflow during the drying and curing process is crucial for achieving high-quality buds. Good airflow helps to prevent mold and mildew growth while also ensuring that the buds dry evenly. Here are some tips to optimize airflow during drying and curing:
- Hang buds to dry: Hang the buds upside down from drying racks with enough space between them to allow for airflow. Make sure not to overcrowd the racks as this can lead to poor airflow and increase the risk of mold.
- Rotate buds: Rotate the buds every few hours to make sure that all parts of the buds receive equal airflow. This will help to prevent any spots on the buds that are left damp and prone to mold growth.
- Use a fan: Placing a fan near the drying racks can help to increase airflow and speed up the drying process. Be careful not to point the fan directly at the buds as this can dry them out too quickly and affect the final taste and potency of the buds.
- Open the windows: If the weather permits, you can open the windows slightly to improve airflow in the drying room.
- Check humidity levels: High humidity levels can slow down the drying process and increase the risk of mold growth. Make sure to monitor the humidity levels in the drying room and use a dehumidifier if needed to maintain optimal conditions.
By optimizing airflow during the drying and curing process, you can ensure that your buds are properly dried and cured for the highest quality final product.
Light Exposure
When it comes to drying and curing buds, light exposure is a crucial factor that should be taken into consideration. While some growers may believe that exposing their buds to light during the drying and curing process can enhance their trichome production, excessive light exposure can actually degrade the quality of the buds.
| Issue | Solution |
| Light breaks down THC | Avoid exposing your buds to direct sunlight or harsh artificial light. Instead, keep them in a dark, well-ventilated area during the drying and curing process. |
| Light can alter the flavour and aroma | Minimize light exposure by storing your cured buds in opaque containers such as glass jars or vacuum-sealed bags. This will help preserve their delicate flavours and aromas. |
| Light can promote mold growth | Mold thrives in warm, moist environments. Avoid exposing your buds to any unnecessary light since it can increase the humidity levels and create a breeding ground for mold. Keep your drying and curing space well-ventilated to prevent moisture buildup. |
It is important to monitor the amount of light your buds are exposed to in order to ensure a high-quality end product. Proper drying and curing techniques, combined with controlled light exposure, can help you achieve optimal potency, flavour, and aroma in your final buds.
How to Know When Your Buds Are Ready
Determining when your buds are ready for consumption can be a perplexing task for novice cannabis cultivators. Proper timing is crucial to preserving potency and obtaining the desired flavor and aroma. Fortunately, there are several techniques to determine whether your buds are ripe for drying and curing. In this section, we’ll discuss three different methods for assessing bud readiness, each with its own level of accuracy and reliability. By following these guidelines, you’ll be able to confidently harvest and prepare your buds for optimal quality and taste.
Touch Test
One way to tell if your buds are ready for storage is to perform a touch test. This involves gently squeezing one of the buds between your fingers and noting how it feels.
Optimal buds should feel firm and spring back after being squeezed, but not too dry or brittle. If they are too dry, they may crumble or break apart easily, indicating that they were dried too quickly or for too long.
On the other hand, overly moist buds may feel spongy to the touch and not bounce back at all, which could be a sign that they need further drying before storage.
Properly dried and cured buds, on the other hand, will feel somewhat firm, but still pliable to the touch, with a little bit of give. This indicates that they have been dried and cured to the correct moisture level, preserving their potency and flavor.
It’s important to note that the touch test is not always foolproof, and it’s just one of several methods for determining whether your buds are ready for storage. It’s always a good idea to use multiple methods, such as the bend or magnifying glass test, to confirm that your buds are properly dried and cured before storing them for long-term use.
| Touch Test Results | Significance |
|---|---|
| Firm and Springy | Buds are optimally dried and cured |
| Too Dry/Brittle | Buds were dried too quickly or for too long |
| Spongy/No Bounce Back | Buds need further drying before storage |
| Firm but Pliable | Buds are properly dried and cured |
Bend Test
One common method for determining if your buds are properly dried and cured is known as the bend test. This is a simple and effective way to check if your buds have reached the optimal level of dryness without the risk of overdrying them.
To perform the bend test, take a small bud and gently bend the stem until it snaps. If the stem snaps cleanly with an audible crack, this indicates that it is properly dried and cured. However, if the stem bends without breaking or only partially breaks, this means that the buds are still too moist and need more time to dry.
It’s important to note that the bend test should only be used as a general guideline and not as the sole indicator of dryness. Other factors, such as the size and density of the buds, can affect the results of the test. Additionally, over-dried buds may also snap when bent, so it’s important to use this method in combination with other tests to confirm that your buds are ready.
The bend test is a useful tool for ensuring that your buds are at the proper level of dryness for curing. However, it’s important to also consider other factors, such as humidity, airflow, and temperature, to ensure the best possible results.
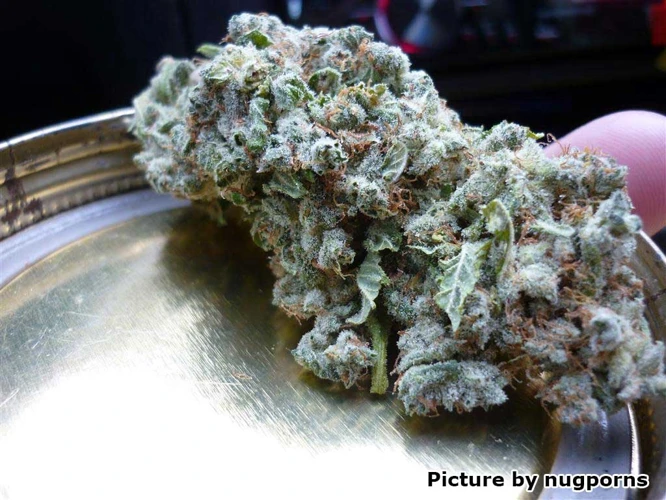
Magnifying Glass Test
One way to inspect the trichomes on your buds to determine their readiness for harvest is to use a magnifying glass. The trichomes are tiny, hair-like structures on the surface of the buds that contain the precious compounds responsible for their effects and aroma. By examining the trichomes up close, you can get an idea of their color and shape, which can indicate how mature they are.
To perform the magnifying glass test, you will need a high-quality magnifying glass or jeweler’s loupe with at least 60X or greater magnification. Here are the steps to follow:
| Step | Action |
|---|---|
| Step 1 | Choose a bud or two from your plants that are close to harvest time |
| Step 2 | Using the magnifying glass or loupe, examine the trichomes on the buds |
| Step 3 | Look for the color and shape of the trichomes. The color of the trichomes can indicate whether they are ready for harvest or not. You are looking for a milky-white color or amber color depending on your desired potency. |
| Step 4 | If the trichomes are still clear, they are not yet matured and are not at peak potency. Waiting a few more days before harvesting will improve the potency and flavor of the buds. |
| Step 5 | If the trichomes are cloudy or milk-white, this is an indication that they are at peak potency and ready for harvest. |
| Step 6 | If you have allowed the trichomes to turn amber, the buds will have a more relaxing effect on you when you consume them. Amber trichomes are more of an amber-brown color, and this indicates that the THC is converting into the more calming CBG compound. This type of trichome will provide a more sedative effect. |
By performing the magnifying glass test, you can harvest your plants at the peak of their potency, which will result in better flavor and aroma as well.
Storing Your Buds After Drying and Curing
After investing time and effort into drying and curing your buds properly, it’s important to store them correctly. Improper storage can lead to degradation of potency, flavor, and aroma.
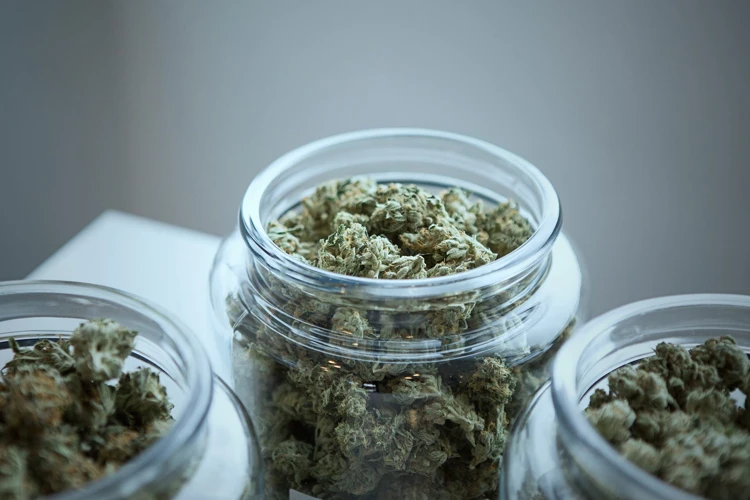
The first step to proper storage is choosing the right container. Airtight glass jars are the most common choice as they provide an ideal environment for storing buds. Mason jars are a popular option, but any glass jar with an airtight lid will work.
It’s important to fill the jar no more than three-quarters full. This allows enough air space for the buds to move around and breathe but not so much that it affects the humidity level in the jar.
For long-term storage, consider adding a humidity control packet to the jar. These packets help regulate moisture levels in the jar, maintaining a consistent humidity level that preserves the quality of the buds. They can be found at many smoke shops or online.
Keep your jars in a cool, dark place. Avoid direct sunlight and temperatures above 70°F (21°C) as this can cause the buds to lose moisture and potency. A closet or cupboard is an excellent storage location.
Be sure to burp your jars daily for the first few weeks of storage. Burping involves briefly opening the jar to allow any excess moisture to escape. This helps ensure that the buds don’t become too moist and moldy.
Finally, label your jars appropriately. Write the strain name and the date of storage on the jar lid with a marker. This allows you to monitor the age of your buds and keep track of different strains in your collection.
Proper storage is critical for maintaining the potency, flavor, and aroma of your buds. With the right container, humidity level, and storage location, you can enjoy high-quality buds for a long time.
Conclusion
In conclusion, proper drying and curing techniques are essential for producing high quality buds that are potent, flavorful and aromatic. The proper techniques not only enhance the smoking experience, but also preserve the medicinal properties of the plant. With the use of appropriate techniques, it is possible to produce high-quality buds that are free from contaminants and enjoyable for consumption.
It is important to remember that the process of drying and curing can take some time, and it requires patience and attention to detail. The quality of the buds is directly proportional to the amount of effort and time that goes into the process. Rushing the process can lead to substandard buds that are not desirable.
Factors such as humidity, temperature, airflow and light exposure play a significant role in the drying and curing process. It is important to monitor these factors and make necessary adjustments to avoid any adverse effects on the buds.
Once the buds are ready, it is important to store them properly to maintain their quality. Airtight containers, such as glass jars or vacuum-sealed bags, are ideal for storing buds. It is also important to store buds in a cool and dark place, away from direct sunlight.
To sum up, the importance of proper drying and curing techniques should not be underestimated by anyone looking to produce high-quality buds. With the right techniques, attention to detail and patience, it is possible to ensure that the final product is potent, flavorful and enjoyable for consumption.
Frequently Asked Questions
What is the difference between drying and curing?
Drying is the process of removing moisture from the buds after harvest, while curing is the process of allowing the buds to rest in an airtight container to develop their full flavor and potency.
Can I skip the drying and curing process?
No. Skipping the drying and curing process can result in harsh, unpleasant-tasting buds with diminished potency.
What is water curing and when should I use it?
Water curing involves soaking the buds in water for a period of time to remove impurities and improve the flavor. It should only be used for buds that are heavily contaminated or moldy.
How long does the drying process take?
The drying process can take anywhere from 5-14 days, depending on the humidity and temperature levels in the drying area.
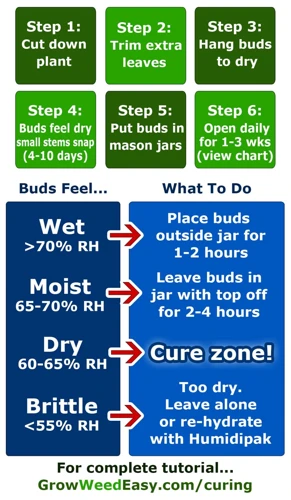
What is the ideal humidity level for drying and curing?
The ideal humidity level for drying and curing is between 45-55% relative humidity.
Can I speed up the drying process by using heat?
No. Using heat to dry buds can result in their potency being diminished and unpleasant flavors developing.
How do I know when my buds are ready for jar curing?
You will know your buds are ready for jar curing when the stems snap rather than bend and the buds feel crispy on the outside but slightly moist on the inside.
What should I do if I’m experiencing mold during the drying or curing process?
If you notice mold during the drying or curing process, remove the affected buds immediately and discard them to prevent spreading to the rest of your harvest.
Can I store my buds in the freezer?
No. Storing buds in the freezer can cause the trichomes to break off and lead to diminished potency.
How long can I store my cured buds for?
If stored properly in an airtight container in a cool, dark place, cured buds can be stored for up to 6 months without significant loss of flavor or potency.

