
Positioning Grow Lights for Optimal Cannabis Growth and Yield
Growing cannabis indoors can be a challenging yet rewarding task for any hobbyist or professional cultivator. One of the critical success factors for optimal yield and potency is proper light positioning. However, this aspect can be perplexing, considering the different types of grow lights, wattage, cover area, height, and angle. Nevertheless, with some knowledge on this subject, it is possible to achieve your desired results. In this article, we will explore why proper light positioning is crucial for cannabis growth and yield, how to select the appropriate grow lights, positioning techniques, monitoring, and troubleshooting common issues in cannabis lighting. Follow this guide step-by-step, and you will be on the right path to becoming a successful cannabis grower.
Why Proper Light Positioning is Important
Contents
When it comes to growing cannabis indoors, proper light positioning is crucial for achieving optimal growth and yield. The photosynthesis process, light intensity and coverage, and temperature and humidity control all play important roles in the health and productivity of your plants. Without the right lighting, your plants may not receive the necessary nutrients to grow to their full potential. So, let’s take a closer look at why proper light positioning is crucial for a successful cannabis growing operation.
Photosynthesis Process
Photosynthesis is the process by which plants convert light energy into chemical energy that is necessary for growth and development. This process is paramount to the success of any cannabis grow operation. Understanding the photosynthesis process is crucial in positioning grow lights for optimal growth.
The photosynthesis process can be divided into two stages:
- Light-dependent reactions: This stage occurs in the thylakoid membranes of the chloroplast. In this stage, light energy is absorbed by chlorophyll and used to generate ATP, which is a high-energy molecule, and NADPH, which is a molecule that carries electrons.
- Light-independent reactions: Also known as the Calvin cycle, this stage occurs in the stroma of the chloroplast. Here, ATP and NADPH are used to synthesize glucose, which is a type of sugar that is important for plant growth and development.
The photosynthesis process requires the following factors:
- Light: This is the most important factor for photosynthesis. Light is captured by the plant’s pigments, particularly chlorophyll, and is used to generate energy.
- Carbon dioxide: This is a key raw material for photosynthesis.
- Water: Water is also required for photosynthesis, as it is used to produce oxygen and other organic molecules.
Factors that affect photosynthesis:
- Light intensity: The stronger the light intensity, the greater the photosynthetic rate. However, extremely high light intensity can damage the plant’s chlorophyll, resulting in leaf burn or other forms of damage.
- Light quality: Plants require a specific spectrum of light to maximize photosynthetic growth. For example, blue and red light are important for plant growth, while green light is less important.
- Temperature: Higher temperatures can lead to an increase in photosynthetic activity up to a certain point. Beyond that point, the enzymes involved in photosynthesis start to denature, leading to a decrease in photosynthetic activity.
Photosynthesis is a complex process that requires proper light intensity, light quality, temperature, and humidity. Understanding these factors is critical to the success of any cannabis grow operation. By positioning grow lights properly and fine-tuning these factors over time, growers can achieve optimal photosynthetic rates and maximize their yield.
Light Intensity and Coverage
Achieving the appropriate light intensity and coverage is crucial for optimal cannabis growth and yield. Here are some important factors to consider:
- Wattage: The higher the wattage of the grow light, the greater the light intensity. However, it is important to ensure that the wattage is appropriate for the size of your grow space and type of plants.
- Distance: The distance between the grow light and plants also affects light intensity. If the light is too close, it can damage the plants due to excess heat and light intensity. Conversely, if the light is too far away, the plants may stretch in an attempt to reach the light source, resulting in weak stems and reduced yield.
- Coverage Area: The coverage area refers to the area of the grow space that is covered by the grow light. Smaller coverage areas can result in uneven growth and yield.
To determine the appropriate light intensity and coverage for your grow setup, consider factors such as the size of your grow space, the type of plants you are growing, and the wattage of your grow light. It is important to measure the actual light output using a light meter to ensure that your plants are receiving sufficient light.
Temperature and Humidity Control
Proper temperature and humidity control is crucial for the success of your cannabis grow. High humidity levels can lead to mold and mildew growth, while low humidity can cause the plants to dry out and become stressed. Similarly, high temperatures can cause the plants to wilt or even die, while low temperatures can stunt growth and delay flowering.
To ensure the ideal temperature and humidity levels, consider investing in a thermometer and a hygrometer. These tools can help you keep track of the environmental conditions in your grow room or tent. Additionally, you may want to consider using a dehumidifier or humidifier, depending on the humidity levels in your growing environment.
As a general rule, aim to keep your grow room or tent between 70 and 85 degrees Fahrenheit during the day, and between 60 and 70 degrees Fahrenheit at night. Humidity levels should ideally be between 50 to 60% during the vegetative stage and between 40 to 50% during the flowering stage. However, it is important to note that these ideal levels can vary depending on the strain of cannabis you are growing.
To help maintain ideal conditions, you may also want to consider using fans or an air conditioning unit to regulate temperature and promote air circulation. This will help prevent stagnant air and reduce the risk of mold or pest infestations. Good air circulation can also help promote stronger stems and healthier plants.
| Temperature | Humidity |
|---|---|
| 70-85 °F during the day | 50-60% during the vegetative stage |
| 60-70 °F at night | 40-50% during the flowering stage |
Proper temperature and humidity control is crucial for optimal cannabis growth and yield. Keep track of your growing environment and make adjustments as necessary to ensure that your plants are healthy and thriving.
Choosing the Right Grow Light
As you begin your journey into indoor cannabis cultivation, selecting the right grow light may seem like a daunting task. With so many options available, it’s important to understand the different types of grow lights, their wattage and coverage area, and which technology is best for your specific needs. This crucial decision will directly affect the quality and yield of your harvest, so it’s important to approach it with care and research. Let’s take a look at some of the factors to consider when choosing the perfect grow light for your cannabis plants.
Types of Grow Lights
When it comes to choosing the right grow light for your cannabis plants, there are a few different types to consider. Each type of grow light has its own benefits and drawbacks, so it’s important to do your research before making a decision. Here are some of the most common types of grow lights:
- Fluorescent Lights: Fluorescent lights are a popular choice for beginner growers because they are affordable and easy to use. They come in a range of sizes and spectrums, making them versatile for different stages of plant growth. The downsides of fluorescent lights are that they are not very powerful, and they need to be positioned very close to the plants in order to be effective.
- High-Intensity Discharge (HID) Lights: HID lights are more powerful than fluorescent lights, and they can cover a larger area. They are available in two types: metal halide (MH) and high-pressure sodium (HPS). MH lights emit a cool, blue light, which is ideal for vegetative growth, while HPS lights emit a warm, red light, which is better for flowering. The downsides of HID lights are that they are expensive, and they can produce a lot of heat, which requires additional ventilation.
- Light Emitting Diode (LED) Lights: LED lights are becoming more popular among cannabis growers because they are energy-efficient and produce very little heat. They also offer a wide range of spectrums that can be customized for different stages of growth. The downsides of LED lights are that they can be more expensive upfront, and some growers question their effectiveness compared to HID lights.
Ultimately, the type of grow light you choose will depend on your budget, the size of your grow space, and your personal preferences. It’s important to consider all of these factors before making a decision, and to remember that the quality of your grow light will directly impact the quality and yield of your cannabis plants.
Wattage and Coverage Area
When choosing a grow light, the wattage and coverage area are two important factors to consider. Here are some key points to keep in mind:
- Wattage: The wattage of a grow light refers to the amount of power it consumes. Generally speaking, a higher wattage light will be able to cover a larger area and provide more intense light, which can lead to better plant growth. However, it’s important to balance this with the size of your growing space and your budget, as high-wattage lights can be more expensive and generate more heat.
- Coverage Area: The coverage area of a grow light refers to the size of the space it can effectively illuminate. This will vary depending on the wattage of the light, as well as the type of plants you’re growing and the stage of growth they’re in. As a general rule, cannabis plants will need between 25 and 50 watts of light per square foot of growing space.
- Reflectors: Reflectors can help to increase the effective coverage area of your grow light by reflecting light back onto your plants. These are available as add-ons for some grow lights, or you can purchase lights that come with built-in reflectors. Keep in mind that reflectors can also increase the heat output of your light, so you’ll need to factor this into your calculations.
When determining the ideal wattage and coverage area for your grow light, it’s important to consider a range of factors, such as the size of your growing space, the number of plants you’re growing, and the stage of growth they’re in. By choosing the right wattage and coverage area, you can ensure that your plants get the light they need to thrive and produce a bountiful yield.
High-Pressure Sodium (HPS) vs. Light Emitting Diode (LED)
When choosing a grow light for your cannabis plants, there are two main types to consider: high-pressure sodium (HPS) and light emitting diode (LED). Both have their advantages and disadvantages.
Advantages of HPS
- Proven track record in the industry with many years of use
- Cost-effective compared to LED
- Produce more intense light, particularly in the red and orange spectrum which is important for flowering and fruiting
Disadvantages of HPS
- Lower efficiency compared to LED, producing more heat and using more electricity
- Shorter lifespan, requiring more frequent replacement
- Less control over spectrum, making it more difficult to customize for different stages of growth
Advantages of LED
- Energy efficiency, using less electricity and producing less heat
- Longer lifespan, reducing replacement costs
- Customizable spectrum, allowing for precise control of light for different stages of growth
Disadvantages of LED
- Higher cost compared to HPS
- Less intense light, which can result in slower growth and lower yields
- Less proven track record in the industry, with some growers skeptical of their effectiveness
Ultimately, the choice between HPS and LED will depend on your budget, growing goals, and personal preferences. It’s important to do your research and choose a high-quality grow light that fits your specific needs.
Positioning Grow Lights
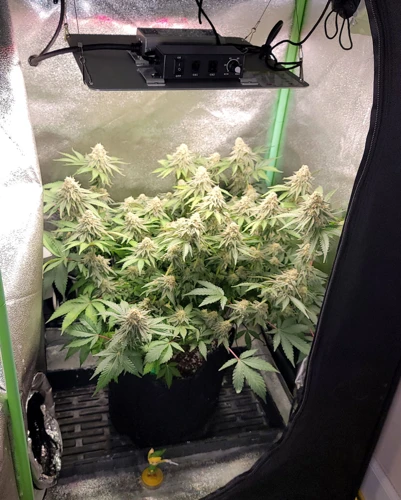
As you start to set up your cannabis grow space, the positioning of your grow lights is a critical factor to consider. How you place your lights will have a significant impact on plant growth and yield, so it’s important to approach this task with care and attention to detail. In this section, we’ll explore the best practices for positioning grow lights, including the optimal height from plants, even distribution, angle, and light schedule. By mastering these techniques, you’ll be able to create the perfect environment for your cannabis plants to thrive.
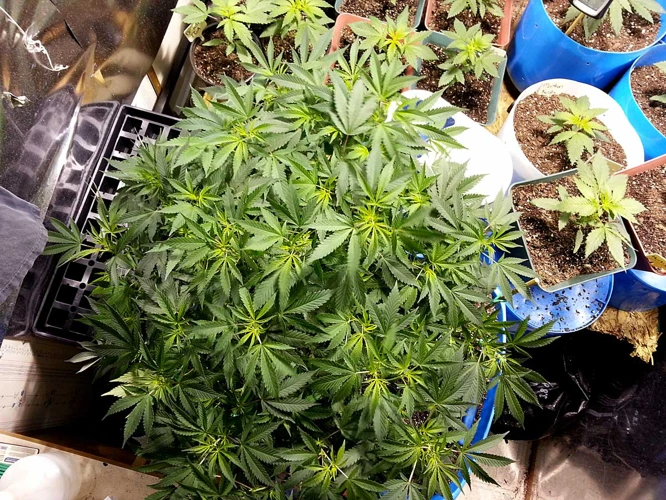
Height from Plants
Height from Plants
The distance between your grow lights and your cannabis plants is critical. If the lights are too close, they can burn the leaves and cause irreparable damage. If they’re too far away, the plants won’t get enough light to grow and will end up spindly and weak.
The ideal distance between your grow lights and cannabis plants depends on the type of light you’re using and the growth stage of your plants. Here are some general guidelines:
| Light Type | Growth Stage | Distance from Plants |
|---|---|---|
| Fluorescent | Seedlings & Cuttings | 2-4 inches |
| Fluorescent | Vegging | 6-12 inches |
| LED | Seedlings & Cuttings | 24-36 inches |
| LED | Vegging | 18-24 inches |
| LED | Flowering | 12-18 inches |
| HPS | Seedlings & Cuttings | 24-36 inches |
| HPS | Vegging | 12-24 inches |
| HPS | Flowering | 8-16 inches |
Remember that these are general guidelines and the optimal distance between your grow lights and cannabis plants may vary depending on other factors, such as the size of your grow space and the intensity of your lights. It’s important to use a light meter to measure the intensity of the light at different heights and adjust accordingly.
As your plants grow taller, you’ll need to raise your lights to maintain the optimal distance. Be sure to also keep an eye on your plants’ foliage and adjust the distance if you notice any burning or stretching. By keeping the right distance between your grow lights and cannabis plants, you’ll ensure they get the light they need to grow strong, healthy, and full of buds.
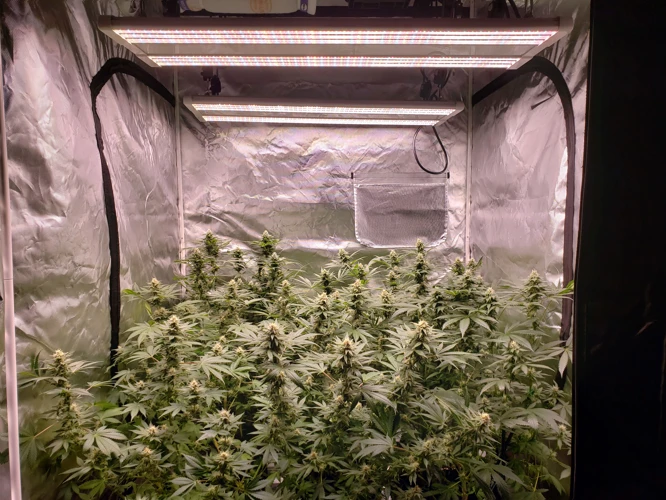
Even Light Distribution
One of the most crucial aspects of light positioning for optimal cannabis growth and yield is ensuring even light distribution. Uneven light distribution can result in some plants getting too much light, while others not getting enough, which can stunt growth and limit the overall yield. Here are a few tips for achieving even light distribution:
- Use multiple lights: Depending on the size of your grow space, you may need to use more than one grow light to achieve even coverage. Using several lights can help you distribute light more evenly and avoid any shadows that could affect plant growth.
- Adjust light height: One common mistake is keeping grow lights too close to the plants, which can cause hot spots and uneven light distribution. Make sure to adjust the height of your grow lights to maintain a consistent distance from the plants and ensure that the light is evenly distributed.
- Position lights at an angle: Positioning your grow lights at a slight angle can help distribute light more evenly throughout the canopy. This can also help prevent hot spots and ensure that all parts of the plant get enough light.
- Rotate plants: Rotating plants periodically can help ensure that they all receive the same amount of light. This is especially important when using multiple grow lights, as some plants may receive more light than others depending on their position relative to the lights.
By following these tips, you can achieve even light distribution and maximize the potential of your cannabis plants.
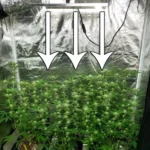
Angle of Light
The angle of light is another important factor in the positioning of grow lights for optimal cannabis growth and yield. Adjusting the angle of the light can help to ensure that all parts of the plant receive sufficient light. Here are some tips for getting the angle of light just right:
- Position the light directly above the center of the plant canopy. This will ensure that the light is evenly distributed and that all parts of the plant receive equal amounts of light.
- Adjust the angle of the light to avoid shadows. If the light is angled too steeply, it may create shadows that prevent certain parts of the plant from receiving enough light. Adjust the angle so that the light hits all parts of the plant canopy evenly.
- Consider using reflectors to guide light to specific areas of the plant. Reflectors can help to direct light to specific areas of the plant that may be receiving less light than others. This can be especially helpful for plants that are growing in tight spaces, where every bit of light is important.
- Be mindful of the heat generated by the lights. Depending on the intensity of the light, it may generate a significant amount of heat. If the light is angled too close to the plant, it may cause the plant to wilt or burn. Make sure to adjust the angle of the light so that it provides an even distribution of light without overheating the plant.
By taking the time to adjust the angle of the grow lights, you can help to ensure that your cannabis plants are getting the right amount of light and that they are growing and flowering as they should. Keep in mind that the angle of the light may need to be adjusted periodically as the plants grow and develop, so be sure to monitor them closely and make any necessary adjustments as needed.
Light Schedule
A vital aspect of positioning grow lights for optimal cannabis growth and yield is the light schedule. Proper timing and duration of light exposure can significantly impact the health and productivity of plants. Here are some important factors to consider when setting up a light schedule:
- Duration: The duration of light exposure is crucial for cannabis plants. During the vegetative stage, it is recommended to provide 18-24 hours of light per day. On the other hand, during the flowering stage, it is necessary to expose plants to 12 hours of light and 12 hours of uninterrupted darkness for them to develop and have a good yield. Keep in mind that any interruptions during the dark period can cause problems for the plant, so avoid such scenarios as much as possible.
- Consistency: Consistency is essential when it comes to light schedules. Plants thrive in predictable environments, and sudden changes in the light schedule can be detrimental. It is therefore important to maintain a regular light schedule from the moment you start growing your cannabis plants.
- Intensity: Light intensity changes significantly at different times of the day. Typically, peak hours of light intensity are in the afternoons when the sun is high in the sky. It is worth noting that indoor grow lights come with varying intensity settings, and you can adjust them according to the growth stage of your plants.
It’s essential to note that during the final phase of flowering, you should keep your plants in total darkness for up to two days to improve quality and potency. This technique is popularly known as “flushing.”
To ensure the best yields, it’s essential to maintain a consistent light schedule throughout the growth cycle. This involves keeping track of the duration, intensity, and consistency of light exposure. Remember, any changes in the light schedule must be done progressively to avoid stressing the plants.
Monitoring and Adjusting Grow Lights
Ensuring that grow lights are properly positioned is just one aspect of successful cannabis cultivation. To maximize crop yield and potency, it’s also essential to monitor and adjust the lights as needed. This involves carefully measuring light intensity, adjusting the distance and angle of the lights, and making changes to the light schedule as necessary. By staying vigilant and proactive, growers can avoid common issues like stretching and burning plants, while promoting healthy growth and flowering. Let’s explore some tips and strategies for monitoring and adjusting grow lights with precision and care.
Measuring Light Intensity
To ensure proper growth and yield, it’s essential to measure the light intensity of your grow lights. Light intensity is typically measured in foot candles (fc) or lux. A foot candle is a measure of illuminance, which is the amount of light that falls on a given surface area. Lux is the metric unit of illuminance, which measures the amount of light that reaches a surface area.
To measure light intensity, you can use a light meter. This device gives you an accurate measurement of your grow light’s intensity and helps you adjust the distance between your plants and the grow light accordingly.
When measuring light intensity, place the light meter near the top of the plants’ canopy to obtain an accurate reading. It’s important to measure the light intensity at different points in the grow room to ensure even light distribution.
To make the most out of your grow lights, keep a record of the light intensity at different points in your grow room over time. This record helps to ensure your grow lights are doing their job effectively and productively.
Here is a table summarizing the optimal light intensity range and the appropriate distance between your plants and grow lights:
| Light Intensity | Distance from Plants |
|---|---|
| Optimal: 400-600 fc (4,300-6,500 lux) | 18-24 inches (45-60 cm) |
| High: 700-900 fc (7,500-9,700 lux) | 12-18 inches (30-45 cm) |
| Low: 200-400 fc (2,100-4,300 lux) | 30-36 inches (75-90 cm) |
Remember, your cannabis plants’ growth and yield depend on the proper positioning of grow lights. Never overlook the importance of measuring and adjusting the light intensity, distance, and even the angle of light. Keep a close eye on the performance of your grow lights and make adjustments as necessary.
Adjusting Distance and Angle
Once you’ve set up your grow lights and started monitoring your plants, you may notice that they’re not responding as expected. If this is the case, you’ll want to adjust the distance and angle of your lights to ensure the optimal growing environment for your cannabis plants. Here are some tips to help you adjust the distance and angle of your grow lights:
- Monitor plant growth: In order to determine if your plants need adjustments, it’s important to regularly monitor their growth. Take note of any changes in leaf color, plant height, or bud development.
- Adjust distance: If your plants are showing signs of overexposure to your grow lights, such as burnt leaves or stunted growth, it may be time to increase the distance between your lights and your plants. On the other hand, if your plants are stretching towards the light and appear to be elongated or leaning excessively, it’s a sign that your grow lights are too far away and you should adjust them closer to your plants.
- Adjust angle: The angle of your grow lights can also have a significant impact on plant growth. If you notice that certain areas of your plants are looking less healthy than others, it may be a sign that the light angle needs to be adjusted. Experiment with different angles to see which one provides the most even coverage for your plants.
Adjusting the distance and angle of your grow lights requires a bit of trial and error, so don’t be afraid to experiment until you find the optimal set up for your plants. Additionally, it’s important to regularly adjust your lights as your plants grow and change throughout their life cycle. By monitoring your plants and making adjustments as necessary, you’ll be able to achieve optimal cannabis growth and yield.
Light Schedule Adjustments
One important aspect of maintaining optimal grow light positioning is adjusting the light schedule to fit the needs of the plants. This involves taking note of the stage of growth the plants are in and adjusting the length of time the lights are on and off accordingly.
Here are some tips for adjusting the light schedule:
- During the vegetative stage, aim for 18-24 hours of light and 6-0 hours of darkness.
- During the flowering stage, aim for 12 hours of light and 12 hours of darkness to simulate the natural photoperiod of cannabis during the fall season.
- If your plants are not responding well to the current light schedule, consider adjusting the timing or duration of the light cycles.
- Keep in mind that abrupt changes to the light schedule can stress the plants and should be avoided.
- If you need to make gradual changes, adjust the light schedule by 15-minute increments until you reach the desired schedule.
Proper light schedule adjustments can help promote healthy growth and maximize yields. By providing your plants with the ideal amount and duration of light, you can ensure they receive the energy needed to grow strong and produce high-quality buds.
Troubleshooting Common Light Positioning Issues
As a cannabis grower, you may run into some issues with your grow lights despite proper positioning. It can be perplexing to see your plants not thriving and not know the root of the problem. In this section, we will discuss some common light positioning issues that can arise and how to troubleshoot them. So, let’s delve into some solutions to help you diagnose and fix any problems you may be facing.
Stretching Plants
One common issue that can arise from improper grow light positioning is the stretching of plants. When plants don’t receive enough light, they will begin to reach for the light source, resulting in tall, thin stems and weak, sparse foliage. This stretching can be a problem for cannabis growers, as it can lead to reduced yields and weaker plants that are more susceptible to disease and pests.
To prevent stretching and promote healthy growth, it’s important to position grow lights at the right distance and angle. Choosing the right type of grow light and adjusting the light schedule can also help to prevent stretching.
One way to prevent stretching is to use a grow light with a high enough intensity to fully penetrate the canopy of the plants. This can be achieved by choosing a grow light with a high wattage and a large coverage area. It’s important to position the light at the right distance from the plants.
Measuring light intensity can help you determine the optimal distance between the light and the plants. Use a light meter to measure the amount of light the plants are receiving, and adjust the light’s distance accordingly. Aim for a light intensity of around 500-1000 µmol/s/m2 for vegetative growth, and 800-1500 µmol/s/m2 for flowering.
Adjusting distance and angle of the grow light can also help to prevent stretching. The light should be positioned close enough to the plants to provide adequate light, but not so close as to cause heat damage or burning. As the plants grow, adjust the height and angle of the light to maintain a consistent light distribution across the canopy.
Light schedule adjustments can also be helpful in preventing stretching. During the vegetative stage, provide the plants with 18-24 hours of light per day to encourage healthy growth. During the flowering stage, reduce the light cycle to 12 hours per day to encourage the plants to produce buds.
By following these tips, cannabis growers can prevent stretching and promote healthy growth and optimal yields.
Burning Plants
One common issue with improper light positioning is burning plants. When grow lights are placed too close to the plants, the intense heat can cause damage to the leaves and flowers, ultimately leading to stunted growth or even death of the plant.
Burning Plants | Symptoms and Causes
Symptoms of burning plants may first appear as yellow, brown or crispy edges or tips of the leaves. In more severe cases, the leaves may turn entirely brown or black and lose their functionality. This damage can occur when the grow lights are too close to the plant or when the wattage is too high for the coverage area.
It is essential to remember that every plant species has a different tolerance for light intensity and heat. For cannabis plants, the ideal temperature range is between 65-85°F (18-29°C), and the relative humidity should be around 50-70%.
Burning Plants | Prevention and Solutions
To prevent burning plants, you should always follow the recommended distance and wattage guidelines for your specific grow light. Most grow light manufacturers provide useful information on the proper height and wattage for their products.
You should regularly monitor your plants daily, ensuring that they are not getting too close to the grow lights. If you are using an LED grow light, you can use a PAR meter to measure the light intensity at different areas of your grow space.
If you notice any signs of burning, you should promptly adjust the distance between the grow light and the plant. You can also reduce the wattage of the grow light to prevent further damage. Additionally, you can increase the distance between the grow light and the plant by raising the height of the grow light or lowering the plant.
Keep in mind that outdoor factors such as temperature, humidity, and airflow can also affect your plant’s susceptibility to burning. Always ensure that your grow space has proper ventilation to maintain an adequate temperature and humidity level.
Poor Flowering and Yield
If you notice that your cannabis plants are not flowering as they should be, or that your yield is much lower than expected, there could be an issue with your grow lights’ positioning. Here are some potential causes and solutions to address poor flowering and yield in your cannabis plants:
- Insufficient light intensity: If your grow lights are not strong enough or are not positioned properly, your plants may not receive the required amount of light. This lack of light can lead to slow growth and poor flowering. Consider increasing the wattage of your grow lights or adjusting the distance between the lights and the plants to ensure adequate light intensity.
- Uneven light distribution: Uneven light distribution can also lead to poor flowering and yield. Make sure that your grow lights are positioned to provide consistent coverage across all plants. Consider adding reflective surfaces to redirect light to areas that may not be receiving enough light, or adjust the height of individual plants or lights to ensure equal coverage.
- Inconsistent light schedule: Your cannabis plants require a consistent light schedule to ensure proper growth and flowering. If your grow lights are not on for the appropriate amount of time each day, your plants may not develop properly, leading to poor flowering and yield. Double-check your light schedule and ensure that your grow lights are set to an appropriate timer.
- Excessive heat: Too much heat can cause stress to your cannabis plants and reduce their ability to flower properly. Make sure that your grow lights are not producing excessive heat and that the temperature of your grow room is within the appropriate range. Adding exhaust fans or adjusting airflow can help regulate the temperature and prevent heat stress.
- Poor air circulation: Poor air circulation can also contribute to poor flowering and yield in your cannabis plants. Without proper airflow, your plants may struggle to exchange gases and may not be able to properly absorb water and nutrients from the soil. Consider adding fans to improve air circulation and promote healthy growth and flowering.
By addressing these potential issues, you may be able to improve the flowering and yield of your cannabis plants. Be sure to monitor your plants’ growth regularly and adjust your grow lights’ positioning as needed to ensure optimal growth and development.
Conclusion
In conclusion, proper light positioning is an essential aspect of successful cannabis cultivation. Ensuring that your grow lights are positioned at the correct height, angle, and distance can have a significant impact on your overall plant growth and yield.
It’s important to remember that the photosynthesis process is at the heart of plant growth, and light intensity and coverage are critical factors in ensuring that your plants receive the light they need to thrive. Additionally, monitoring temperature and humidity levels can help create a stable environment for your plants to grow in.
When choosing a grow light, it’s important to consider the type of light, wattage, and coverage area to ensure that your plants receive the optimal amount of light. High-Pressure Sodium (HPS) and Light Emitting Diode (LED) lights have their own advantages and disadvantages, so it’s important to carefully consider which is best for your specific needs.
Positioning your grow lights correctly involves ensuring that they are at the right height from your plants, and are distributing light evenly across your grow area. Adjusting the angle of the light and scheduling light cycles can also make a significant difference in your plant growth.
Monitoring your plants and grow lights is key, as measuring light intensity and adjusting distance or angle may need to be done periodically. Troubleshooting common light positioning issues, such as stretching or burning plants, can also help ensure a successful harvest.
Overall, by taking the time to properly position and adjust your grow lights, you can optimize your cannabis growth and yield, and create a healthy and thriving environment for your plants.
Frequently Asked Questions
What is the best type of grow light to use for cannabis plants?
The best type of grow light to use for cannabis plants depends on your specific growing setup and needs. However, LED and HPS lights are two popular options for cannabis growers.
How high should grow lights be from cannabis plants?
The height of grow lights from cannabis plants depends on the wattage and type of light being used. In general, lights should be positioned between 12 and 24 inches away from the plant canopy.
Can I use regular household light bulbs for growing cannabis?
No, regular household light bulbs do not provide enough light spectrum or intensity for proper cannabis growth and yield.
What should I do if my plants are stretching towards the grow lights?
If your plants are stretching towards the grow lights, it may indicate that the lights are positioned too high or not intense enough. Adjust the lights closer to the plants and increase the light intensity as needed.
How do I measure the light intensity of my grow lights?
You can measure the light intensity of your grow lights using a light meter or by using the “hand test” method where you place your hand under the light at plant canopy height and adjust accordingly.
Should I adjust the angle of my grow lights during different stages of plant growth?
Yes, you should adjust the angle of your grow lights during different stages of plant growth to ensure even light distribution and proper coverage.
What can I do if my plants are getting burnt from the grow lights?
If your plants are getting burnt from the grow lights, it may indicate that the lights are positioned too close or too intense. Adjust the lights further away from the plants and reduce the light intensity as needed.
Can I use grow lights for outdoor cannabis plants?
Yes, you can use grow lights for outdoor cannabis plants, but they are typically not necessary unless you are growing in a region with limited sunlight or are looking to extend the growing season.
Do I need to adjust the light schedule during different stages of plant growth?
Yes, you should adjust the light schedule during different stages of plant growth to mimic natural lighting patterns and promote optimal growth and yield.
What should I do if my plants are not flowering or producing a high yield?
If your plants are not flowering or producing a high yield, it may indicate a problem with light intensity, coverage, or position. Re-evaluate your grow light setup and make necessary adjustments.

