
How to Hand-Trim Your Cannabis: Excellent Technique
Today we discuss with you a boutique hand trimming. It’s certainly unlike machine trimming. If you’re looking for the utmost quality, you need to take time in your trimming process.
It all starts with handling. Always remember as farmers, as processors, we’re here to protect those trikes that we’ve grown onto these flowers. Okay. And once the plant has been dried, those trikes are very fragile. Every time you touch the flowers they degrade. That’s the bottom line. So the idea is to handle them as little as possible and minimize that damage throughout the process. So I have a branch that was selectively harvested five days ago and has been in my condition drawing room for the past five days. It’s specifically been at a humidity range between 60 and 64% humidity. It’s now at the ideal state for trimming.
I’ve used lots of scissors over the years. I’ve used spring-loaded scissors. I’ve used regular kitchen scissors and I have now evolved into using these Japanese pruning shears. Very fond of these. They have a very fine point. They’re not spring-loaded so effectively you don’t get that hand fatigue that you might otherwise get using spring-loaded scissors anywhere from six to eight hours in a given a day’s worth of trimming.
So let’s start in. I take my branch here and I break it down from big to small, meaning I have a branch.
I like to start at the bottom and also notice my handling. Handling is critical. Always touching the stem and never handling the flowers or minimize the handling of the flowers as much as possible. So I always start at the bottom of the branch and lop off the individual buds first.
Usually you work your way up to the given top and you decide where it’s best to stop and it can be a personal choice. I like the larger, kind of golf ball size nugs, so I’ll tend to preserve those when I can. Always using the branch as your handle, and I go from big to small. So in this instance, big means these fan leaves coming off first. Cut at the very base of those fan leaves to get the most of that fan stem away from the flower. We just work our way through.
Again, the biggest fan leaves first and as you remove these larger fan leaves, it becomes more apparent what else needs to be removed. As we begin to expose this flower, removing those fan leaves, if you can’t reach the base of the leaf, we remove as much as we can up to the point of the flower. What’s important is to never cut into the individual bracts, the individual female flowers, because we don’t want to damage the flower.
So since I’m maintaining a small boutique grow, it allows me the opportunity to really take my time through this process. Unlike some of the commercial growers who also do a hand trim, because of the quantity of product they need to produce over such a short period of time, efficiencies dictate that they need to work through the flowers a bit quicker. But what’s most important on a smaller scale like this is maintaining the quality. Again, you could see I’m selectively trimming. I’m not just hedging my way up the flower, it’s slowly looking at it. It’s rotating the stem to get a good look and work my way around and just remove some of those excess leaves that just don’t have the trichome content as the balance of the flower.
The last thing you do is you trim off that handle and I like to trim it right onto my tray. Another thing you want to do through this process is to track your flowers. So I trim all my flowers onto this tray. The tray is labeled with the strain type. It’s labeled with the plant number.
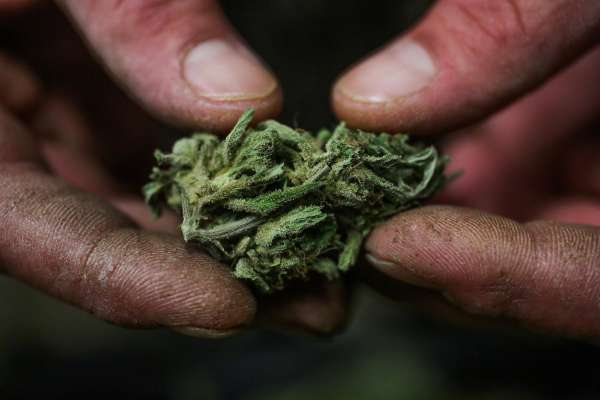
So how do you know when it’s done? How do you know when you finish trimming? You’ve gone through, you’ve gone big to small, you take a quick look around the flower, you rotate that little handle around. If you see anything, any extra little bits that come out, they’re usually going to be a paler in color than the rest of the flower. You might see some odd pale green, little leaf sticking out. That might need to come off, but otherwise, I’m going to have to say that this flower right here is trimmed and ready.
It’s not been shaved. All of the surface trichomes are intact. Unlike that hedging, that just shaves all those trichomes off. We selectively trim this, we maintain those trichomes and that’s really our job as a boutique farmer. Once this tray has been filled with flowers, a good solid day worth of trimming and you can fill this entire tray. Even taking the time that I’m taking here. This tray will go back into my condition drawing room for another seven days before it goes into the curing process.
So to recap, we started with a branch that had been in my condition drying room for five days, at which point it was at the ideal dryness level for trimming. If it had been a little bit dryer, it would have been a bit crumbly. We would have lost a lot more trichomes through this process. Had it been too moist, these scissors would have been gummed up within the first couple of minutes. So again, in my experience, it’s about five days in the condition drying room, humidity levels between 60 to 64%, at which point it’s ready to be trimmed. Once it’s trimmed, I put it onto these trays.
This is all part of the drying and curing process. After those seven days, they’re going to go into my curing buckets for a true cure. So again, remember it’s all about handling, taking your time, and being very selective when you’re trying to do boutique hand trim.
