
How to Hang-Dry Your Cannabis Buds
Growing cannabis is a labor of love, and after months of nurturing, it can be difficult to decide when and how to harvest your cannabis buds. While there are a variety of methods for drying and curing your buds, hang-drying is the most traditional and widely-used approach. However, the process of hang-drying can be a bit overwhelming, especially if you’re new to cannabis cultivation. In this comprehensive guide, we’ll take you step-by-step through the process of hang-drying your cannabis buds, from harvesting to curing. By the end of this article, you’ll have a better understanding of how to hang-dry your buds to achieve the perfect balance of flavor, potency, and texture.
Harvesting Your Cannabis Buds
Contents
As the cannabis plant nears the end of its life cycle, growers eagerly anticipate the moment they can finally harvest their buds. The anticipation comes from knowing that the quality of the buds is a direct result of proper harvesting techniques. However, because there is no one-size-fits-all method to determine the perfect time to harvest, many growers feel a sense of perplexity, wondering if they’re doing it right. In this section, we’ll go over the important aspects of harvesting your cannabis buds, giving you the tools to know when and how to harvest the best possible yield.
Know When to Harvest
Harvesting your cannabis buds at the right time is crucial for maximizing your yields and getting the desired effects from your plants. Knowing when to harvest can be tricky, but there are a few key things to look for.
| Pistil color: | One reliable indicator of when to harvest is the color of the pistils, or hairs, on the buds. When most of the pistils have turned from white to a reddish-brown color, this typically indicates that the buds are ripe and ready for harvest. |
| Trichome development: | Another way to tell if your buds are ready for harvest is to examine the trichomes under a magnifying glass or microscope. When the trichomes are mostly cloudy or milky in color, with some amber or brown ones starting to appear, it’s usually a good time to harvest. This is because the trichomes are where much of the plant’s THC and other cannabinoids are produced, and harvesting at this point will give you the most potent buds. |
| Plant growth stage: | The growth stage of your plants can also give you an idea of when to harvest. For most strains, you’ll want to harvest when the buds are in the “full bloom” stage, which is typically around 6-8 weeks after the plants start flowering. Be aware, however, that different strains may have different growth patterns and may require longer or shorter flowering times. |
Keep in mind that these are just general guidelines, and there may be other factors that come into play depending on your specific strain and growing conditions. The best way to ensure that your buds are harvested at the right time is to closely monitor your plants and use a combination of the above indicators to guide your decision-making.
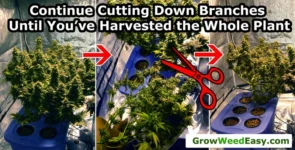
How to Harvest Your Buds
When it comes to harvesting your cannabis buds, timing is crucial. You should wait until the buds have reached their peak potency before harvesting them. Here are the steps to follow for harvesting your buds:
| Step | Action |
|---|---|
| Step 1 | Stop watering the plants a few days before harvest to help them start to dry out. |
| Step 2 | Choose a time to harvest when the trichomes are milky white or have amber-colored heads. |
| Step 3 | Use a pair of sharp scissors or pruning shears to cut the branches where they meet the main stem of the plant. Be careful not to damage the buds! |
| Step 4 | Remove any leaves that are still attached to the buds. You want to leave only the sugar leaves and the buds themselves. These leaves don’t contain much THC and can make the buds taste harsh when smoked. |
| Step 5 | Hang the buds to dry in a dark, cool, and well-ventilated space. |
Following these steps will help ensure that your harvest is successful and your buds are of the highest quality. Remember to be gentle when handling the buds and take care not to damage them during the harvest process.
Preparing Your Cannabis Buds for Drying
Now that you have successfully harvested your cannabis buds, it’s time to prepare them for the next step: drying. Before you can hang your buds to dry, you’ll need to take a few important steps to make sure they are ready. This process may seem daunting at first, but with the right tools and knowledge, you’ll be able to properly prepare your buds for drying in no time. So, let’s delve into the crucial steps you need to take in order to get your cannabis buds ready for the drying process.
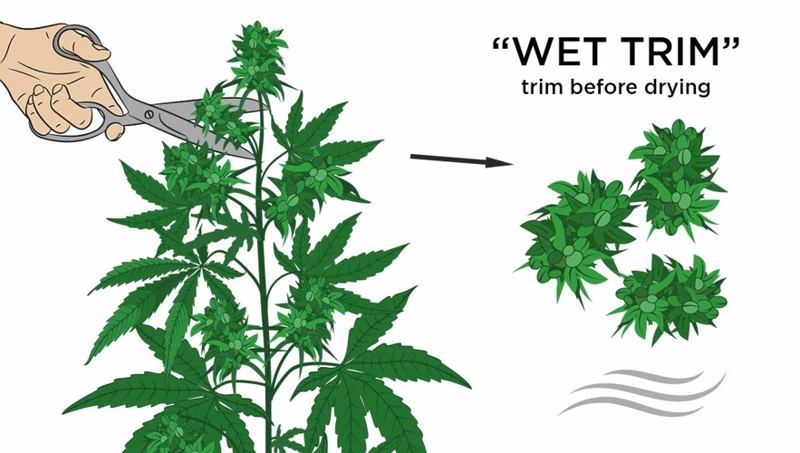
Trimming Your Buds
After harvesting your cannabis buds, the next step is to prepare them for drying by trimming. Trimming is an important step that involves removing excess leaves and stems from the buds. This helps to improve the overall quality and potency of your cannabis. Here’s a step-by-step guide on how to trim your buds.
| Tools needed: | Steps: |
|---|---|
| Sharp scissors or pruning shears | Step 1: Start by removing the large fan leaves using your scissors or pruning shears. These leaves do not contain much THC, and removing them will allow for better air circulation during the drying process. |
| Clean, flat surface | Step 2: Next, place your trimmed buds onto a clean, flat surface. This will make it easier to trim off any remaining leaves or stems. |
| Smaller scissors or trimming scissors | Step 3: Use your smaller scissors or trimming scissors to carefully remove any excess leaves or stems from the buds. Be sure to pay attention to the small sugar leaves, which contain high concentrations of THC and other cannabinoids. |
| Clean container or tray | Step 4: As you trim your buds, place them into a clean container or tray. This will make it easier to transfer them to the drying area once you are finished trimming. |
| Latex gloves (optional) | Step 5: If desired, wear latex gloves during the trimming process to avoid getting resin on your hands. This will also help prevent the buds from becoming contaminated with bacteria or other unwanted substances. |
Remember that it is important to handle your buds gently during the trimming process to avoid damaging the trichomes. Trimming your buds properly will help to ensure a high-quality end product that is free of excess plant matter.
How to Handle Wet Buds
After harvesting your cannabis buds, it’s crucial to handle them with care, especially if they are wet. Wet buds can easily develop mold and other harmful bacteria if not handled properly. Here are some tips on how to handle wet buds:
| Step | Explanation |
|---|---|
| Step 1 | Be gentle when handling wet buds. Wet buds are fragile and can easily break or crumble with excessive handling. Avoid using excessive force, and handle the buds delicately to prevent damage. |
| Step 2 | Remove any excess water. Use a clean, dry towel or paper towel to gently pat the buds dry. Avoid using too much force, as this can damage the buds. Be sure to remove any excess water, as this can contribute to mold growth. |
| Step 3 | Hang the wet buds to dry immediately. Wet buds should be hung to dry as soon as possible after harvesting. This will prevent mold and other bacteria from growing on the buds. |
| Step 4 | Avoid stacking wet buds. Stacking wet buds on top of each other can create an ideal environment for mold and other harmful bacteria to grow. Instead, hang the buds individually or lay them out on a flat surface to dry. |
| Step 5 | Monitor the drying buds closely. Check on the buds regularly to ensure they are drying properly and to prevent mold growth. If you notice any signs of mold or other issues, take action immediately. |
By following these steps, you can ensure that your wet buds are properly handled and dried, minimizing the risk of mold and other harmful bacteria growing on your cannabis buds.
Hanging Your Cannabis Buds to Dry
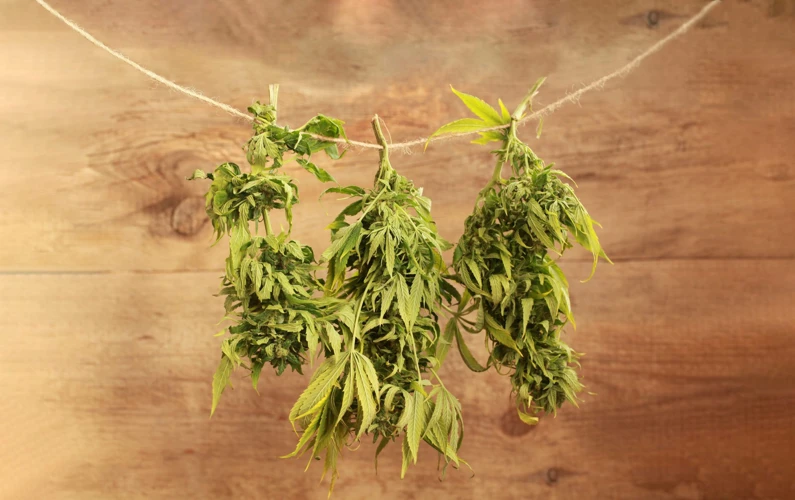
After harvesting and trimming your cannabis buds, the next crucial step is to dry them properly. One of the most popular methods to dry cannabis buds is to hang them. This method allows for the buds to dry slowly and evenly, preserving their potency and flavor. However, it’s important to do it correctly to avoid mold or mildew growth. In this section, we will guide you step-by-step on how to hang your cannabis buds to dry, from setting up the drying space to optimizing drying conditions.
Setting Up the Drying Space
When setting up the drying space for your cannabis buds, it’s important to create an environment that allows for proper airflow and minimizes the risk of contamination. Here are some steps to follow:
- Choose a drying space: Select a location that is cool, dry, and dark. Ideally, the room should have a temperature between 60-70°F and a humidity level between 45-55%. Avoid areas with high humidity or direct sunlight, as this can lead to mold growth or potency loss.
- Prepare the space: Clean the area thoroughly to remove any dust or debris. Set up a drying rack or hang the buds from a line, ensuring that there is enough space between each bud to allow for proper air circulation.
- Use a fan: Set up a fan in the drying space to promote air flow and minimize humidity. You want to ensure that the air is circulating around your buds without being too strong, as this could potentially dry out the buds too quickly and affect their quality.
- Control the smell: Drying cannabis buds can produce a strong odor, so it’s important to take steps to control the smell. You can use an air purifier, an exhaust fan or carbon filter to minimize the scent.
- Monitor the drying space: Regularly check the temperature and humidity levels in the drying space to ensure that they remain within the ideal range. Adjust the fan or add a dehumidifier if necessary to maintain the optimal conditions.
By following these steps, you can set up an ideal drying space for your cannabis buds, allowing you to achieve the best possible results in the drying process.
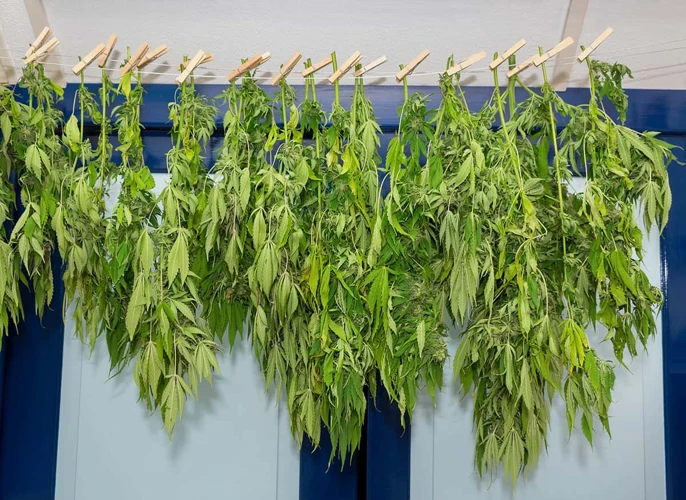
Hanging Your Buds
Once you have everything set up for drying your cannabis buds, it’s time to move on to the actual hanging process. This step is crucial to ensure that your buds lose moisture properly as they dry. Here are the steps to hang your buds correctly:
| Step 1: | Pick up a bud by its stem and gently bend it. If the stem snaps, it’s ready for drying. If it only bends, you may want to wait a bit longer for drying. |
| Step 2: | Grab some string or twine and make a small, tight loop around the stem of each bud. Remember to keep the buds a few inches apart to ensure good airflow. |
| Step 3: | After looping the string around each stem, tie the string to a horizontal line, such as a clothesline. Make sure that the buds are hanging upside down, with the stem pointing upward. You can also use a drying rack with several tiers to set up your buds. |
| Step 4: | Check the buds regularly to ensure that they are drying evenly. Every few days, rotate the buds to ensure that the side facing down gets a chance to dry out as well. |
It’s important to note that you should handle your buds gently during the hanging process as they can be fragile and may fall off their stems if handled too roughly. Also, keep in mind that the drying time can vary depending on humidity levels, temperature, and the size of the buds. Be patient and check regularly to ensure that the buds are drying thoroughly.
Optimizing Drying Conditions
When it comes to hanging your cannabis buds to dry, it’s important to consider the conditions of the environment they’ll be in. Properly optimizing the drying conditions can help ensure that your buds dry evenly and retain maximum potency and flavor. Here are some factors to consider:
| Factor | Importance | Optimal Range |
|---|---|---|
| Humidity | Highly Important | 45-55% |
| Temperature | Moderately Important | 65-75°F |
| Airflow | Moderately Important | Gentle Breeze |
| Light | Not Important | Dark Environment |
Humidity: Proper humidity levels are crucial for successful drying – too much moisture can cause mold or mildew, while too little can dry out your buds too quickly, causing them to lose their potency and flavor. In general, aim for a humidity range of 45-55%. You can use a hygrometer to measure humidity levels in your drying space.
Temperature: While not as crucial as humidity, temperature is still an important factor to consider when hanging your buds to dry. Ideally, the temperature should be between 65-75°F. Avoid temperatures that are too hot, as this can cause your buds to dry too quickly and become brittle.
Airflow: Proper airflow is essential for even drying and to prevent stagnant air that can promote mold and mildew growth. A gentle breeze is optimal – you can use a fan to create a gentle airflow, but be careful not to blow directly on your buds, as this can cause them to dry out too quickly.
Light: Keeping your drying buds in a dark environment can help prevent the breakdown of THC and preserve the potency of your buds. While light isn’t as crucial as humidity or airflow, it’s still best to keep your buds in a dark, cool location.
Monitoring Your Drying Buds
As your precious cannabis buds begin to dry, it’s crucial to keep a close eye on them in order to ensure a successful harvest. Maintaining the right environment during the drying process can make all the difference, especially when it comes to preventing mold or mildew from ruining your buds. In this section, we’ll explore the key steps you need to take to monitor your drying buds and ensure that they are drying properly. So, let’s take a closer look at some of the tips and tricks that will help you achieve the perfect dry for your cannabis harvest.
Checking for Mold or Mildew
One of the most important things to do while drying your cannabis buds is to check them regularly for mold or mildew. Mold and mildew are common problems that can ruin your harvest if left unnoticed and untreated. Here are some simple steps to follow when checking your buds for mold or mildew:
| Step | Action |
|---|---|
| Step 1: | Check your drying space regularly for any signs of mold or mildew. Look for any areas that are moist, dark or have poor ventilation as these are ideal conditions for mold and mildew to grow. |
| Step 2: | Inspect the buds themselves for any signs of discoloration or unusual growth. Mold can range in color from white to black, and may appear fuzzy or powdery. You may also notice a musty or unpleasant smell coming from the buds. |
| Step 3: | If you find any mold on your buds, act quickly to prevent it from spreading to the rest of your harvest. Remove any affected buds and place them in a sealable plastic bag. You can then either freeze them, or dispose of them if you prefer. |
| Step 4: | If you are concerned about mold or mildew in your drying space, you may want to consider using a dehumidifier or fan to improve ventilation and reduce moisture levels. |
It is essential to check your buds regularly during the drying process to catch mold or mildew early, before it can spread and ruin your harvest. By following these simple steps and acting quickly, you can help ensure that your buds dry safely and without any unwanted contaminants.
Testing Dryness
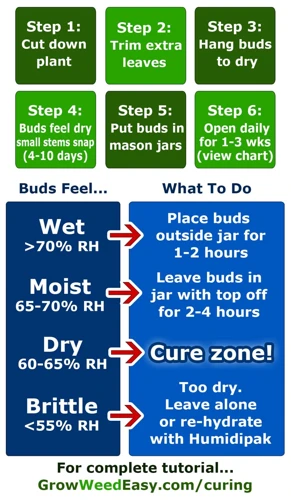
One crucial step in the process of hang-drying your cannabis buds is testing for dryness. It’s important to ensure that your buds are dried properly before moving on to the next stage of curing.
Here are some steps to test the dryness of your cannabis buds:
- Check the moisture content: You can use a hygrometer to check the moisture content of your buds. Ideally, you want the moisture content to be around 12%, which can be achieved by drying your buds for 5-10 days.
- Check the texture: Another way to test the dryness of your buds is to feel their texture. When your buds are dry, they should feel crispy to the touch and should easily snap instead of bend.
- Test the stem: You can also test the dryness of your buds by bending the stem. If it snaps instead of bending, then your buds are ready for curing.
- Perform the squeeze test: Lastly, you can do the squeeze test to check the dryness of your buds. Gently squeeze a bud between your thumb and forefinger. If it feels spongy, then it’s not dry enough. If it feels crispy and crumbles easily, then it’s ready for curing.
It’s important to note that over-drying your buds can also negatively affect their flavor and potency. So, make sure to keep a close eye on the drying process and test your buds frequently to ensure that they’re dried properly.
Curing Your Cannabis Buds
After hanging your cannabis buds to dry, the next crucial step is to cure them. This is the process of allowing the buds to properly age and develop their unique flavor and aroma, while also enhancing their potency. Without proper curing, your buds may be harsh, tasteless, or even moldy. In this section, we will guide you through the steps of curing your cannabis buds to perfection. Get ready to unleash the full potential of your harvest!
Why Curing Is Important
Curing your cannabis buds is a crucial step in achieving the best possible taste, potency, and overall quality of your harvest. During the drying process, moisture is drawn out of the buds, but the remaining moisture and plant matter can cause a harsh and unpleasant taste. Curing helps to break down these leftover materials and enhance the flavor and aroma of your buds.
Here are some reasons why curing is important:
- Improved flavor and aroma: Curing your buds allows the terpenes and flavonoids to fully develop, resulting in a more nuanced and enjoyable taste and scent.
- Increased potency: Proper curing can enhance the potency of your buds by allowing the remaining moisture to evaporate slowly, which preserves the trichomes and cannabinoids.
- Smooth smoking experience: Cured buds burn more smoothly and evenly, resulting in a more pleasant smoking experience.
- Longer shelf life: Curing your buds properly can help extend their shelf life by preventing mold growth and preserving the overall quality of the buds.
Taking the time to properly cure your cannabis buds is well worth it in terms of achieving the highest quality and most enjoyable end product.
How to Properly Cure Your Buds
After hanging your cannabis buds to dry and monitoring their progress, the next step is to properly cure them. Curing is the process of slowly drying your buds in a controlled environment over a period of time. This process helps to improve the flavor, aroma, and potency of your buds, as well as preserve their quality for a longer period of time. Here’s how to properly cure your buds:
Step 1: Once your buds have dried for about a week, it’s time to start the curing process. Start by removing the buds from their drying space, and trimming off any remaining leaves or stems.
Step 2: Place your buds in glass jars, filling them about 3/4 full. Make sure the jars are clean and sterile to prevent any contamination or mold growth.
Step 3: Seal the jars and place them in a cool, dark place with a temperature of around 60-70 degrees Fahrenheit (15-21 degrees Celsius). This environment will allow for a slow and controlled curing process.
Step 4: For the first few days, open the jars for a few minutes every day to let in fresh air and release any excess moisture. This will help prevent mold growth.
Step 5: After the first few days, start opening the jars less frequently. Gradually decrease the amount of time you open the jars over the course of a few weeks until you’re only opening them once a week.
Step 6: Continue this curing process for at least two weeks, although many people prefer to cure their buds for a month or longer for optimal results.
Step 7: While your buds are curing, be sure to monitor them for any signs of mold or mildew. If you notice any, remove the affected buds immediately and discard them.
Step 8: After your buds have cured to your satisfaction, they’re ready to be stored. Transfer them to airtight containers, such as mason jars, and store them in a cool, dark place to preserve their quality.
By following these steps, you can properly cure your cannabis buds to improve their flavor, aroma, and potency, and preserve their quality for a longer period of time.
Storing Your Buds
Once your cannabis buds have been properly dried and cured, it’s important to store them correctly. Proper storage will ensure that your buds maintain their potency, flavor, and aroma for as long as possible. Here are some tips for storing your buds:
- Use airtight containers: Storing your buds in airtight containers will prevent oxygen from seeping in and causing your buds to dry out or lose their potency. Mason jars, vacuum-sealed bags, and plastic containers with airtight lids are all good options.
- Avoid direct sunlight: Exposure to direct sunlight can cause cannabinoids and terpenes in your buds to break down, which can reduce their potency and flavor. Keep your buds in a cool, dark place, such as a cabinet or closet.
- Monitor humidity: Buds that are too dry can crumble, while buds that are too moist can develop mold or mildew. Use a hygrometer to monitor the humidity levels in your storage container, and aim for a relative humidity of around 62%. Boveda packs can also be used to maintain the proper humidity levels.
- Avoid over-handling: Every time you handle your buds, you risk damaging trichomes and losing potency. Only handle your buds when necessary, and avoid touching them excessively.
- Label your containers: Keep track of the strain, harvest date, and curing time of your buds by labeling your storage containers. This will help you keep track of which buds are ready to be used and which ones need more time to cure.
By taking the time to properly store your buds, you can ensure that they stay fresh, potent, and flavorful for as long as possible.
Conclusion
After going through the entire process of hang-drying your cannabis buds, it’s time to reap the rewards of your hard work. By following a step-by-step process for harvesting, preparing, hanging, monitoring, and curing your buds, you can achieve potent, flavorful, and long-lasting cannabis that is sure to satisfy your cravings.
But it’s important to remember that this is just the beginning. Properly drying and curing your buds is the foundation for a high-quality harvest, but there’s still much to learn and experience when it comes to maximizing the potency, aroma, and flavor of your cannabis. Experiment with different strains, cultivation techniques, and consumption methods to unlock a whole world of possibilities.
Plus, don’t forget about responsible consumption. It’s important to use your cannabis in moderation and always abide by your local laws and regulations. Whether you’re using it for medicinal or recreational purposes, always prioritize safety, respect, and awareness in your consumption habits.
In conclusion, hang-drying your cannabis buds is a rewarding and fulfilling process that can lead to truly exceptional cannabis. By following the steps outlined in this guide and integrating your own personal experience and expertise, you can produce cannabis that is truly unique and valuable. So get started today and see what incredible results you can achieve.
Frequently Asked Questions
What is the purpose of hang-drying cannabis buds?
Hang-drying cannabis buds is an important step in the harvesting process, as it allows for the moisture to be gradually drawn out of the buds, which helps to preserve their potency, flavor, and aroma.
What are the optimal conditions for hang-drying cannabis buds?
Optimal conditions for hang-drying cannabis buds include a temperature of 60-70°F with humidity levels around 45-55%. It’s also important to ensure proper airflow and ventilation to prevent mold or mildew from developing.
When is the best time to harvest cannabis buds?
The best time to harvest cannabis buds is when the trichomes have turned milky white and the pistils have changed color. This typically occurs 6-8 weeks after flower initiation for indica strains and 8-10 weeks for sativa strains.
How do I know if my cannabis buds are dry enough?
You can test the dryness of your cannabis buds by gently bending the stem. If it snaps easily, it’s dry enough. You can also try lightly pressing the buds – if they feel dry and crispy, they’re ready to be cured.
Why is curing cannabis buds important?
Curing cannabis buds is important because it allows for the remaining moisture to be gradually drawn out, which improves the flavor, aroma, and overall quality of the buds. It also helps to prevent mold and mildew from developing during storage.
How long should I hang-dry my cannabis buds for?
In general, it’s recommended to hang-dry cannabis buds for around 7-10 days. However, the exact duration can vary depending on various factors such as the humidity, temperature, and airflow in your drying space.
How should I store my cured cannabis buds?
It’s recommended to store cured cannabis buds in a cool, dark, and dry place such as a mason jar, plastic container, or a vacuum-sealed bag. Avoid storing them in direct sunlight or in a humid environment, as this can cause mold or mildew to develop.
Can I speed up the drying process?
Although it’s not recommended to rush the drying process, there are a few ways to increase airflow and ventilation in your drying space, such as using a fan or a dehumidifier. However, be careful not to dry your buds too quickly, as this can negatively impact their potency and flavor.
How do I know if my cannabis buds have mold or mildew?
You can visually inspect your cannabis buds for mold or mildew, which can appear as white, gray, or black spots or patches. Damp or musty smells can also be a sign of mold or mildew.
How do I properly trim my cannabis buds before drying?
To properly trim your cannabis buds, start by removing any unwanted leaves using a sharp pair of scissors or shears. Focus on removing the large fan leaves and any other leaves with visible stem material. Trim the buds down to their desired size and shape.

