
Save Money and Maximize Your Yield with DIY Lighting Solutions
Introduction
Contents
Growing cannabis indoors can be a tricky task, but with the right DIY lighting solutions, it can become much easier. Whether you’re a seasoned grower or just starting out, finding the right lighting for your plants is essential for their optimal growth and development. In this article, we’ll explore the reasons why you should consider DIY lighting solutions, how to understand your lighting needs, and provide step-by-step guides on building your own LED strip lights, DIY COB lights, and DIY CFL bulbs. Additionally, we’ll cover choosing the right materials, installation and maintenance, and troubleshooting tips to ensure your plants thrive under your customized lighting system. So, let’s dive in and start growing!
Why Choose DIY Lighting Solutions?
Do-it-yourself (DIY) lighting solutions for cannabis growers have become increasingly popular and for good reason. Here are a few reasons why you should consider DIY lighting solutions for your grow room:
- Customizability: DIY lighting solutions allow growers to tailor their lighting system to their specific needs and preferences, unlike pre-made lighting systems from manufacturers.
- Affordability: Building your own lighting system can be more cost-effective than purchasing a pre-built system. Plus, you can often reuse some of the materials you already have on hand, further reducing your costs.
- Flexibility: With a DIY lighting system, you have the option to upgrade or modify it as you see fit, without the need to replace an entire pre-made system.
- Control: DIY lighting solutions provide growers with greater control over the quality and intensity of light their plants receive, which can lead to better yields and increased potency.
By choosing to build your own lighting system, you can save money, customize your grow room lighting to your specific needs, and be in complete control over the quality and intensity of the light your plants receive.
Understanding Your Lighting Needs

When it comes to growing cannabis indoors, effective lighting is crucial to ensure that your plants receive enough light for optimal growth and development. But with so many lighting options available on the market, it can be overwhelming to choose the right one for your needs. To better understand your lighting needs, it’s important to consider factors such as light spectrum and grow room size. By taking these factors into account, you can determine the best DIY lighting solution for your specific cannabis growing operation.
Understanding the Importance of Light Spectrum
One of the most important factors to consider when designing your DIY lighting solution for growing cannabis is understanding the importance of light spectrum. Cannabis plants require a specific range of light spectrums to promote optimal growth and development. Here are some key points to keep in mind:
- Cannabis plants require a spectrum of light that is rich in red and blue wavelengths. Red light stimulates growth and flowering, while blue light promotes leaf development.
- Full-spectrum lighting is important for cannabis plants, because it contains all of the wavelengths necessary to support healthy growth and development.
- Too much of one spectrum can be damaging to your plants. For example, too much blue light can result in stunted growth and small, weak plants.
- Flowering plants require more red light to stimulate growth, while vegetative plants require more blue light to promote leaf growth.
When designing your DIY lighting solution, it’s important to choose bulbs or LED strips that emit a full spectrum of light, and can be adjusted to provide more red or blue light as needed. You may also want to consider using dual-spectrum bulbs, which allow you to switch between red and blue spectrums depending on the stage of growth your plants are in. By understanding the importance of light spectrum and choosing the right lighting solution for your plants, you’ll be well on your way to a successful harvest.
Calculating Your Lighting Needs Based on Grow Room Size
Calculating Your Lighting Needs Based on Grow Room Size
When it comes to growing cannabis indoors, the right amount of light is crucial for healthy plant growth and higher yields. The amount of light needed depends on the size of your grow room. Here’s how to calculate the lighting needs for your cannabis grow:
- Measure the length and width of your grow room in feet.
- Multiply the length by the width to get the total square footage of your grow room.
- For vegetative growth, you’ll need around 35 watts of light per square foot.
- For flowering growth, you’ll need around 50 watts of light per square foot.
- Calculate the total wattage needed by multiplying the square footage by the wattage per square foot. For example, if you have a 4′ x 4′ grow room, you’ll need 560 watts for vegetative growth and 800 watts for flowering growth.
Keep in mind that these calculations are based on using high-quality grow lights with a good light spectrum. If you’re using lower-quality or less efficient lights, you may need to adjust your calculations accordingly. Additionally, certain strains may have specific lighting requirements, so it’s important to research the needs of the specific strains you plan to grow.
DIY Lighting Solutions
One of the most crucial aspects of cultivating cannabis is providing adequate lighting during the growth process. While there are many lighting solutions available on the market, some growers choose to go the DIY route to save money and have more control over their lighting setup. But with so many options out there, it can be difficult to choose the right one. Let’s explore some of the most popular DIY lighting solutions, including LED strip lights, DIY COB lights, and DIY CFL bulbs.
LED Strip Lights
When it comes to DIY lighting solutions for cannabis growers, LED strip lights are a popular choice due to their flexibility and low heat output. These lights are also energy-efficient, which can help growers save money on electricity costs in the long run.
To build your own LED strip lights, you will need the following components:
| Components | Description |
|---|---|
| LED strip lights | The main lighting component, available in a variety of colors and spectrums. |
| Power supply | Provides electricity to the LED strip lights. |
| Wires | Connect the LED strip lights to the power supply. |
| PVC pipe | Used to create a frame for the LED strip lights. |
| End caps | Attach to the PVC pipe to create a finished frame for the LED strip lights. |
| Hanging chain | Used to hang the LED strip lights from the ceiling of the grow room. |
To build your LED strip lights, follow these steps:
1. Cut the PVC pipe to the desired length for your grow room.
2. Attach the end caps to each end of the PVC pipe.
3. Attach the hanging chain to the PVC pipe.
4. Cut the LED strip lights to the desired length to fit inside the PVC pipe.
5. Connect the LED strip lights to the power supply using wires.
6. Place the LED strip lights inside the PVC pipe and secure them in place with zip ties.
7. Connect the power supply to an outlet and test the lights to ensure they are working properly.
8. Hang the LED strip light fixture in your grow room using the hanging chain.
It is important to regularly clean and maintain your LED strip lights to ensure they are functioning at their best. This may involve wiping down the lights with a damp cloth to remove dust or debris. Additionally, if any of the LED lights burn out, you will need to replace them to maintain the proper spectrum for your plants. LED strip lights can be an affordable and effective way to provide lighting for your cannabis plants.
DIY COB Lights
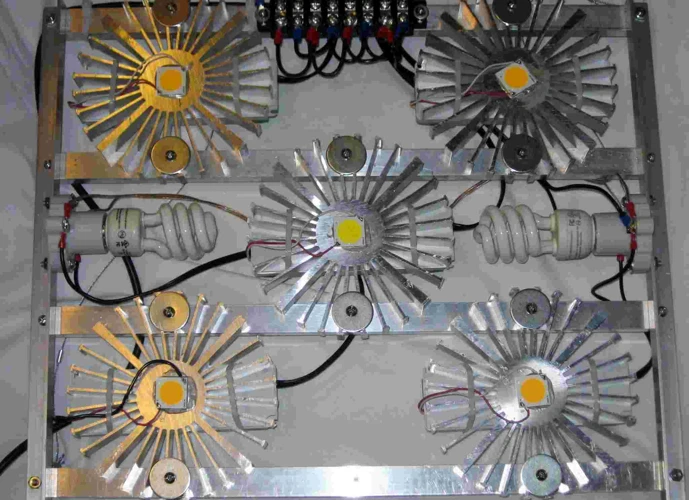
Looking for a lighting solution that provides a high level of brightness and complete coverage for your cannabis plants? DIY COB lights might be just what you need! COB stands for “chip on board,” which refers to the way the lights are constructed. Instead of individual LED chips, COB lights consist of small LED chips that are all mounted together on a single board.
Advantages of DIY COB Lights
- COB lights are incredibly bright and provide full-spectrum lighting that closely mimics natural sunlight. They can provide more light output per square foot than other types of lighting, which makes them a good choice for larger grow rooms.
- DIY COB lights are also efficient and can save you money on electricity costs while still delivering the brightness your plants need. They don’t produce as much heat as some other types of lights, which can help keep your grow room at a cooler temperature.
- Additionally, DIY COB lights are customizable and allow you to adjust the spectrum of light your plants receive based on their growth stage.
Materials Needed for DIY COB Lights
- COB LEDs
- Heat sinks
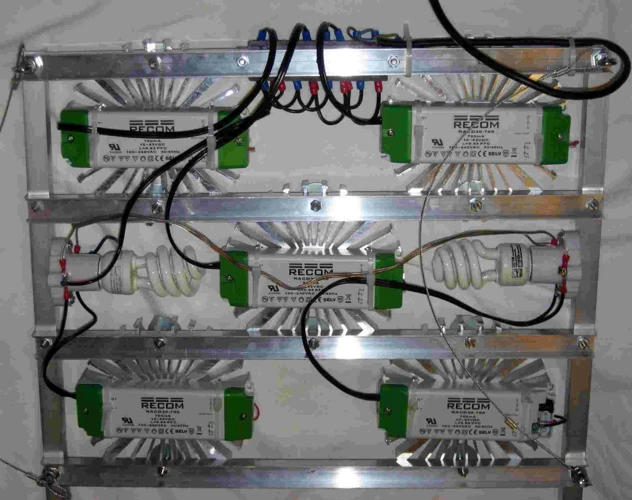
- LED drivers
- Wiring
- Screws and bolts
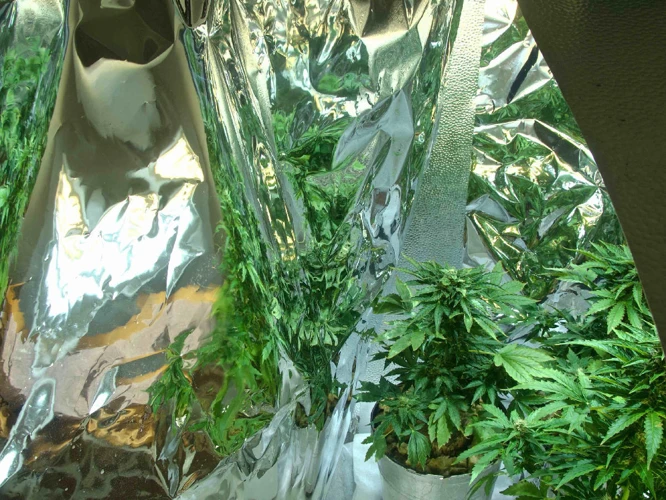
- Reflective material
Building Your DIY COB Lights
Building a DIY COB light may seem intimidating, but with the right materials and instructions, it can be a relatively straightforward process. Here are the basic steps for building your own COB lights:
- Choose the appropriate COB LEDs for your grow room and purchase a sufficient number to meet your lighting needs.
- Select heat sinks that match the size and number of your COB LEDs.
- Choose LED drivers based on the number and wattage of your COB LEDs.
- Wire your LEDs, driver, and heat sink together following the manufacturer’s instructions.
- Attach the reflective material to the top and sides of your DIY light fixture.
- Test your completed COB light fixture to ensure that all components are wired correctly and functioning properly.
Tips for Maintaining Your DIY COB Lights
Proper maintenance is important to ensure that your DIY COB lights continue to function properly and provide optimal lighting for your cannabis plants. Here are some tips for maintaining your COB lights:
- Clean the reflective material regularly to ensure the maximum amount of light is reflected back onto your plants.
- Check your wiring periodically to ensure that all components are securely attached and functioning properly.
- Replace any burned-out bulbs or components as soon as possible to prevent a drop in overall light output.
- Adjust your lighting schedule as your plants grow and develop to ensure they are receiving the appropriate amount and spectrum of light.
With the right materials and a little bit of know-how, DIY COB lights can provide a customized, efficient, and effective lighting solution for your cannabis grow room.
DIY CFL bulbs
For those looking for a budget-friendly option, DIY CFL bulbs can be a great solution. CFL (Compact Fluorescent Light) bulbs can be found at any hardware store and have a low heat output, making them perfect for smaller grow spaces.
To create a DIY CFL bulb setup, you will need the following components:
| Component | Description |
|---|---|
| Socket with cord | This will house the CFL bulb and allow you to connect it to a power source. |
| Screw-in socket extender | This will lengthen the socket, allowing you to get the bulb closer to your plants. |
| CFL bulbs | These come in various wattages and spectrums, so choose the appropriate ones for your grow space and plant needs. |
| Reflector | A reflector will help direct the light towards your plants and increase overall efficiency. |
| Timer | A timer will help you control the lighting schedule for your plants. |
When building your DIY CFL bulb setup, it is important to follow these steps:
1. Screw in the socket extender to your socket with cord.
2. Screw in the CFL bulb to the socket extender.
3. Attach the reflector to the socket with cord, making sure it is securely in place.
4. Plug in the socket with cord to a timer.
5. Set your lighting schedule on the timer.
It is important to note that CFL bulbs have a limited coverage area, so if you have a larger grow space, you will need to use multiple CFL bulbs or consider a different DIY lighting solution. Additionally, CFL bulbs have a shorter lifespan compared to other lighting options, so you may need to replace them more frequently. However, DIY CFL bulbs can still provide effective lighting for small grow spaces on a budget.
Choosing the Right Materials
When it comes to building your own DIY lighting solution for your cannabis grow room, choosing the right materials might seem overwhelming. But fear not, with the right components and equipment, you can create a high-quality light fixture that meets your specific needs. In this section, we will explore the essential components for each type of DIY lighting solution, highlighting the key features to consider when selecting your materials. With careful planning and research, you can ensure your DIY fixture provides your plants with optimal light spectrum and intensity, leading to a healthier and robust harvest.
LED Strip Light Components
To build your LED strip light fixture, you’ll need to acquire the following components:
- LED Strips: The core of your DIY lighting solution, LED strips come in many varieties with different color temperatures and light output. Choose a strip with a spectrum in the ranges of blue to white to maximize plant growth.
- Power Supply: LED strips require a driver that can convert the AC voltage of your house into the DC voltage needed to light the diodes. Make sure to choose a power supply that can handle the wattage of your LED strip.
- Aluminum Channel: An aluminum channel will help dissipate the heat from your LED strips and protect them from damage. Choose a channel that fits the width of your LED strip.
- End Caps: End caps will close off your aluminum channel and give your fixture a finished look. Choose end caps that match the width and shape of your aluminum channel.
- Wiring: You’ll need some wiring to connect your LED strip to your power supply. Make sure to choose wire that can handle the voltage and wattage of your fixture.
- Soldering Equipment: To connect your wiring to your LED strip, you’ll need a soldering iron and solder.
- Heat Sink Compound: This compound will help transfer heat away from your LED strip to the aluminum channel. Apply it between the strip and the channel for best results.
Once you have all the necessary components, you can begin building your DIY LED strip light fixture. Follow the step-by-step guide carefully to ensure the best possible outcome.
DIY COB Light Components
When it comes to building a DIY COB light for your cannabis grow room, it’s important to have a full understanding of the necessary components. Here are the key components you will need:
- Circuit Board: To hold the COB LED(s) and other electrical components. It’s important to choose the right size and shape based on how many LED chips you plan on using.
- COB LED: The main component of the light. COB stands for “Chip on Board” and refers to the fact that multiple LED chips are integrated into one module. Look for high-quality, high-efficiency COB lights with a good balance of red and blue spectrum for optimal plant growth.
- Heat Sink: Helps dissipate heat away from the LED chip(s) to prevent overheating and damage. Choose a heat sink that is the appropriate size for your COB LED(s).
- Driver: Powers the light and provides the necessary voltage and current. Choose a driver with the appropriate output voltage and current based on the number of COB LEDs you are using.
- Wires and Connectors: You will need wires to connect components and connectors to secure them. Choose high-quality wires and connectors that are rated for the appropriate voltage and current.
- Power Cord: Provides power to the driver. Look for a power cord that is rated for the appropriate voltage and current to match your driver.
- Hanging Kit: You will need a way to securely hang your light fixture above your grow room. Choose a hanging kit that is rated for the weight of your light fixture.
By choosing high-quality components and following proper guidelines, you can build a powerful and energy-efficient COB light for your cannabis grow room that will provide the optimal light spectrum for your plants’ growth and health.
DIY CFL Bulb Components
When it comes to building your own CFL bulb lighting solutions for cannabis cultivation, some of the essential components you’ll need to get started include:
| Component | Description |
|---|---|
| Compact Fluorescent Bulbs | These bulbs are the heart of your DIY CFL lighting solution. Make sure to choose bulbs with high lumens per watt and a color temperature in the 2700k-6500k range for optimal plant growth |
| Socket Adapters | These adapters will allow you to screw in your CFL bulbs and connect them to a power source. Make sure to choose adapters that can handle the wattage of your bulbs. |
| Power Cords | You’ll need to connect your lighting fixtures to a power source, and power cords with standard 120-volt plugs are ideal for this. Make sure your cords are rated for the wattage of your lighting setup. |
| Light Reflector Hoods | Reflector hoods are optional but are highly recommended as they help to concentrate the light down onto your plants. You’ll need reflector hoods that are compatible with your CFL bulbs and socket adapters. |
| Light Timer | A timer is essential for controlling the amount of light your plants receive. Look for a timer that can handle the wattage of your lighting setup and allows you to set different on/off cycles. |
| Wire Strippers | You’ll need wire strippers to strip the insulation from your power cords and connect them to your socket adapters. |
| Wire Nuts | You’ll need wire nuts to connect the wires from your power cords to the wires on your socket adapters. |
| Screws and Nuts | Depending on the design of your lighting setup, you may need screws and nuts to attach your socket adapters and reflector hoods to your grow tent or other structure. |
With all of these components in hand, you’ll be well on your way to building your own DIY CFL lighting solution for cannabis cultivation. Keep in mind that CFL bulbs may not be as efficient as other types of lighting solutions, but they can still provide good results when used correctly.
Building Your DIY Light Fixture

Now that you have a good understanding of your lighting needs and have chosen the right materials for your DIY lighting solution, it’s time to move on to the exciting part – building your own DIY light fixture! This process may seem daunting, but with the right guidance and tools, anyone can build their own custom grow light. In this section, we will provide step-by-step guides for building three different types of DIY lighting solutions: LED strip lights, DIY COB lights, and DIY CFL bulbs. So grab your materials and let’s get to work!
Step-by-Step Guide for LED Strip Lights
To begin building your DIY LED strip light fixture, you will need the following materials:
- LED strip lights: Choose a high-quality, full-spectrum LED strip light that is suitable for growing cannabis.
- Aluminum channel: This will be the housing for your LED strip lights and will help distribute heat away from the LEDs.
- Power supply: You will need a power supply that is compatible with your LED strip lights, typically 12V or 24V.
- Wire: You will need wire to connect your LED strip lights to the power supply.
- Soldering iron and solder: This will be needed to join the wires together.
- Heat shrink tubing: This is used to insulate and protect the soldered connections.
Once you have gathered your materials, follow these steps to build your LED strip light fixture:
- Cut the aluminum channel: Measure and cut the aluminum channel to the desired length of your LED strip lights. Be sure to leave room for the power supply and make sure the channel is deep enough to house the LED strip lights.
- Mount the LED strip lights: Apply adhesive to the back of the LED strip lights and carefully place them in the aluminum channel. Make sure the LED strip lights are evenly spaced and not overcrowded.
- Connect the wires: Use the wire to connect the positive (+) and negative (-) terminals of the LED strip lights to the corresponding terminals on the power supply. Solder the connections and insulate them with heat shrink tubing.
- Test the connections: Before attaching the power supply to the LED strip lights, check to make sure all connections are secure and the wiring is correct.
- Attach the power supply: Once you have tested your connections, attach the power supply to the LED strip lights. Make sure the power supply is securely attached and not in danger of falling or shifting.
- Install your fixture: Your LED strip light fixture is now ready to be installed in your grow room. Make sure it is securely mounted and properly positioned for optimal light coverage.
Building your own LED strip light fixture can be a cost-effective and customizable lighting solution for your cannabis grow room. By following these steps, you can create a high-performing and efficient DIY lighting system that will help your plants thrive.
Step-by-Step Guide for DIY COB Lights
DIY COB Lights: If you are looking for a more powerful lighting solution for your cannabis grow room, COB (Chip on Board) lights are a great option. Here is a step-by-step guide for building your own DIY COB lights.
| Materials Needed: | Tools Needed: |
|---|---|
| COB LED chips | Wire stripper |
| Heat sink | Soldering iron |
| Driver | Screwdriver |
| Wires | Heat sink compound |
| Power cord | Electrical tape |
| Multimeter |
1. Choose your COB LED chips: Select the number of COB LED chips you need based on the size of your grow room and the amount of plants you are growing.
2. Mount the COB LED chips: Using the heat sink and heat sink compound, mount the COB LED chips onto the heat sink. Make sure to follow the instructions provided by the manufacturer.
3. Mount the driver: Mount the driver onto a suitable location on the heat sink.
4. Solder the wires: Solder the wires onto the COB LED chips and the driver, making sure to follow the manufacturer’s instructions.
5. Connect the power cord: Connect the power cord to the driver.
6. Check the connections: Use a multimeter to check for any loose connections or potential electrical problems.
7. Test the COB lights: Turn on the COB lights and ensure they are functioning properly.
Note: Building DIY COB lights can be complex and requires some expertise in electronics. If you are not comfortable working with electrical components, it is important to seek the help of a professional or stick to simpler DIY lighting solutions.
Step-by-Step Guide for DIY CFL Bulbs
DIY CFL Bulbs
If you want to try a more traditional option, you can make your own CFL (compact fluorescent lamp) bulbs. This type of lighting is popular for its energy efficiency and moderate light output.
Materials:
To build your DIY CFL bulb, you will need the following materials:
| Material | Description |
|---|---|
| CFL bulbs | Bulbs with plastic bases and twist-off glass bulbs |
| Screwdrivers | Flathead and Phillips head screwdrivers |
| Pliers | Needle-nose and regular pliers |
| Electrical tape | Black and white electrical tape rolls |
| Wire strippers | Tool for removing insulation from wires |
| Wire nuts | Fasteners used for connecting wires |
| Drill | Tool for making holes in bulb base |
| Reflectors | Aluminum or mylar sheeting for reflecting light |
Building Your CFL Bulb
Follow these steps to make your own DIY CFL bulb:
1. Start by disassembling your CFL bulb. Use the screwdriver to remove the screws on the base of the bulb, and then carefully twist off the glass bulb.
2. Inside the base, you will see two wires attached to a small circuit board. Use the pliers to carefully detach these wires.
3. Next, use the wire strippers to strip the ends of the wires, exposing the metal underneath.
4. Take the end of one wire and twist it together with one end of your replacement wire. Secure the connection with a wire nut.
5. Repeat this process with the other wire and the remaining end of your replacement wire.
6. Now, it’s time to attach the reflector. Cut a piece of aluminum or mylar sheeting to size, and use the drill to make a hole in the center of the sheet.
7. Thread the wires through the hole and attach the sheet to the base with screws. Make sure the sheet is securely in place, as it will help improve the reflectivity of the bulb.
8. Use the electrical tape to wrap the wires and any other exposed metal on the base to prevent electrical shorts.
9. Finally, screw the glass bulb back onto the base and test your new DIY CFL bulb.
Conclusion:
Building your own DIY lighting solutions can be a rewarding project for any cannabis grower. CFL bulbs are a great option for those who want to try something traditional, without sacrificing energy efficiency or light output. Follow these steps carefully and enjoy the fruits of your hard work.
Installation and Maintenance
Now that you’ve built your own DIY lighting solution for your cannabis grow room, it’s time to focus on installing and maintaining it. This is an important step to ensure that your plants receive the proper light spectrum and intensity they need to thrive. Installing your homemade light fixture may seem daunting, but with the right tools and guidance, it can be a straightforward process. Additionally, proper maintenance is necessary to avoid any potential issues that could harm your plants. Let’s dive into the details of installation and maintenance so you can be confident in setting up and caring for your DIY lighting solution.
How to Install Your DIY Light Fixture
Installation of Your DIY Light Fixture
Once you have built your own DIY light fixture, it’s time to install it in your grow room. Here are the steps to follow for a safe and effective installation.
| Step 1: | Firstly, turn off the power supply in your grow room to avoid electrocution. |
| Step 2: | Position the light fixture where you want it to be installed. It should be at the optimal height for your plants, which will vary depending on the type of fixture and the growth stage of your plants. |
| Step 3: | Attach the fixture to the ceiling or wall using sturdy anchors and screws that are appropriate for the weight of your fixture. It’s important to use the right materials to prevent the fixture from falling down and harming your plants. |
| Step 4: | Connect the fixture to the power supply. Make sure the wiring is done correctly and securely to avoid short circuits and other electrical problems. If you’re not comfortable with wiring, consult a professional electrician. |
| Step 5: | Set up a timer to control the light schedule for your plants. This will ensure they get the right amount of light each day for optimal growth and flowering. |
| Step 6: | Turn the power supply back on and test the fixture to make sure it’s working correctly. Check for any flickering or hot spots, which could be a sign of wiring problems or defects in the fixture itself. |
Conclusion
Installing your DIY light fixture is a crucial step in setting up your grow room. By following these steps carefully, you can ensure a safe and effective installation that will provide optimal lighting for your cannabis plants. Remember to always put safety first when working with electricity and seek professional help if you’re not comfortable with any aspect of the installation process.
Maintaining and Troubleshooting Your DIY Lighting Solutions
Maintaining and troubleshooting your DIY lighting solutions is crucial to ensure optimal performance and longevity of your grow lights. Here are some tips to help you keep your lighting solutions working efficiently:
1. Regular cleaning: It is essential to keep your lighting fixtures clean from dust and debris. This can be done easily by wiping down the fixtures with a damp cloth or a compressed air canister.
2. Checking for damage: Inspect your DIY lighting solutions for any signs of damage or wear and tear. Damaged components should be replaced immediately.
3. Monitor temperature: Make sure that your DIY lighting solutions are not generating excessive heat. Keep an eye on the temperature of your grow room and ensure that it stays within a safe range.
4. Troubleshooting: If you experience any issues with your DIY lighting solutions, such as flickering or uneven lighting, start by checking the connections and components. Loose connections can affect the performance of the lights, causing them to flicker or dim. If the problem persists, consult online forums or seek help from a professional electrician.
5. Upgrading components: As your plants grow, they require more light intensity and spectrum. Consider upgrading your DIY lighting solutions by adding more LED strips, COB lights, or CFL bulbs to meet the needs of your plants.
By following these maintenance and troubleshooting tips, you can ensure that your DIY lighting solutions are functioning optimally, providing your plants with the necessary light spectrum and intensity for their growth and yield.
Conclusion
In conclusion, DIY lighting solutions for cannabis growers can be a cost-effective and efficient way to provide the necessary light for your plants to thrive. By understanding the importance of light spectrum and calculating your lighting needs based on the grow room size, you can choose the right DIY lighting solution for your needs.
LED strip lights offer versatility and customization options with their various color and brightness options. DIY COB lights provide a high intensity light source that can penetrate deep into the canopy for maximum growth potential. DIY CFL bulbs are a budget-friendly option that can still provide sufficient light for smaller grows.
When choosing the right materials for your DIY lighting solution, it’s important to consider the components of each type of lighting. LED strip light components include the LED strip, power supply, and connectors. DIY COB light components include the COB LED chips, heat sink, and driver. DIY CFL bulb components include the bulb socket, ballast, and extension cord.
Building your DIY light fixture can include step-by-step guides for each type of lighting, such as attaching the LED strip to an aluminum channel for better heat dissipation or wiring the COB LED chips to the driver for optimal performance.
Once your DIY light fixture is built, installing it in your grow room and maintaining it is crucial for the success of your plants. Proper installation can include hanging the fixture at the correct height and distance from the plants for optimal coverage. Maintaining and troubleshooting your DIY lighting solution can include checking for burnt out bulbs or damaged components and repairing or replacing them as needed.
Overall, DIY lighting solutions for cannabis growers can provide a customizable and cost-effective way to provide the necessary light for your plants to thrive. By understanding your lighting needs and following step-by-step guides for building and maintaining your DIY light fixture, you can ensure the success of your grow.
Frequently Asked Questions
What are the benefits of using DIY lighting solutions for cannabis growing?
DIY lighting solutions can offer more affordability and customization compared to pre-made options. Additionally, building your own lighting system can give you a better understanding of your specific needs and the opportunity to use high-quality materials.
Why is light spectrum important in cannabis growth?
Light spectrum plays a crucial role in cannabis growth as different light colors can affect various stages of the plant’s life cycle. For instance, blue light helps with vegetation while red light promotes fruiting and flowering.
What factors should be considered when calculating lighting needs for a cannabis grow room?
The size of your grow room, the intensity of light required for your specific strain, and the type of lighting used are all important factors to consider when calculating your lighting needs.
What is an LED strip light?
An LED strip light is a flexible circuit board equipped with multiple LEDs that emit different colors of light. These lights are designed for easy installation and can be cut to fit almost any space.
What is a DIY COB light?
A DIY COB light is a customized lighting system made with a “chip on board” LED. These lights offer a higher level of brightness and directional control, helping to improve the efficiency of your grow room lighting.
What is a DIY CFL bulb?
A DIY CFL bulb is a homemade lighting system that uses compact fluorescent bulbs. These bulbs are easy to find and offer a high level of customization, allowing growers to select bulbs with the appropriate light spectrum for their specific plants.
What components do I need for an LED strip light fixture?
To build an LED strip light fixture, you will need an LED strip, a power supply, lighting controls, and mounting hardware.
What components do I need for a DIY COB light fixture?
To build a DIY COB light fixture, you will need a COB LED chip, a heat sink, a power supply, and mounting hardware.
What components do I need for a DIY CFL bulb fixture?
To build a DIY CFL bulb fixture, you will need CFL bulbs, a socket, wiring, and mounting hardware.
How do I troubleshoot my DIY lighting system?
If you experience issues with your DIY lighting system, start by checking the wiring and connections for any loose or damaged components. You can also consult the instructions for troubleshooting tips or contact the manufacturer for support.

