
DIY Compost Bin Guide for Cannabis Gardeners
As cannabis enthusiasts, we all know the importance of having a healthy and fruitful garden. And one crucial aspect of that is ensuring that our soil is always at its best. While chemical fertilizers may seem like an easy fix, they can do more harm than good in the long run. That’s where composting comes in – a natural and eco-friendly way to boost soil health and nurture your cannabis plants. But, as a beginner, where do you even start? Don’t fret! In this comprehensive DIY guide, we’ll take you through the step-by-step process of creating your very own compost bin for your cannabis garden.
Why Compost is Important for Cannabis Gardening
Contents
If you’re a cannabis gardener, you know that the key to a successful harvest lies in the quality of the soil. The healthier the soil, the better the plant growth and yield. This is where composting comes in. Composting is the process of breaking down organic matter into nutrient-rich soil. But what makes compost so important for cannabis gardening? In this section, we’ll explore three reasons why compost is crucial for the success of your cannabis garden.
1. Improves Soil Quality
One of the main reasons why compost is important for cannabis gardening is that it improves soil quality. Healthy soil is essential for growing healthy plants. Compost helps to provide the necessary nutrients and minerals that plants need to thrive.
Here are some of the benefits of compost that contribute to improving soil quality:
| Benefits of Compost for Soil Quality |
|---|
| Increases soil fertility and organic matter content |
| Improves soil structure and drainage |
| Balances soil pH levels |
| Enhances soil biodiversity and beneficial microbial activity |
Compost is rich in nutrients such as nitrogen, phosphorus, and potassium, which are all essential for plant growth. When added to soil, compost helps to improve its fertility and organic matter content. This, in turn, promotes root growth and increases the ability of plants to retain moisture and nutrients.
Compost helps to improve soil structure and drainage. This is particularly important for cannabis plants which require well-aerated soil with good drainage. Compost helps to create a crumbly soil texture, which allows for proper root development and water absorption.
Another benefit of compost is its ability to balance soil pH levels. Cannabis plants generally grow best in soil with a slightly acidic pH range between 6.0 to 7.0. Compost can help to regulate soil pH levels, preventing the soil from becoming too acidic or alkaline.
Finally, compost helps to enhance soil biodiversity and beneficial microbial activity. These microorganisms break down organic matter in the compost, making the nutrients available for plant uptake. They also help to break down harmful chemicals and pollutants, making the soil more hospitable for plants.
By improving soil quality, compost plays a vital role in the success of any cannabis garden.
2. Enhances Nutrient Absorption
Composting not only improves the overall soil quality but also enhances the nutrient absorption of plants, making it an essential practice for any cannabis gardener. The decomposition process of composting allows for the release of key nutrients such as nitrogen, phosphorus, and potassium, which are necessary for healthy plant growth.
Here is a table of the essential nutrients released during composting:
| Nutrient | Description |
|---|---|
| Nitrogen | Helps with the production of vegetative growth, increases chlorophyll production, and aids in the creation of new plant cells |
| Phosphorus | Plays a critical role in photosynthesis, energy transfer, and the production of flowers/fruits |
| Potassium | Enhances stress tolerance, disease resistance, and facilitates nutrient transportation throughout the plant |
Instead of relying on expensive commercial fertilizers, composting can provide all the necessary nutrition for your cannabis garden in a natural and sustainable way. By using compost in your garden, you are not only improving nutrient absorption but also reducing the likelihood of nutrient imbalances and deficiencies that could harm your plants.
In the next section, we’ll go through the necessary steps to create your own compost bin for your cannabis garden.
3. Reduces Chemical Fertilizer Dependency
When it comes to cannabis gardening, reducing chemical fertilizer dependency is essential for creating a healthy and sustainable garden. By creating a compost bin, you can produce your own organic compost to supplement or even replace the need for chemical fertilizers. Here are some benefits of reducing chemical fertilizer dependency through composting:
| BENEFIT | DESCRIPTION |
| 1 | Reduces the amount of chemical fertilizers needed |
| 2 | Improves soil structure and fertility naturally |
| 3 | Prevents chemical fertilizer runoff and pollution |
| 4 | Produces a healthy and nutrient-rich growing medium for your cannabis plants |
Using compost can also increase the overall yield of your cannabis garden. By providing the necessary nutrients in a more natural and slow-release form, compost can help avoid adding too much of a particular nutrient or even burning your plants with chemical fertilizers. Additionally, chemical fertilizers can contribute to environmental pollution and harm beneficial microorganisms in the soil. By reducing chemical fertilizer dependency, you’re practicing environmentally friendly cannabis cultivation and building a stronger, more resilient garden in the process.
DIY Compost Bin Guide
Are you ready to take your cannabis gardening to the next level? One of the keys to success is creating a DIY compost bin. Compost is an important ingredient for healthy and vibrant plants, and by making your own, you’ll save money and reduce waste. But where do you start? In this section, we’ll guide you through the process of building your own compost bin step-by-step. From choosing the right materials to turning your compost, we’ve got you covered. Let’s get started!
1. Choose Your Compost Bin Type
When it comes to choosing a compost bin type for your cannabis garden, there are several options to consider. Each type has its pros and cons depending on your needs and space availability. Let’s take a closer look at some of the most popular compost bin types:
| Type | Description | Pros | Cons |
|---|---|---|---|
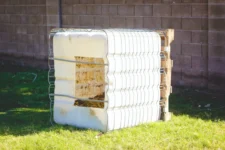
| Wire Bin | A simple bin made from chicken wire or mesh fencing. | Easy and cheap to make, good airflow for composting. | May not be as durable as other types, not the most aesthetically pleasing. |
| Plastic Bin | A commercial bin made from sturdy plastic. | Durable and long-lasting, good for small spaces and urban settings. | Can be expensive to purchase, may not have as much airflow as other types. |
| Wooden Bin | A bin made from untreated or naturally rot-resistant wood. | Durable and aesthetically pleasing, can be customized to fit your needs. | May be more expensive than other types, can be labor-intensive to build. |
| Tumbling Bin | A bin on a frame that can be rotated to aerate the compost. | Great for small spaces or people with limited mobility, quick and efficient composting process. | Can be expensive to purchase, may not hold as much compost as other types. |
Consider the size of your outdoor space, the amount of compost you plan on producing, and your budget when choosing the best compost bin type for your cannabis garden. Remember that any of these types can work, it just depends on your specific needs and preferences.
2. Gather Materials
When it comes to gathering materials for your DIY compost bin, there are a few items you’ll want to have on hand to ensure successful composting. Here are some of the supplies you should consider:
- Container: You’ll need a container to hold your composting materials. This can be a plastic bin, trash can or even an old wooden box.
- Aeration: Composting requires oxygen to help break down the materials, so you’ll need something to provide proper aeration. This can be achieved by drilling holes in the container or using a pitchfork or shovel to turn the materials regularly.
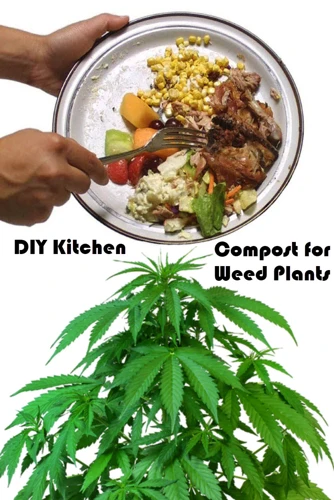
- Brown Materials: Brown materials include things like dried leaves, dry grass clippings and shredded newspaper. These provide carbon and help absorb excess moisture.
- Green Materials: Green materials include things like fresh grass clippings, vegetable and fruit scraps, and coffee grounds. These provide nitrogen and help speed up the composting process.
- Water: Moisture is important in composting, so you’ll want to keep a spray bottle or watering can nearby to add a little water when the materials start to dry out.
- Composting Starter: While not a requirement, adding a composting starter can help jumpstart the process by introducing microorganisms to break down the materials faster.
By gathering these materials beforehand, you’ll be well on your way to creating a successful and nutrient-rich compost for your cannabis garden.
3. Build Your Compost Bin
To build your own compost bin, you will need to follow a few simple steps. First, decide on the size of your compost bin based on the amount of compostable materials you plan to generate. Next, gather the following materials:
- A plastic or metal bin with a tight-fitting lid.
- A drill with a 1/2 inch drill bit.
- Some wire mesh or chicken wire.
- A hammer and nails or a stapler.
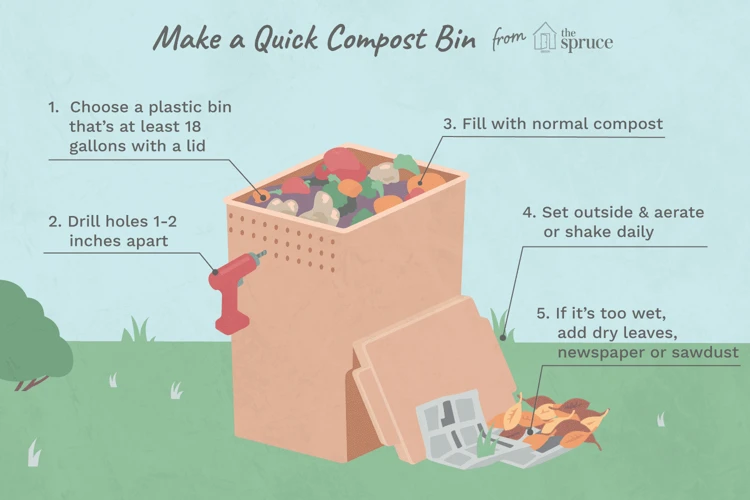
Once you have gathered these materials, it’s time to start building your compost bin. Begin by drilling several 1/2 inch holes in the lid and sides of your bin to allow for air circulation. Then, use your hammer and nails or stapler to attach the wire mesh or chicken wire to the bottom of the bin. This will help to hold the compost material in place while it’s decomposing. After that, place the bin in a spot that is easily accessible but out of direct sunlight. Finally, add a layer of compostable materials to the bottom of the bin to get started.
Remember, building your own compost bin can save you money and is a great way to reduce your household waste. With a little bit of effort, you can create nutrient-rich compost to help your cannabis plants thrive, while also reducing your footprint on the environment.
4. Add Composting Materials
Once you have built your compost bin, you can start adding composting materials. It’s important to have a good balance of carbon-rich materials and nitrogen-rich materials, also known as “greens” and “browns”.
Greens provide nitrogen and include:
| Green Composting Materials | Examples |
|---|---|
| Plant scraps | Vegetable and fruit scraps, coffee grounds |
| Grass clippings | From untreated lawns |
| Manure | From herbivorous animals (cow, horse, rabbit) |
Browns provide carbon and include:
| Brown Composting Materials | Examples |
|---|---|
| Fall leaves | Shredded dry leaves |
| Straw | Untreated straw |
| Wood chips | Untreated wood chips (not from pressure-treated wood) |
It’s important to avoid adding certain materials, such as meat, dairy, and oily foods. These materials can attract pests and create unpleasant odors.
Once you have gathered your composting materials, layer them in your bin, starting with a layer of browns, followed by a layer of greens, and so on. Aim for a ratio of roughly 3 parts browns to 1 part greens.
To speed up the composting process, you can also add a compost starter or activator. These products often contain microorganisms that help break down the materials.
Remember to regularly add new materials to your bin and turn the compost every few weeks to help aerate it and promote even decomposition. With time and patience, you’ll have nutrient-rich compost to feed your cannabis plants.
5. Turn Your Compost
Turning your compost is an important step in the process of creating nutrient-rich soil for your cannabis garden. This step helps to ensure that the materials inside the compost bin break down evenly and thoroughly. Here are some steps to follow when turning your compost:
- Use a pitchfork or shovel: To turn your compost, you will need a pitchfork or shovel. This will help you to mix the materials inside and aerate the compost.
- Turn your compost regularly: You should turn your compost every few weeks to ensure that it is breaking down evenly. This step can speed up the composting process and prevent the materials from becoming compacted and stuck together.
- Add water if necessary: If your compost is dry, you can add water to help it break down. However, make sure not to add too much water, as this can cause the materials to become waterlogged and slow down the composting process.
- Check the temperature: As you turn your compost, take a moment to check its temperature. The ideal temperature range for composting is between 135 and 160 degrees Fahrenheit.
- Monitor the progress of your compost: As you turn your compost, make note of its progress. Is it breaking down evenly? Do you notice any smells or signs of mold? Monitoring the progress of your compost will help you to identify any potential problems and address them before they become serious issues.
By following these steps and turning your compost regularly, you can create nutrient-rich soil for your cannabis garden that will help your plants thrive.
6. Use Your Compost in Your Cannabis Garden
Once your compost has had time to mature, it’s time to reap the benefits and use it in your cannabis garden. The beauty of compost is that it can be used in a variety of ways to benefit your plants. Here are just a few examples:
| How to Use Your Compost | Description |
|---|---|
| As Soil Amendment | Mix your compost into your soil to improve soil quality and provide your plants with essential nutrients. The compost will help break up heavy soil and retain moisture in sandy soil, creating the perfect environment for your cannabis plants to thrive. |
| As Mulch | Spread a layer of your compost around the base of your plants to help suppress weeds and retain moisture. As the compost breaks down, it will continue to provide nutrients to your plants. |
| As Liquid Fertilizer | Brew your compost into a tea by mixing it with water and letting it steep for a few days. Strain the solids and use the liquid as a nutritious fertilizer for your cannabis plants. This method allows the plants to quickly absorb the nutrients and is particularly useful for plants that need a boost. |
Using your own homemade compost in your cannabis garden not only saves money by reducing your need for store-bought fertilizers, but it also allows you to have control over what is being added to your soil. With a little effort and patience, creating a DIY compost bin can be an easy and rewarding project for any cannabis gardener.
Tips and Tricks for Composting Success
Now that you have created your own compost bin and started composting materials for your cannabis garden, it’s important to know how to maximize the effectiveness of your compost. Here are some tips and tricks to help ensure that your composting process is successful and that your cannabis plants flourish with the nutritious soil you have created. By following these do’s and avoiding these don’ts, you can troubleshoot common composting problems and maintain the longevity of your compost bin. Let’s get started!
1. Composting Do’s
When it comes to composting, there are certain guidelines you should follow to ensure success. Here are some composting do’s to keep in mind:
- Aerate Your Compost: Oxygen is necessary for the composting process, so make sure to turn your compost frequently to incorporate air. This will also prevent the compost from becoming compacted and slowing down the process.
- Monitor Moisture: Your compost should be moist, but not too wet. The ideal moisture level is around 50-60%. If it is too dry, add water. If it is too wet, add dry materials such as leaves or newspaper.
- Add a Variety of Materials: Include a mix of green and brown materials to provide a balance of nitrogen and carbon. Green materials include kitchen scraps and grass clippings, while brown materials include leaves and branches. The ideal ratio is 2:1 brown to green.
- Shred Materials: To speed up the composting process, shred or chop larger materials into smaller pieces. This will provide more surface area for the composting organisms to break down.
- Keep Pests Out: To avoid attracting rodents or other pests, do not add meat, dairy or oily foods to your compost. Also, consider adding a cover to your compost bin.
- Be Patient: Depending on the size and type of materials in your compost bin, the process can take anywhere from a few months to a year. Be patient and wait for the compost to mature before adding to your garden.
By following these composting do’s and keeping a consistent routine, you’ll be well on your way to creating nutrient-rich compost for your cannabis garden.
2. Composting Don’ts
When it comes to composting, there are certain things you should avoid adding to your compost bin. Here are some composting don’ts which are just as important to ensure successful composting:
- Avoid adding meat or dairy products to your compost bin: These products can attract harmful pests and cause unpleasant odors. Additionally, they can take a long time to break down, which can slow down the composting process.
- Avoid adding pet waste or diseased plants to your compost bin: These items can contain harmful pathogens that may survive the composting process and infect your cannabis plants. It’s best to dispose of pet waste in a separate area and to discard diseased plant material too.
- Avoid adding weeds that have gone to seed: While composting can kill many weed seeds, it’s best to avoid adding weeds that have already gone to seed. This is because they can sprout in your garden when you use the compost, leading to more weeding.
- Don’t add too much of one type of material: It’s important to maintain a balance of brown and green materials in your compost bin. Adding too much of one type can slow down the composting process and create an unbalanced environment that may not break down items effectively.
- Avoid using compost made from treated wood products: Wood products that have been treated with chemicals should not be added to your compost bin as they can leach harmful toxins into the soil which can damage plants.
- Don’t allow your compost bin to become too dry or too wet: Composting requires a balance of moisture. If your compost bin becomes too dry, it can slow down the composting process. If it becomes too wet, it can create an environment that fosters harmful bacteria instead of beneficial microbes.
By avoiding these composting don’ts, you will be able to create a healthy and nutrient-rich compost that will benefit your cannabis garden.
3. Troubleshooting Common Composting Problems
Composting is a simple and natural process, but sometimes problems can arise. Here are some common issues that may occur and how to troubleshoot them:
- Smelly Compost: If your compost smells bad, like rotten eggs or ammonia, it may be too wet or have too much nitrogen-rich material. To fix this, add more carbon-rich material and turn the compost to improve aeration.
- Incomplete Decomposition: If your compost is not breaking down properly, it may be because there isn’t enough oxygen or moisture. Make sure to turn the compost regularly to add air and add water when necessary.
- Pest Infestations: Composting can attract pests like fruit flies, ants, or rodents. To solve this problem, make sure not to compost meat, dairy, or oily foods that can attract pests. Cover the compost with a lid, use a bin with a tight-fitting lid or a wire mesh, and avoid adding materials that pests are attracted to.
- Too Much Moisture: If your compost is wet and slimy, it may be because there is too much moisture. Add dry carbon-rich material and avoid adding wet food scraps or grass clippings.
- Not Enough Air: If your compost is compact and not breaking down, it may have insufficient air flow. Turn the compost frequently to add air or consider incorporating aeration tubes into the composting bin.
- Long Time to Decompose: If your compost is taking a long time to break down, it may be because you’re not adding enough organic material or the pieces are too big. Make sure to shred or chop the materials and add enough to keep the compost pile large enough to generate heat.
- Acidic Compost: If your compost is too acidic, it may be because there is too much citrus or other acidic materials. Try adding more alkaline materials like eggshells, coffee grounds, or wood ash to balance out the pH.
By troubleshooting these common composting problems, you can ensure a healthy and productive compost bin that will provide your cannabis garden with the nutrients it needs to flourish.
4. Maintaining Your Compost Bin for Longevity
To keep your compost bin in optimal condition and prolong its lifespan, there are some key steps you can take. Follow these guidelines to ensure a thriving compost bin that yields rich compost for your cannabis garden.
1. Keep Your Compost Bin Aerated: Proper air circulation is crucial to decompose the organic matter in your compost bin, so make sure to turn the pile and add dried leaves or straw to improve airflow.
2. Monitor Moisture Levels: Your compost bin should be moist, but not soaked. Check the moisture levels regularly and add water if necessary. Conversely, if the pile is too wet, mix in some dry materials to balance it out.
3. Add Nitrogen-Rich Materials: Nitrogen-rich materials such as grass clippings or vegetable scraps will help speed up the composting process. Make sure to add these materials in moderation, as too much nitrogen can create an unpleasant odor.
4. Avoid Adding Fats or Meat: These materials take longer to break down and can attract pests. Stick to plant-based materials for a healthy compost bin.
5. Keep an Eye Out for Pests: While many insects are helpful for breaking down the compost, some can cause harm. Keep an eye out for pests and take action if necessary.
6. Use Your Compost: Once your compost is ready, use it in your cannabis garden to improve soil quality and nutrient absorption. Regular use will also prevent your compost from becoming overfull and extending the life of your compost bin.
By keeping your compost bin in good shape, you’ll be able to produce rich compost that will enhance the quality of your cannabis garden. With these tips, you can maintain your compost bin for years to come.
Conclusion
In conclusion, creating a DIY compost bin for your cannabis garden is not only a sustainable practice, but it also has numerous benefits for your plants. Composting improves soil quality, enhances nutrient absorption, and reduces chemical fertilizer dependency, all while reducing waste and helping the environment.
By following the step-by-step guide outlined in this article, you can easily build your own compost bin using materials readily available in your home or local hardware store. With a little effort and patience, you can create nutrient-rich compost that will help your cannabis plants thrive.
Remember to follow the tips and tricks provided to ensure composting success and avoid common problems. Also, maintaining your compost bin is essential for its longevity, so make sure to regularly add materials and turn your compost.
Overall, composting is a simple yet powerful way to improve the health and yield of your cannabis garden while minimizing your carbon footprint. Give it a try and see the difference it can make for both your plants and the planet.
Frequently Asked Questions
What materials can I compost?
You can compost almost any organic material, including food scraps, yard waste, cardboard, and newspaper. However, avoid composting meat, dairy, and oily foods as they can attract pests and slow down the composting process.
How long does it take to compost?
The composting process can take anywhere from a few weeks to several months depending on the materials you use and how often you turn your compost.
What type of compost bin should I use for my cannabis garden?
You can use any type of compost bin you prefer, including a DIY bin made of wood or wire mesh, or a store-bought bin made of plastic or metal.
Is it necessary to turn the compost?
Yes, turning the compost is necessary to ensure that all the materials are evenly broken down and to prevent bad odors and pests.
How do I know when my compost is ready?
Your compost is ready when it has a dark, crumbly texture and does not smell bad. It should look and smell like rich, earthy soil.
Can I use compost in potted cannabis plants?
Yes, you can use compost in potted cannabis plants as long as it is well-aerated and does not contain any large chunks of material that can obstruct drainage.
What can I do with excess compost?
You can use excess compost as a soil amendment for other plants in your garden, or give it away to friends and family who have their own gardens.
How often should I add new materials to my compost bin?
You can add new materials to your compost bin as often as you like, but it is best to wait until the existing materials are broken down before adding more.
Can composting be done indoors?
Yes, composting can be done indoors using a small compost bin or vermicomposting system.
Are there any risks involved in composting?
Composting is generally safe, but it is important to handle materials correctly and avoid composting any hazardous chemicals or materials.

