
Growing Cannabis with DIY Aeroponic Systems
Growing cannabis can be an exciting and rewarding experience, but it can also be quite challenging, especially for beginners. There are various cultivation methods to choose from, each with its own set of advantages and disadvantages. However, if you’re looking for a highly efficient and effective way to grow cannabis, aeroponics might be the answer. This method involves suspending the roots of the plants in a mist environment, which allows for maximum nutrient uptake and oxygenation. In this guide, we will provide you with detailed step-by-step instructions on how to create your own DIY aeroponic system for cannabis cultivation, including the materials needed, design, and maintenance requirements. So, let’s dive in and learn how to grow cannabis with aeroponics!
Why Choose Aeroponics for Cannabis Cultivation?
Contents
If you’re a cannabis grower, you’re probably well aware that cultivation methods can have a huge impact on the final product. If you’re considering aeroponics as a method of growing cannabis, you may be wondering why it’s worth the investment. Aeroponics offers a unique approach to cultivating cannabis that can result in faster growth and higher yields. Additionally, the benefits of aeroponics over other methods of cultivation make it an attractive option for many growers. Let’s explore these benefits and why aeroponics may be the right choice for your cannabis cultivation needs.
Aeroponic vs. Other Cultivation Methods
When it comes to cultivating cannabis, there are a variety of methods to choose from. However, aeroponics stands out from other cultivation methods in a few key ways:
- Hydroponics: Unlike hydroponics, aeroponics doesn’t require a constant flow of nutrient-rich water. Instead, the roots are misted with a nutrient-rich solution, which can lead to faster and more efficient nutrient uptake.
- Soil-based growing: Growing in soil can be messy and presents several potential issues, such as pests and disease. Aeroponics eliminates these issues and allows for precise control over nutrient levels and pH.
- Traditional DWC: Deep Water Culture (DWC) is another popular hydroponic method for growing cannabis. However, aeroponics typically produces faster growth rates and larger yields than DWC.
So why choose aeroponics over other cultivation methods?
Aeroponics provides several key benefits for cannabis growers, including:
- Faster Growth: The nutrient-rich mist can be absorbed by the roots more efficiently than in traditional soil-based growing or hydroponics, leading to faster vegetative growth and larger yields.
- Larger Yields: With increased nutrient uptake and faster growth rates, aeroponics can lead to larger yields compared to other methods of cultivation.
- Precise Control: Aeroponics allows for precise control over nutrient levels, pH, and other environmental factors. This eliminates the guesswork of soil-based growing and can lead to more consistent results.
- Reduced Water Usage: Since the roots are only misted with a nutrient-rich solution, aeroponics uses significantly less water than traditional soil-based growing methods.
- Less Space Required: Aeroponic systems can be compact and require less space compared to soil-based growing methods. This can be ideal for those with limited growing space.
Aeroponics provides several advantages over other cultivation methods when it comes to growing cannabis. With faster growth rates, larger yields, and precise control over growing conditions, it’s no wonder more cultivators are turning to this innovative method.
Benefits of Aeroponics for Cannabis Growers
One of the biggest advantages of aeroponics for cannabis growers is increased yield. Compared to traditional soil-based methods, aeroponics can produce higher yields because the plants have access to more oxygen and nutrients. This leads to faster growth and more vigorous plants.
Another benefit is that aeroponics allows for more precise control over growing conditions. When growing in soil, it can be difficult to maintain consistent moisture levels and nutrient ratios. With aeroponics, growers can precisely control the delivery of water and nutrients to the plants, ensuring optimal growth and health.
Additionally, aeroponics systems can be more space-efficient than traditional soil-based methods. Because the plants are suspended in the air rather than planted in soil, more plants can be grown in a smaller area. This can be especially beneficial for indoor growers who need to maximize their growing space.
Another advantage is that aeroponics can reduce the risk of pests and disease. Soil can harbor a variety of pests and pathogens that can damage or kill plants. By growing in an aeroponic system, growers can avoid these issues, leading to healthier plants and higher yields.
Finally, aeroponic systems can be more environmentally friendly than traditional soil-based growing methods. By minimizing the use of soil and water, aeroponics can reduce waste and lower the environmental impact of cannabis cultivation.
| Benefits of Aeroponics for Cannabis Growers |
|---|
| Increased yield compared to soil-based methods |
| More precise control over growing conditions |
| Space-efficient for maximizing growing space |
| Reduced risk of pests and disease |
| Environmentally friendly by minimizing waste and resource use |
DIY Aeroponic System Design
When it comes to growing cannabis, the cultivation method you choose can greatly impact the quality and yield of your harvest. Aeroponics is a popular choice among growers, as it allows for precise control over nutrient delivery and encourages rapid growth. In this section, we will delve into the design of a DIY aeroponic system and provide step-by-step instructions on how to construct your own. From choosing the right materials to implementing lighting and pH control, we will cover everything you need to know to set up your own aeroponic system for growing cannabis.
Materials Needed
To build your own DIY aeroponic system, you will need a variety of materials. The table below outlines the essential equipment, along with optional items you may choose to include.
| Essential Materials | Optional Materials |
|---|---|
| Container: A large plastic tub or container to hold the nutrient solution and act as the reservoir. | Water pump: Used to circulate the nutrient solution through the system. |
| Air pump: Supplies oxygen to the roots and helps prevent blockages in the misters. | Misters: Spray nutrient solution onto the roots. |
| Aerospray Nozzles: Similar to misters, these spray the nutrient solution in a fine mist directly onto the roots. | Net pots: Hold the plants in place and allow their roots to be suspended in the nutrient solution. |
| Tubing: Connects the water and air pumps to the misters and aerospray nozzles. | pH meter: Used to monitor and adjust the pH level of the nutrient solution. |
| pH adjusters: Used to raise or lower the pH level of the nutrient solution. | Grow lights: Provide the necessary light for your plants to grow. |
| Coco coir or other growing medium: Used to anchor the plants in the net pots. | Humidity and temperature monitor: Used to keep track of the environment in your grow space. |
While aeroponic systems require more equipment than some other cultivation methods, building your own DIY system can be a cost-effective way to grow high-quality cannabis. Be sure to have all the necessary materials before you start building your system.
Step-by-Step Instructions
To build your own DIY aeroponic system for cannabis cultivation, you will need to follow these step-by-step instructions:
| Step 1: | Start by gathering all the materials you will need to build your DIY aeroponic system. You will need a reservoir, a water pump, PVC pipes, net pots, and growing medium. You will also need tubing, spray nozzles, and a pH meter. |
| Step 2: | Build the reservoir using a food-grade container that can hold at least 10 gallons of water. Drill a hole in the lid and install the water pump, making sure it is securely fastened. |
| Step 3: | Install the PVC pipes into the reservoir. Cut the pipes to size so they fit securely and snugly. You will also need to drill holes into the pipes where the net pots will be placed. Make sure the holes are evenly spaced and sized to fit the net pots. |
| Step 4: | Place the net pots into the PVC pipes. Fill the net pots with your chosen growing medium such as rockwool or coco coir. |
| Step 5: | Attach tubing to the spray nozzles and place them into the PVC pipes. The spray nozzles should be evenly spaced so they cover all of the plants in the net pots. |
| Step 6: | Connect the tubing to the water pump and turn the pump on. Make sure the water is spraying evenly from all of the nozzles and adjust the water flow if necessary. |
| Step 7: | Monitor the pH levels of the water in the reservoir regularly and adjust as needed. Cannabis plants prefer a pH level between 5.5 and 6.5. You may also need to add nutrients to the water to ensure the plants are getting the necessary nutrients for growth. |
Following these steps, you should be able to build your own DIY aeroponic system for cannabis cultivation. Remember to regularly monitor and maintain the system for optimal plant growth and high-quality yields.
Building the Reservoir
Building the Reservoir:
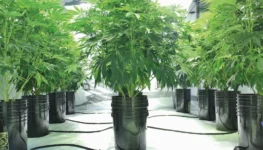
One of the essential components of building an aeroponic system is the reservoir, where the nutrient-rich water solution is stored, and the plant roots are suspended. Below is a step-by-step guide on how to build the reservoir for your DIY aeroponic system:
- Choose a Suitable Container: You’ll need a container that’s large enough to hold your water solution and accommodate your net pots. A food-grade plastic container or a plastic drum will work well.
- Add Holes for Net Pots: Using a hole saw, add holes to the lid of the container where you’ll place your net pots. The number of holes you need will depend on how many plants you plan on growing.
- Add Water Level Indicator: To prevent your pump from running dry, add a water level indicator to your reservoir. You can use a float valve or a water level sensor.
- Attach Hose Fittings: Depending on the pump you’re using, attach the hose fittings to the container. You’ll need an intake hose to pull the water solution from the reservoir and an output hose to deliver the water solution to the misting nozzles.
- Add Nutrient Solution: Once you’ve constructed your reservoir, add the nutrient solution to the container. Make sure to mix it well and follow the manufacturer’s instructions for the correct nutrient dosing.
- Test Your System: Before adding your plants, test your system to ensure it’s working correctly. Turn on the pump and adjust the pH as needed.
By following these steps, you can build a functional reservoir for your DIY aeroponic system. It’s essential to select a robust and suitable container that can support your plants throughout their growth cycle while ensuring the water level remains stable. Additionally, it’s crucial to maintain a regular watering schedule and monitor the pH levels to ensure the plants receive the right amount of nutrients.
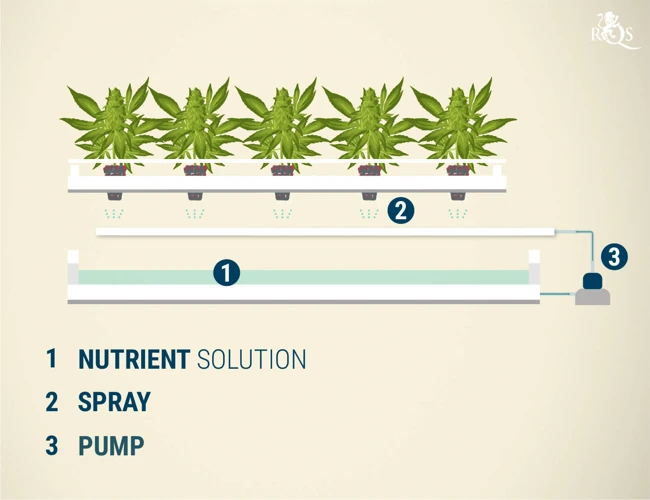
Creating the Aeroponic System
Once you have the reservoir set up, it’s time to create the aeroponic system itself. The following steps will guide you through the process:
1. Attach the nozzles: First, you will need to attach the misting nozzles to the PVC pipes. Use a drill to make holes in the pipes and insert the nozzles. Make sure that they are pointing downwards towards the pots.
2. Create the pot holders: Using a saw, cut the PVC pipes into shorter sections that are about the same height as your pots. These will serve as pot holders. Make sure that they fit snugly inside the larger PVC pipes.
3. Attach the pot holders: Attach the smaller PVC pipe sections to the larger pipes by sliding them inside. Leave about an inch of space between each pot holder.
4. Add the net cups: Using a hole saw or a sharp knife, create holes in the center of each pot holder. Insert the net cups into these holes, making sure that they fit securely.
5. Attach the aeroponic manifold: The aeroponic manifold is the device that distributes the nutrient solution through the nozzles. Attach it to the top of the PVC pipes.
6. Connect the pump: The pump is what pushes the nutrient solution through the manifold and into the pipes. Connect it to the manifold with tubing.
7. Fit the tubing: Use tubing to connect the manifold to the nozzles. Cut the tubing to the appropriate length and attach it to the nozzles with small clips.
Note: It’s important to make sure that all of the connections are tight and secure. Any leaks could cause nutrient solution to escape from the system, leading to a loss of nutrients and potentially damaging your plants.
Lighting and pH Control
Proper lighting and pH control are crucial for the success of your DIY aeroponic system. Here are some key points to keep in mind:
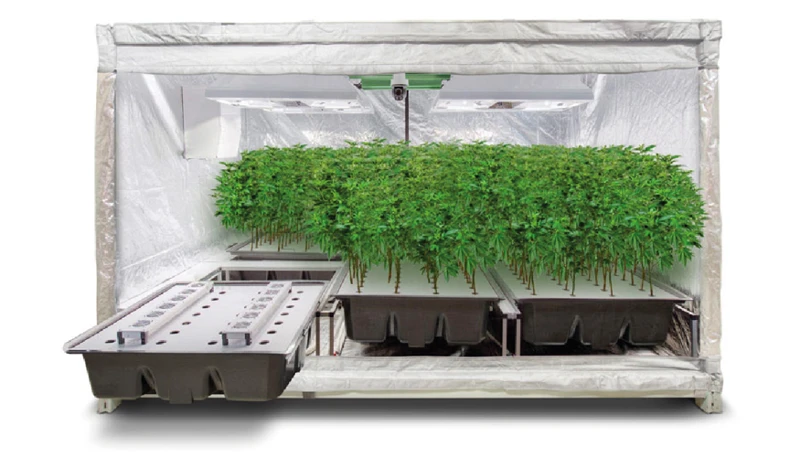
- Lighting: Cannabis plants require a lot of light, especially during the vegetative stage. LED grow lights are the most effective for indoor cultivation, as they produce less heat and use less energy than traditional HPS or MH lights. You’ll want to ensure that your plants are getting at least 18 hours of light per day during the vegetative stage, and 12 hours of light per day during the flowering stage.
- pH Control: Aeroponic systems require a slightly acidic pH level of around 5.5-6.5 for optimal nutrient uptake. You can use a pH meter or pH test strips to monitor the pH level of your reservoir. If you need to adjust the pH level, you can use pH up or pH down solutions to bring it to the desired range. It’s important to monitor and adjust the pH level regularly, as it can fluctuate due to factors such as nutrient uptake, water evaporation, and bacterial growth.
Remember to regularly check and adjust the lighting and pH levels in your DIY aeroponic system to ensure healthy growth and optimal yields.
Choosing the Right Strain for Aeroponics
When it comes to aeroponic cultivation of cannabis, it’s important to choose the right strain in order to maximize your yield and ensure the highest quality flower. Different strains have varying growth patterns, nutrient requirements, and environmental preferences, so it’s important to do your research and select a strain that will thrive in an aeroponic system.
Factors to Consider When Choosing a Strain:
| Factor | Description |
|---|---|
| Sativa vs. Indica | Sativas tend to have longer flowering times and taller growth patterns, while Indicas are generally shorter and have a more compact growth habit. Consider the height of your aeroponic system and the space you have available. |
| Genetics | Look for strains with genetics that are well-suited to aeroponic cultivation, such as those with strong root systems and resistance to stress and disease. |
| Nutrient Requirements | Aeroponic systems deliver nutrients directly to the plants’ roots, so look for strains that thrive in nutrient-rich environments. |
| Flowering Time | Consider the length of your grow cycle and choose a strain with a flowering time that fits within that time frame. Some strains can take up to 14 weeks to flower, while others may flower in as little as 8 weeks. |
| Yield | Some strains are known for their high yield potential, making them a good choice for aeroponic growers who want to maximize their harvest. |
| Flavor and Aroma | Lastly, consider the flavor and aroma profile of different strains in order to choose one that meets your personal preferences. |
Some strains that have been reported to do well in aeroponic systems include:
– Blue Dream
– Sour Diesel
– OG Kush
– Green Crack
– Jack Herer
Ultimately, the right strain for your aeroponic system will depend on a variety of factors, including your personal preferences and growing goals. Experimenting with different strains can help you find the perfect fit for your aeroponic garden.
How to Maintain Your Aeroponic System
Once you have set up your DIY aeroponic system for cannabis cultivation, it is essential to ensure that it is well-maintained to ensure your plants grow healthy and strong. Proper maintenance involves monitoring pH and water levels, ensuring that the system is clean and sanitized, and taking care to prevent any potential problems that can harm your plants. In this section, we will guide you through the steps you need to follow to maintain your aeroponic system successfully.
Monitoring pH and Water Levels
In aeroponic systems, it is important to constantly monitor the pH levels and water levels to ensure the health and vitality of your cannabis plants. Improper pH levels or water levels can lead to stunted growth or even the death of your plants. To prevent this, you should regularly check and adjust the pH and water levels.
Here are some steps for monitoring pH and water levels:
- Check pH levels daily using a pH meter or testing kit. The optimal pH level for cannabis plants in aeroponic systems is between 5.5 and 6.5.
- If the pH levels are too high, add a few drops of pH Down solution to lower it. If it’s too low, add pH Up solution to raise it. Test again after adding the solution and adjust as necessary.
- Make sure to also check the water levels daily. You want to maintain a consistent level of water in the reservoir to ensure the plants have enough moisture without drowning.
- If the water level is too low, add more water to the reservoir. If the water level is too high, use an air stone or drain some of the water out of the reservoir.
Some additional tips for monitoring pH and water levels in aeroponic systems:
- Keep a log of pH and water levels to track changes and determine patterns.
- Regularly clean and sanitize the system to prevent the buildup of algae or bacteria that can affect pH and water levels.
- Consider investing in an automated pH and water level monitoring system for more precise and efficient monitoring.
Maintaining proper pH and water levels in your aeroponic system is essential for healthy and successful cannabis cultivation. By monitoring and adjusting these levels as necessary, you can ensure your plants have the optimal conditions for growth and development.
Cleaning and Sanitizing the System
Keeping an aeroponic system clean and sanitized is critical for the health of your plants as well as the success of your grow. Here are some steps to follow for cleaning and sanitizing your system:
- Empty the Reservoir: Begin by emptying the nutrient solution from the reservoir. Dispose of the solution properly and make sure to rinse out any sediment or debris that may have accumulated.
- Clean the Reservoir: Use a mild soap and water solution to clean the inside of the reservoir. Be sure to scrub any areas that may have stubborn buildup or residue. Rinse the reservoir thoroughly with clean water.
- Sanitize the Reservoir: Use a mixture of hydrogen peroxide and water to sanitize the reservoir. The recommended ratio is one part hydrogen peroxide to ten parts water. Allow the solution to sit in the reservoir for 30 minutes to an hour before draining and rinsing with clean water.
- Clean the Spray Nozzles: Remove the spray nozzles from the system and soak them in a mixture of white vinegar and water for at least 30 minutes. Scrub the nozzles to remove any buildup or debris, then rinse thoroughly with clean water.
- Check pH and Nutrient Levels: Once the system is clean and sanitized, make sure to check the pH and nutrient levels of the solution before adding it back into the reservoir. This will ensure that your plants have the proper balance of nutrients for optimum growth.
By regularly cleaning and sanitizing your aeroponic system, you will help prevent the growth of harmful bacteria and other pathogens that can affect your plant’s health.
Harvesting and Drying Your Cannabis
After weeks of dedicated care and attention, the time has finally come to harvest your cannabis plants. This is an exciting moment for any grower, but it is important to handle the process with care to ensure the best possible results. Proper harvesting and drying techniques are crucial for preserving the potency and flavor of your cannabis. In this section, we will explore the important steps you need to follow to harvest and dry your cannabis plants successfully. From knowing when to harvest to techniques for drying and curing, this guide has got you covered. So, let’s dive in and discover how to get the most out of your cannabis harvest!
Knowing When to Harvest
Knowing When to Harvest
Harvesting your cannabis plant at the right time is crucial for the quality and potency of your buds. But how do you know when it’s the right time to harvest?
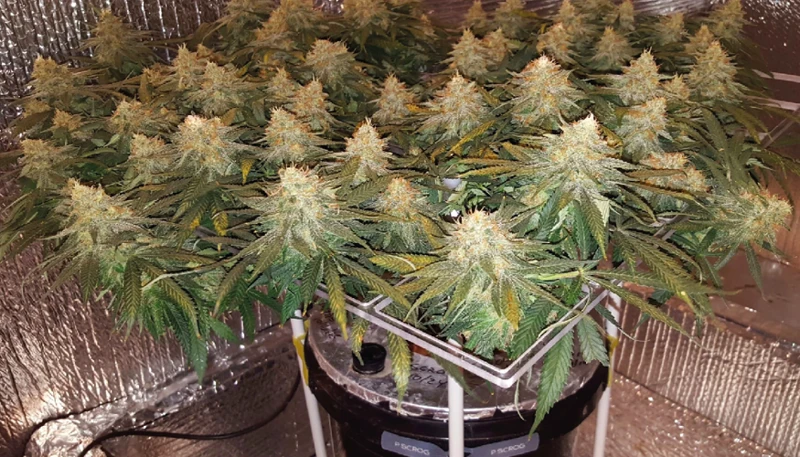
There are a few indicators that can help you determine when your cannabis is ready for harvest. One of the most important is the trichomes. Trichomes are small, crystal-like structures that cover the buds and sugar leaves of the cannabis plant. These structures contain the plant’s cannabinoids, including THC and CBD.
To determine the trichome maturity, you need a magnifying glass or a jeweler’s loupe. Look at the trichomes and check their color. At the early stage of the flowering phase, trichomes are clear. As the plant matures, these trichomes become cloudy. This is the stage where the buds will have the most potent effects. If you wait too long, the trichomes will turn amber, indicating that the THC is starting to degrade.
Another indicator of readiness is the color of the pistils. Pistils are the hair-like structures that stick out from the buds. When the pistils start to turn brown, red or orange, it is a sign that the plant is ready for harvest.
It’s also important to consider the strain you are growing, as different strains have different maturation times. Some strains may mature in as little as 8 weeks, while others may take up to 14 weeks.
Keep in mind that harvesting too early can result in less potent buds, while harvesting too late can also affect the potency and quality of your finished product.
Table: Indicators of Harvest Readiness
| Indicator | Description |
|---|---|
| Trichome Maturity | Clear (immature), cloudy (ready), amber (overripe) |
| Pistil Color | Brown, red or orange |
| Strain | Different strains have different maturation times |
By paying attention to these indicators and testing the trichomes, you can ensure that you are harvesting your cannabis plant at its peak potency and quality. Remember that harvesting is just the first step in the process. Proper drying and curing are also important for the final product.
Harvesting Techniques
When it comes to harvesting your cannabis plants from your DIY aeroponic system, there are a few different techniques that you can employ depending on your needs and preferences. Here are some of the most common harvesting techniques and what they entail:
| Technique | Description |
|---|---|
| Selective Harvesting | In this technique, you selectively harvest buds from the plant as they reach maturity, rather than waiting for the entire plant to mature. This allows you to stagger your harvests and ensures that you have a continuous supply of fresh buds throughout the growing cycle. |
| Whole Plant Harvesting | This technique involves harvesting the entire plant at once, rather than selectively harvesting buds. This can be a good option if you want to process the entire plant at once for edibles, concentrates, or other uses. |
| Timing-Based Harvesting | In this technique, you base your harvest timing on the color of the trichomes on the buds. When they are clear, the plant is not ready for harvest yet. When they turn cloudy, the plant is at its peak potency. When they turn amber, the plant has begun to degrade and its potency is decreasing. |
| Flush Harvesting | This technique involves flushing the plant with water for a period of time before harvest in order to remove any nutrients or other substances that may affect the flavor or quality of the final product. |
No matter which harvesting technique you choose, it is important to handle the buds carefully to avoid damage and to dry them slowly and evenly to preserve their flavor and potency. With a little practice and the right techniques, you can enjoy a bountiful harvest from your DIY aeroponic system.
Drying and Curing Your Cannabis
After harvesting your cannabis, it is important to dry and cure it properly to ensure a high-quality final product. Drying and curing are separate processes that need to be completed in succession. Drying removes the moisture from the plant, while curing allows the buds to develop their full flavor and aroma.
To properly dry your cannabis, you will need to hang the buds upside down in a room with low humidity and good air circulation. The drying process can take up to two weeks, depending on the temperature and humidity levels. It is important to check the buds regularly to ensure they do not become too dry or too moist.
Once the buds are dry, you can begin the curing process. This involves placing the buds in an airtight container for several days to several weeks. During the curing process, the buds will develop their full flavor and aroma. It is important to monitor the humidity levels in the container and to open it periodically to allow fresh air in.
To properly cure your cannabis, follow these steps:
| Step | Description |
|---|---|
| Step 1 | Trim the buds and place them in an airtight container, such as a glass jar. |
| Step 2 | Store the container in a cool, dark place with a temperature between 60-70°F and a humidity level between 60-65%. You can use a hygrometer to monitor the humidity levels. |
| Step 3 | Open the container once a day to allow fresh air in, and check the buds for mold or mildew. |
| Step 4 | After a few days, the buds will begin to feel slightly moist. This is a sign that the curing process is working. If the buds feel too dry, or if the humidity level drops below 55%, add a humidifying pack to the container to restore moisture. |
| Step 5 | Continue the curing process for several days to several weeks, depending on the desired flavor and aroma. The longer the curing process, the smoother and richer the flavor will be. |
| Step 6 | Once the curing process is complete, you can store your cannabis in an airtight container in a cool, dark place until you are ready to use it. |
Properly drying and curing your cannabis is a critical step in the cultivation process, and can make all the difference in the quality of your final product. By following these steps, you can ensure that your aeroponic cannabis is of the highest quality and potency.
Conclusion
In conclusion, aeroponic systems can provide a highly efficient and effective method for growing cannabis. By utilizing a nutrient-rich mist to feed the plants, this form of cultivation allows for faster growth, higher yields, and more precise control of nutrient delivery compared to traditional soil-based methods.
However, it is important to note that creating a DIY aeroponic system requires careful planning and execution. Proper materials, lighting, and pH control are essential to ensure the success of your cannabis plants. Moreover, selecting the right strain for aeroponic cultivation is also crucial, as some strains may not thrive in this environment.
Once you have set up your aeroponic system, it is important to monitor pH and water levels regularly and keep your system clean and sanitized to avoid any potential contamination or disease. Harvesting your cannabis at the right time and drying/curing it properly are also critical steps in the process.
Overall, DIY aeroponics can be a rewarding and cost-effective way to grow high-quality cannabis at home. With careful planning, execution, and ongoing maintenance, you can enjoy bountiful yields of cannabis while also gaining a deeper appreciation for the plant and its growth process.
Frequently Asked Questions
What is Aeroponics and How Does it Work?
Aeroponics is a method of growing plants in a soilless environment where the roots are suspended in air and misted with a nutrient-rich solution.
Is Aeroponics Better than Other Cannabis Cultivation Methods?
It is difficult to compare one cultivation method to another as each has its unique advantages and disadvantages. However, aeroponics is excellent at providing a high yield, faster growth, and full control over the nutrient intake of the plants.
What Materials do I Need to Build an Aeroponic System?
You will need a large container, net cups, misters, PVC pipes, air pump, tubing, and a timer.
How Can I Choose the Right Strain for Aeroponics?
You should consider the growth rate, nutrient requirements, and overall size of the plant when selecting a cannabis strain. Dwarf varieties are ideal for aeroponic systems as they don’t grow too tall, making maintenance easier.
How can I Monitor pH Levels in My Aeroponic System?
The best way to check the pH level is by using a pH meter or test strips. You should aim for a slightly acidic pH level of around 5.5 to 6.
How Often Should I Clean and Sanitize My Aeroponic System?
You should clean and sanitize your aeroponic system every time you harvest your plants. This ensures your next crop doesn’t suffer from cross-contamination from any remaining nutrients or pathogens.
What is the Ideal Humidity for Drying Cannabis?
The ideal humidity level for drying cannabis is between 45 to 55%. This helps to preserve terpenes and cannabinoids, resulting in a better flavor and aroma.
How Can I Tell When It’s Time to Harvest My Cannabis?
You can tell when it’s time to harvest your cannabis by checking the trichomes on the buds. When they turn from clear to cloudy, it’s the optimal time to harvest.
What is the Best Method for Storing Dried Cannabis?
You should store your dried cannabis in an airtight container such as glass jars or vacuum-sealed bags. Keep them in a cool, dark, and dry location away from any sources of light or moisture.
Is it Legal to Grow Cannabis with an Aeroponic System?
The legality of growing cannabis varies depending on your location. You should check your local laws and regulations before starting to grow cannabis.

