
Curing Your Trimmed Cannabis Buds
As a cannabis enthusiast and grower, you know that the secret to great-tasting and potent buds lies in the curing process. But with so much conflicting information out there, it can be overwhelming to figure out the best way to cure your trimmed cannabis buds. How long should it take? What factors can affect the outcome? Don’t worry, we’ve got you covered. In this article, we’ll take a deep dive into the world of cannabis curing and give you a step-by-step guide to perfecting your process. So grab your jars and let’s get started.
Why Cure Your Cannabis Buds?
Contents
As a cannabis enthusiast, you may have heard about the importance of curing your buds. But why exactly should you go through the curing process? Is it really worth the time and effort? The truth is, curing your cannabis buds is essential for achieving the best possible taste, potency, and overall quality. Curing allows for the gradual breakdown of chlorophyll and other unwanted materials, which in turn enhances the flavor, aroma, and smoothness of your buds. In this section, we’ll explore the science behind curing and why it’s a necessary step for any serious cannabis cultivator.
What is Curing?
Curing is the process of aging cannabis buds after they have been harvested, dried, and trimmed. The process is important for improving the flavor, aroma, and overall quality of the cannabis. During the curing process, the moisture content of the buds is gradually reduced, while the terpene levels and potency are increased.
|Definition |Description |
|——|——|
|Process |Aging cannabis buds after harvesting, drying and trimming |
|Importance |Improving the flavor, aroma and overall quality of cannabis|
|Moisture Content| Gradually reduced|
|Terpene Level| Increased|
|Potency| Increased|
The curing process involves placing the trimmed buds in sealed glass jars, where they will be stored in a cool, dark place for several weeks. During this time, the buds will release excess moisture and gases, which must be allowed to escape periodically by “burping” the jars. Proper curing can take several weeks to several months, but the end result is well worth the wait.
Curing is a crucial step for anyone who wants to achieve the highest quality cannabis possible. Not only does it improve the flavor and aroma of the buds, but it also enhances the potency and overall smoking experience. By taking the time to properly cure your cannabis, you can ensure that you are getting the most out of your harvest.
What Are the Benefits of Curing Your Cannabis Buds?
Curing your cannabis buds is an essential step in the post-harvest process that ensures maximum potency, flavor, and overall quality of your cannabis. Here are some of the benefits of this critical step:
| Benefits of Curing Your Cannabis Buds |
|---|
| 1. Improved Potency |
| The curing process enables the cannabinoids found within the cannabis plant to develop and reach their full potential. This means that the final product will have a higher concentration of THC, CBD, and other cannabinoids, making it more potent for the consumer. |
| 2. Enhanced Flavor Profile |
| Curing helps to bring out the natural flavors and aromas of the cannabis plant. By allowing the buds to slowly release moisture, the terpenes, and flavonoids that give each strain its unique taste and scent become more pronounced, creating a more enjoyable smoking experience. |
| 3. Smoother Smoke |
| Freshly harvested cannabis buds are often harsh and produce a less desirable smoking experience. Cured buds, on the other hand, have had time to release excess moisture, making them smoother to smoke and easier on the throat and lungs. |
| 4. Longer Shelf Life |
| Curing your cannabis properly can extend its shelf life, preserving the potency, flavor, and overall quality of the bud. This means you can enjoy your cannabis for a more extended period without worrying about it becoming stale or losing its potency. |
How Long Should You Cure Your Cannabis Buds?
Determining the appropriate length of time to cure your cannabis buds can be a perplexing process. While some may believe that longer is always better, it’s important to find the sweet spot in curing time to achieve the best possible results. There are several factors to consider, including the drying time, ideal curing time, and external elements that can affect the process. In this section, we’ll explore these factors in more detail to help you perfect your curing process and achieve the highest quality cannabis buds.
Drying vs. Curing Time
When it comes to cannabis cultivation, it’s important to understand the difference between drying and curing, as both play a vital role in achieving high-quality buds. Drying refers to the process of removing most of the moisture from the freshly harvested buds, whereas curing involves the slower process of gradually bringing the buds to their ideal level of moisture content and allowing them to develop their full flavor and potency.
Drying and curing times can vary depending on a number of factors, including humidity levels, temperature, and the specific strains of cannabis being grown. However, as a general rule of thumb, drying time typically lasts around 5-10 days, while curing time can take anywhere from 2-8 weeks or even longer.
It’s important to note that there’s no set-in-stone timeline for drying and curing, and the ultimate goal is to achieve the perfect level of moisture for the specific strain of cannabis being grown. Rushing the process can lead to harsh, bitter, and less potent buds, while properly drying and curing can take cannabis from good to great.
To help get the most out of your buds and ensure a smooth, enjoyable smoking experience, it’s crucial to master both the drying and curing processes.
The Ideal Curing Time
The ideal curing time for your trimmed cannabis buds can vary depending on various factors. However, as a general rule of thumb, the ideal curing time is between 2-4 weeks. During this timeframe, your buds should be properly dried before being stored in an airtight container for curing.
To determine if your buds are properly cured, you can use various indicators such as the texture, aroma, and taste. Your buds should be sticky, but not too moist, and they should have a pleasant aroma and flavor.
Over-curing can result in buds that have a harsher taste and a weaker aroma, while under-cured buds can have a grassy flavor and lower potency.
It is important to note that the ideal curing time can also vary based on the specific strain, as different strains can have different curing requirements. The curing time can be affected by various environmental factors such as humidity and temperature.
To ensure that your buds are perfectly cured, it is recommended to monitor them regularly and adjust the curing time based on their progress. Keep in mind that patience is key when it comes to achieving the ideal curing time, as rushing the process can result in sub-optimal results.
Achieving the ideal curing time for your trimmed cannabis buds requires patience, attention to detail, and proper monitoring. By following the proper steps and guidelines, you can ensure that your buds are perfectly cured and ready for consumption.
| PROS | CONS |
|---|---|
| Develops a smooth, pleasant smoke | Takes time and requires patience |
| Improves the aroma and flavor of buds | Over-curing can result in loss of potency |
| Increases potency and effects | Under-curing can result in harsh taste |
| Improves the smoothness of burn | Environmental factors can affect curing time |
Factors That Can Affect Curing Time
The curing time of your cannabis buds can be affected by various factors, some of which you may not have control over. These factors include:
| Humidity | The humidity level in the environment where you are curing your buds can have a huge impact on the curing time. If the humidity is too high, the buds may take longer to dry and cure. If it is too low, they may dry too quickly and not cure properly. |
| Temperature | The temperature of the environment can also affect the curing process. If it is too cold, the buds may take longer to dry and cure. If it is too hot, they may dry too quickly and become brittle. |
| Airflow | Proper airflow is crucial to the curing process. If there is not enough airflow, the buds may develop mold or other unwanted contaminants. However, if there is too much airflow, the buds may dry too quickly and not cure properly. |
| Bud Size | The size of the buds can also affect the curing time. Larger buds tend to take longer to dry and cure than smaller buds. |
| Strain | The strain of cannabis can also affect the curing time. Different strains have different characteristics and may require different drying and curing times. |
| How Buds Were Trimmed | The way your buds were trimmed can also affect the curing time. Buds that were not trimmed properly may take longer to dry and cure. |
| How Buds Were Dried | The way your buds were dried can also impact the curing time. If they were dried too quickly or in an environment with poor airflow, they may take longer to cure. |
While not all of these factors may be in your control, being aware of them can help you adjust your curing process accordingly and ultimately lead to perfectly cured cannabis buds.
How to Perfect Your Curing Process
Now that you know why curing cannabis buds is essential, it’s time to master the process. While it may seem intimidating at first, with a bit of practice and patience, anyone can perfect their curing technique. In this section, we’ll break down the steps you need to follow to ensure your buds are properly dried and cured. From preparing your jars to monitoring humidity levels, we’ll cover everything you need to know to create a high-quality, enjoyable product. So let’s dive in and explore how to perfect your curing process!
Step 1: Dry Your Cannabis Buds
The first step in curing your cannabis buds is to properly dry them. This step is crucial for achieving the highest quality final product. Here are the necessary steps for drying cannabis buds:
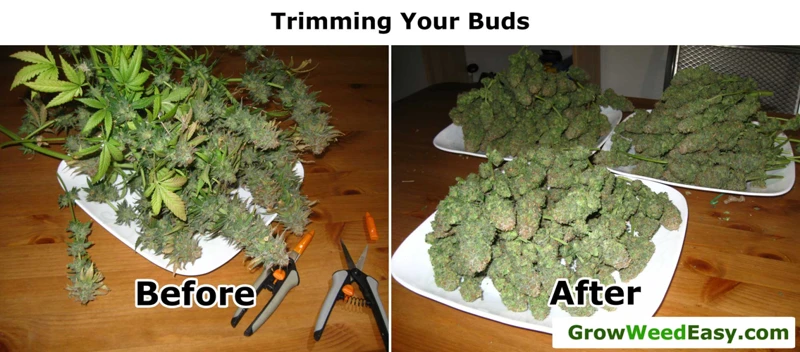
- Trim the buds: Before drying, trim off any excess leaves and stems from the buds. This will help them dry more evenly and prevent mold growth.
- Choose a drying location: The ideal location for drying cannabis buds is a cool, dark room with good air circulation. Avoid drying them in direct sunlight or on top of appliances that emit heat.
- Hang the buds: Once trimmed, hang the buds upside down using string or wire. Make sure there is enough space between the buds to allow for proper airflow.
- Monitor humidity and temperature: It’s important to keep the drying room’s humidity and temperature within optimal ranges. The ideal humidity range is between 45-55%, while the ideal temperature range is between 60-70°F.
- Wait: Allow the buds to dry for 7-14 days, depending on their size and density. Buds are ready to move on to the next step once the stems snap instead of bend and the buds feel dry to the touch.
By properly drying your cannabis buds, you are setting the stage for a successful curing process. Remember to be patient and monitor the humidity and temperature levels to ensure your buds don’t over-dry or develop mold.
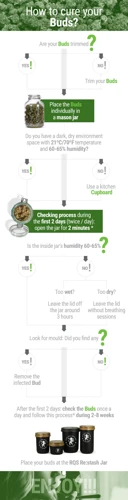
Step 2: Place Buds in Jars
Once you’ve dried your cannabis buds to the ideal moisture level, it’s time to move onto the next step – placing them in jars for the curing process. Choosing the right container is crucial for ensuring a successful cure. Mason jars are the most popular choice among growers because they seal tight and prevent air from circulating in and out of the jar. This helps maintain the ideal humidity level inside the jar, which is a key factor in the curing process.
When placing your buds in the jars, it’s important to pack them loosely. Packing them too tightly can damage the delicate trichomes and affect the overall potency and flavor of your buds. It’s also important to avoid overfilling the jars, as this can lead to excess humidity and mold growth.
Table: Dos and Don’ts when placing buds in jars
| Do | Don’t |
|---|---|
| Use clean, sterile jars that seal tight | Reuse old jars that may have residual bacteria or odors |
| Pack buds loosely | Overpack buds, which can damage trichomes |
| Fill jars no more than 75% full | Overfill jars, which can lead to excess humidity and mold growth |
Once you’ve placed your buds in the jars, be sure to label them with the strain and date so you can keep track of your curing process. It’s also a good idea to place the jars in a cool, dark place, such as a closet or cabinet, to prevent exposure to light and heat.
Step 3: Burp Your Jars
One crucial step in the cannabis curing process is burping your jars. Burping simply means opening your jars for a short period of time to allow fresh air to circulate inside.
This step is important because when you first seal your cannabis buds in the jars, they still have residual moisture that needs to evaporate. As the buds release this moisture, it creates humidity inside the jars, which can lead to mold growth if not properly managed. Burping allows this excess humidity to escape and fresh air to enter, which prevents mold and helps to further cure the buds.
So, how often should you burp your jars? In the first week of curing, it’s recommended to burp your jars several times a day for around 15 minutes each time. This allows the excess moisture to escape and fresh air to enter, which quickens the drying process.
As the curing process progresses and the buds become drier, you can reduce the frequency of burping and increase the length of time the jars are left open. By the third week, you can burp the jars once every few days for around 30 minutes each time.
It’s important to note that every strain and batch of cannabis buds may require different burping times and frequencies. You need to monitor the humidity levels in your jars and adjust your burping schedule accordingly.
To keep track of burping times, you can use a simple table like the one below:
| Week | Burping Frequency | Burping Duration |
|---|---|---|
| 1 | Several times a day | 15 minutes |
| 2 | Every other day | 30 minutes |
| 3 | Every few days | 30 minutes or more |
By following a proper burping schedule, you can ensure that your cannabis buds are curing correctly and will provide you with a high-quality, enjoyable product.
Step 4: Monitor Humidity and Temperature
Maintaining the proper humidity and temperature levels during the curing process is crucial for achieving high-quality cannabis. Here are some steps you can take to properly monitor the humidity and temperature of your curing jars:
- Invest in a hygrometer: A hygrometer is a device that measures the humidity level in the air. You can purchase one online or at your local gardening store. It’s essential to have a hygrometer in each of your curing jars to ensure that the humidity levels remain between 58% and 62%. The optimal humidity level ensures that the cannabis buds are not too moist or too dry, which can lead to mold or a loss of potency, respectively.
- Check the humidity levels daily: It’s crucial to check the humidity levels of your curing jars daily. A sudden drop or rise in humidity can have a significant impact on the quality of your cannabis buds. If the humidity level is too low, add a moistened paper towel to the jar to increase the humidity. If it’s too high, remove the buds from the jar and allow them to air dry for a few hours before returning them to the jar.
- Store curing jars in a cool, dark place: Exposure to light and heat can cause the cannabinoids in the buds to break down, reducing the potency of your cannabis. It’s essential to store your curing jars in a cool, dark place like a closet or cupboard. A temperature of around 70°F (21°C) is ideal for optimal curing. If your curing room is too warm, consider using a small fan or air conditioner to regulate the temperature.
- Monitor for any signs of mold: Mold can ruin your entire crop if not detected early. Keep an eye out for any signs of mold, such as a musty odour or white fuzzy growth on the buds. If you spot any mold, remove the affected buds immediately and increase the ventilation in your curing room.
By taking these steps, you can ensure that your cannabis buds are properly cured and have the optimal flavor, aroma, and potency.
Step 5: Enjoy Your Perfectly Cured Cannabis
After patiently waiting for the curing process to be complete, it’s time to enjoy the fruits of your labor. Here are some steps to make the most out of your perfectly cured cannabis:
- Inspect: Take a good look at your buds. They should be plump and dense with no signs of mold or excessive moisture. You should also notice a pleasant aroma that is indicative of a well-cured product.
- Store: Once you’ve confirmed that your buds are fully cured and ready to use, it’s time to store them properly. They should be kept in airtight containers such as mason jars and stored in a cool, dry place away from direct sunlight. This will help ensure that they retain their potency and flavor for as long as possible.
- Grind: When you’re ready to use your cured cannabis, it’s best to grind it up first. This will help release the full flavor and aroma of the buds and also makes it easier to use in edibles or other products.
- Experiment: One of the best things about perfectly cured cannabis is how versatile it can be. Try using it to make edibles, extracts, or topicals. You might be surprised at how different the effects can be from smoking or vaping.
- Relax: Finally, sit back and enjoy the effects of your perfectly cured cannabis. Whether you’re looking to relax, unwind, or get creative, a well-cured product can help you achieve your goals in a safe and enjoyable way.
By following these steps, you can ensure that your cured cannabis is of the highest quality and will provide the best experience possible. Remember that the curing process takes time and patience, but the end result is well worth the effort. Enjoy responsibly!
Conclusion
In conclusion, curing your cannabis buds is an essential step in the process of obtaining high-quality cannabis. It allows for the full development of the bud’s flavor, aroma, and potency, resulting in a smoother, more enjoyable smoking experience.
By properly drying and curing your buds, you can ensure that they retain their maximum potency and aroma for an extended period. This can significantly benefit those who rely on cannabis for its therapeutic properties and want to experience the best effects possible.
It’s important to note that the duration of curing time can vary depending on various factors such as the strain, humidity, temperature, and personal preference. Therefore, it’s crucial to have a thorough understanding of these factors and be diligent in monitoring them to ensure the buds are appropriately cured.
Overall, perfecting your curing process is a valuable investment that can result in high-quality, potent, and flavorful buds that will enhance your cannabis experience. So don’t shortcut this vital part of the process – instead, take the time to develop and refine your curing methods, and you’ll be rewarded with the best cannabis possible.
Frequently Asked Questions
How does curing affect the potency of cannabis buds?
Curing allows for the development of the full cannabinoid and terpene profile, ultimately increasing the potency and flavor of the buds.
Can you cure cannabis buds for too long?
Yes, over-curing can lead to the loss of potency and flavor in the buds.
Do you need to cure cannabis buds if you plan to make edibles?
Curing is not necessary for making edibles, as the cannabinoids are extracted through the cooking process.
Can you speed up the curing process?
While it is possible to speed up the drying process, curing cannot be rushed as it is a slow process that requires time and patience.
What is the purpose of burping the jars during the curing process?
Burping the jars allows for excess moisture and gases to escape, preventing mold growth and ensuring the buds cure properly.
Do you need a specific type of jar for curing cannabis buds?
Mason jars with an airtight seal are the most commonly used jars for curing cannabis buds.
Can you cure cannabis buds in a plastic container?
No, plastic can trap moisture and does not allow for proper ventilation, which can lead to mold growth in the buds.
What is the optimal temperature and humidity for curing cannabis buds?
The optimal temperature for curing cannabis buds is between 60-70°F (15-21°C) and the optimal humidity level is between 55-62%.
Can you use a hygrometer to measure the humidity in the curing jars?
Yes, a hygrometer can be used to accurately measure the humidity levels in the curing jars.
Can the curing process improve the quality of low-quality cannabis buds?
The curing process can improve the flavor and aroma of low-quality buds, but it cannot turn low-quality buds into high-quality buds.

