
Trimming Your Cannabis Plants: A Step-by-Step Guide
For many cannabis growers, the process of trimming their plants can sometimes feel overwhelming. Where do you even start? What tools do you need? And how do you make sure you’re doing it correctly? But fear not, with the right knowledge and preparation, trimming your cannabis plants can actually be a satisfying and rewarding experience. Not only will it improve the appearance and potency of your buds, but it’s also key in redirecting nutrients and improving airflow to avoid mold. In this guide, we’ll take you through the step-by-step process of trimming your cannabis plants so you can confidently produce high-quality buds.
Why Trimming Your Cannabis Plants is Important
Contents
Trimming your cannabis plants is an essential step in the cultivation process. Not only does it improve the airflow and prevent mold, but it also redirects nutrients to the buds leading to better potency and appearance.
Improve Airflow and Avoid Mold: Trimming your cannabis plants can help improve the airflow within the plant, making it less likely for mold to develop. Airflow is essential, as it reduces the humidity levels around the plant and helps prevent stagnant air. Removing excess leaves and branches can also help reduce shade accumulation, leading to better light penetration and photosynthesis.
Redirect Nutrients to Buds: When you trim your cannabis plants, you’re directing more nutrients to the buds rather than being wasted on the unnecessary leaves and branches. By removing non-productive leaves and focusing on the buds, you’ll end up having denser and more potent buds.
Improve Appearance and Potency: Trimming your cannabis plants can help in improving their appearance and potency. Removing the unnecessary leaves improves the overall appearance of the plant by exposing the buds, which gives a cleaner and more professional appearance. Removing the leaves surrounding the buds redirects the nutrients, leading to denser and more potent buds.
Trimming your cannabis plants is a vital step in the cultivation process. It helps improve the airflow, prevent mold, redirect nutrients to the buds, and improve the potency and appearance of your plants. By spending the time and effort trimming your plants, you can ensure maximum yield and quality of your crop.
Improve Airflow and Avoid Mold
One of the most important reasons for trimming your cannabis plants is to improve the overall health of your plants. By removing excess foliage and branches, you can improve the airflow around the buds, which reduces the risk of mold and mildew growing on your plants. This is particularly important in humid climates, where mold and mildew can quickly take hold and ruin your harvest. Removing excess leaves also allows more light to penetrate the canopy, which can help your plants grow and develop more efficiently. By taking the time to trim your cannabis plants properly, you can ensure that each plant has the best possible chance to thrive and produce high-quality buds.
Redirect Nutrients to Buds
One of the key benefits of trimming your cannabis plants is the ability to redirect nutrients to the buds. During the vegetative stage, your plants will produce an abundance of leaves, which can become a drain on nutrients. By removing these excess leaves during the trimming process, you can ensure that your plant is focusing its energy on producing dense, potent buds rich with THC and other cannabinoids.
Here are some ways trimming can help redirect nutrients to buds:
- Removing fan leaves that are shading buds allows more light to penetrate through to the bud sites, encouraging growth and photosynthesis.
- Trimming lower branches and leaves that are not receiving enough light can help redistribute nutrients to the top cola or main bud, promoting further growth and increasing the potency of the top buds.
- Trimming away excess foliage can help air circulate around the buds, which can reduce the risk of mold and mildew formation. This is especially important during the flowering stage, when humidity levels can rise and create a breeding ground for mold.
- Trimming also helps to prevent the plant from overgrowing or becoming too bushy, which can lead to uneven bud development and lower yields.
By redirecting nutrients to the buds, you are ultimately helping to maximize the quality and potency of your cannabis plants, resulting in a more enjoyable and potent smoking or vaping experience.
Improve Appearance and Potency
One key reason for trimming your cannabis plants is to improve their appearance and potency. By removing excess leaves, you can give your buds a cleaner look, allowing them to stand out more. This can be especially important if you plan to sell your cannabis, as customers are often willing to pay more for buds that are visually appealing.
In addition to improving appearance, trimming can also boost potency. The leaves that grow around the buds, known as sugar leaves, contain trichomes, the tiny resin glands that produce the cannabinoids and terpenes responsible for the plant’s effects and flavor. By trimming away the excess sugar leaves, the trichomes become more concentrated on the buds themselves, resulting in a higher potency.
This table summarizes the benefits of improving the appearance and potency of cannabis plants:
| Benefit | Description |
| Improved Appearance | Removing excess leaves gives buds a cleaner look, making them more visually appealing and potentially increasing their value. |
| Higher Potency | Trimming sugar leaves concentrates the trichomes on the buds, resulting in a higher potency and potentially stronger effects. |
By trimming your cannabis plants, you can enhance their overall quality and value, making them more desirable to both yourself and potential buyers. So, it’s definitely worth taking the time to trim your plants properly for these benefits.
When to Trim Your Cannabis Plants
Trimming your cannabis plants is a crucial step in the growing process, and knowing when to do it is just as important. You don’t want to trim your plants too early, as this can stunt their growth and affect your yield. On the other hand, trimming too late can result in overripe buds that are past their prime. So, when is the best time to trim your cannabis plants?
The Vegetative Stage
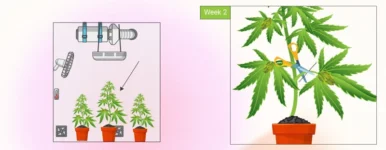
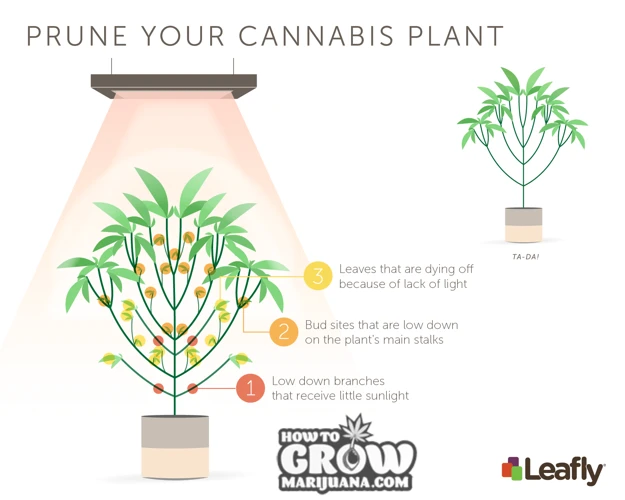
During the vegetative stage, your cannabis plants are focused on growing tall and developing a robust structure. Trimming is not necessary during this stage, but it can be done to shape the plant and encourage bushy growth. You can remove any lower branches or leaves that aren’t getting enough light.
The Flowering Stage
Once your cannabis plants enter the flowering stage, it’s time to start thinking about trimming. The first few weeks of flowering are crucial, as this is when your buds are developing. You can begin by removing any large fan leaves that are blocking light from reaching the buds. However, be careful not to remove too many leaves, as they are important for photosynthesis.
Mid-Flowering Stage
As your cannabis plants reach the mid-flowering stage, it’s time to start trimming the sugar leaves. These small leaves that grow out of the buds can be trimmed away to improve the appearance and potency of your buds. This is also a good time to remove any smaller buds that won’t mature into full-sized colas.
Late-Flowering Stage
In the late-flowering stage, you should be focused on removing any dead or yellowing leaves that could harbor mold or pests. It’s also a good idea to trim away any excess foliage that could block airflow and cause mold to develop. Be careful not to damage the buds themselves, as they are delicate at this stage.
The best time to trim your cannabis plants is during the flowering stage, starting with the removal of large fan leaves and progressing to sugar leaf trimming in the mid-flowering stage. Just be sure to avoid trimming too early or too late, and your plants will thank you with a bountiful yield of high-quality buds.
Tools Needed to Trim Your Cannabis Plants
To successfully trim your cannabis plants, you will need several tools that are specifically designed for this task. These tools are essential in ensuring that you do not damage the plants while trimming and that the cuttings are of high quality.
Scissors and Shears: You will need a good pair of scissors or shears to remove the larger leaves and stems from your plants. Look for a pair that is sharp and comfortable to use, as you may be trimming for several hours.
Trimmers and Clippers: For removing smaller leaves around the buds, it is best to use trimmers or clippers. These tools are specifically designed for accurate and fast trimming.
Gloves and Eye Protection: Trimming cannabis plants can be messy work, and wearing gloves will help to protect your hands from the resin that may stick to them. Eye protection is also recommended to protect your eyes.
Alcohol and Cleaning Supplies: It is essential to keep your tools clean during trimming to prevent the spread of bacteria or other harmful agents. Use rubbing alcohol and cleaning supplies to keep your tools clean and sterile.
Having the right tools can make a big difference in the quality and effectiveness of the trimming process. Make sure to invest in high-quality equipment and take necessary precautions to protect yourself and your plants during the trimming process.
Scissors and Shears
One critical aspect of trimming your cannabis plants is having the right tools on hand. Among the most essential tools are sharp scissors and shears, which allow you to make precise snips and cuts without damaging the buds. Your choice of scissors and shears will play a significant role in determining the final quality of your buds, so it’s important to know what to look for. Keep reading to learn more about these essential tools for trimming cannabis plants.
Trimmers and Clippers
When it comes to trimming your cannabis plants, having the right tools is essential for achieving a clean and precise trim. Two of the most commonly used tools for this process are trimmers and clippers. While these terms are often used interchangeably, there are some slight differences between the two.
Trimmers: Trimmers are electric or battery-powered machines used to trim large quantities of buds quickly and efficiently. They typically have multiple blades, ranging from two to four, that spin rapidly to trim the buds. Trimmers come in two main types: bowl trimmers and hand-held trimmers.
| Type | Description |
|---|---|
| Bowl Trimmers | These machines have a bowl-shaped design with a metal grate in the bottom and a lid that fits on top. The buds are placed inside the bowl, and the lid is closed. As the blades spin, the buds are trimmed by coming into contact with the metal grate. Bowl trimmers are fast and efficient, but they can be loud and produce a lot of plant material waste. |
| Hand-Held Trimmers | These trimmers are similar to scissors but have multiple blades that allow for faster and more precise trimming. They come in various sizes, with some models having curved blades to make it easier to reach tight spaces on the buds. Hand-held trimmers are more versatile than bowl trimmers and produce less waste, but they can be tiring to use for long periods. |
Clippers: Clippers are hand-held, scissor-like tools used for smaller-scale trimming. They are generally more precise than trimmers and are useful for trimming hard-to-reach areas on the buds. Clippers come in various sizes and can have different types of blades, including straight and curved blades.
| Type | Description |
|---|---|
| Straight Clippers | These clippers have straight blades that are ideal for trimming the larger fan leaves and stems that are not easily removed with trimmers. They are also useful for precision trimming of smaller leaves and buds. Straight clippers come in different sizes and can have different handle designs for comfort. |
| Curved Clippers | These clippers have curved blades that make it easier to reach tight spaces on the buds. They can also be used for precision trimming of smaller leaves and buds. Curved clippers come in different sizes and can have different handle designs for comfort. |
Whether you choose to use trimmers or clippers for trimming your cannabis plants, it is essential to make sure they are sharp and in good condition to avoid damaging the buds. Additionally, wearing gloves and eye protection can help protect your hands and eyes from the sticky and potentially irritating resin produced by the cannabis plant during trimming.
Gloves and Eye Protection
When it comes to trimming your cannabis plants, you want to make sure you have the proper protective gear to keep yourself safe. This includes wearing gloves and eye protection during the trimming process.
Gloves are important for two reasons: to protect your hands from sticky resin and to prevent the transfer of oils and contaminants from your hands to the buds. For trimming cannabis plants, you will want to use nitrile gloves that fit snugly but comfortably.
Eye protection is also essential to protect your eyes from accidental contact with debris or resin. Safety glasses or goggles that fit snugly around your eyes and provide ample coverage are recommended.
To help you better understand the types of gloves and eye protection available for trimming cannabis plants, here is a table outlining some options:
| Gloves | Eye Protection |
|---|---|
| Nitrile gloves | Safety glasses |
| Latex gloves | Goggles |
| Leather gloves | Full face shield |
It is better to be safe than sorry when it comes to trimming cannabis plants. Wearing gloves and eye protection can prevent accidents and ensure a successful trimming process.
Alcohol and Cleaning Supplies
Ensuring proper hygiene when trimming your cannabis plants is critical for the overall health of your plants as well as the quality of the final product. To maintain cleanliness and prevent the spread of diseases or pests, you will need to have the following alcohol and cleaning supplies ready:
| Cleaning Supply | Why it’s Needed |
|---|---|
| Rubbing Alcohol | Used to sanitize tools in between trimming each plant to prevent the spread of bacteria or fungi. |
| Clean Water | Used to rinse plants and equipment to remove dirt or debris that could contaminate the trim. |
| Paper Towels | Used to dry your hands and tools during the trimming process to reduce the risk of spreading bacteria or other contaminants. |
| Bleach Solution | Used to sanitize surfaces in your trimming area to prevent the spread of microbes that could harm your plants or contaminate the final product. |
| Disposable Gloves | Used to protect your hands from resin and other sticky substances during the trimming process, as well as to prevent the spread of bacteria or fungi. |
By having these alcohol and cleaning supplies on hand and using them properly, you can ensure that your trimming process is as hygienic and safe as possible, which will help maintain the quality of your crop and protect your investment in time and resources.
Steps for Trimming Your Cannabis Plants
Step 1: Harvest Your Cannabis Plants
Before you start trimming your cannabis plants, you need to properly harvest them. This involves cutting down the plants and removing the branches or colas that contain the buds. After harvesting, hang the branches upside down to dry out for a few days.
Step 2: Remove Fan Leaves and Small Buds
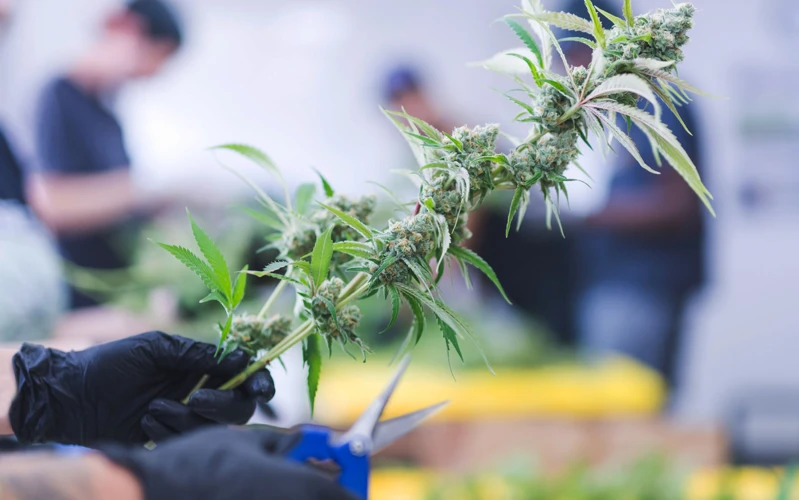
After drying, it’s time to start trimming. Remove the large fan leaves first, as they contain very little THC and will just take up room in your jars. Next, trim away the small popcorn buds that don’t have many trichomes.
Step 3: Trim Sugar Leaves
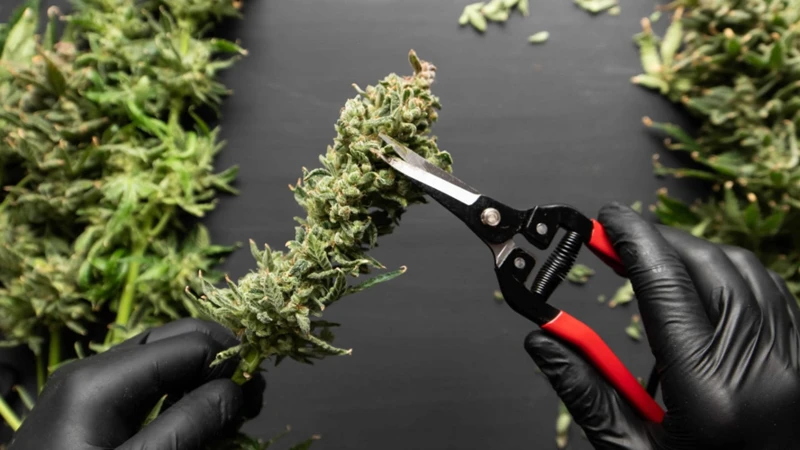
After removing the large fan leaves and small buds, it’s time to trim the sugar leaves. These are the small leaves that grow out from the buds and are covered in trichomes. Use a sharp pair of scissors or shears to carefully trim away these leaves, leaving behind only the buds.
Step 4: Hang the Buds to Dry
Once you’ve trimmed away all the excess leaves, you’ll want to hang your buds up to dry again. This will help to remove any excess moisture from the buds and make them easier to cure.
It’s important to note that trimming can be a time-consuming and tedious process, especially if you have a lot of plants to trim. Take breaks as needed and make sure to clean your tools regularly to prevent the spread of any pests or diseases.
Post-Trimming Care for Your Cannabis Plants
After trimming your cannabis plants and allowing them to dry for a few days, it’s important to properly cure and store your buds. This helps to improve the flavor and aroma of your buds, as well as extend their shelf life.
Curing Your Buds
To cure your buds, place them in airtight jars and store them in a cool, dark place. Open the jars once a day to allow any excess moisture to escape, but make sure not to leave them open for too long.
Storing Your Cannabis Properly
Once your buds are properly cured, store them in a cool, dry place away from direct light. This will help to preserve the potency and flavor of your buds for longer. It’s also important to keep your cannabis away from children and pets, as it can be harmful if ingested in large quantities.
By following these steps for trimming and post-trimming care, you can ensure that your cannabis plants are healthy, potent, and ready for use.
Step 1: Harvest Your Cannabis Plants
One of the most crucial steps in trimming your cannabis plants is the harvest process. This is the culmination of months of hard work and careful cultivation, and you’ll want to make sure you do it right. Harvesting your cannabis at the right time ensures the best possible potency and flavor from your buds. But how exactly do you go about harvesting your plants? It can be a daunting task, but with the right tools and knowledge, it’s a lot easier than you might think. Let’s dive into the first step of trimming your cannabis plants: harvesting.
Step 2: Remove Fan Leaves and Small Buds
Once you have harvested your cannabis plants, it’s time to move onto the trimming process. The first step in this process is to remove the fan leaves and small buds from your plants. This is a crucial step because it allows you to focus on the larger buds that contain the highest concentration of trichomes.
To make this process easier, it’s recommended to have a clean and organized workspace. Lay out a large flat surface, such as a table, and cover it with a clean cloth or paper towels. This will help prevent any plant matter or debris from getting on your buds and potentially contaminating them.
Here are the tools you’ll need for this step:
| Tools | Description |
|---|---|
| Scissors or shears | Used to cut away the fan leaves and small buds that you don’t want to keep. |
| Trimmers or clippers | May be necessary to trim away the smaller leaves and buds that are harder to reach or see. |
| Gloves and eye protection | Wear gloves to protect your hands and eye protection to prevent any plant matter from getting into your eyes. |
| Alcohol and cleaning supplies | Use alcohol and cleaning supplies to disinfect your tools and workspace before trimming. |
Once you have all of your tools ready, you can begin the process of removing the fan leaves and small buds. To do this:
- Hold the stem of the plant with one hand and use the scissors or shears to remove the fan leaves that are closest to the stem. These leaves are typically larger and have a lower concentration of trichomes, making them less desirable for smoking or extracting.
- Use the trimmers or clippers to remove any small buds or leaves that are difficult to reach or see.
- Continue this process until you have removed all of the fan leaves and small buds that you don’t want to keep.
It’s important to note that you should be careful not to remove too much of the plant matter, as this can negatively affect the overall potency and flavor of your buds. Once you have removed the unwanted leaves and buds, you’ll be left with the larger, more desirable buds that you can now trim further in the next step.
Step 3: Trim Sugar Leaves
After removing the fan leaves and smaller buds, it’s time to focus on trimming the sugar leaves. These are the smaller leaves that surround the buds and are covered in resin glands, giving them a sparkling appearance. Trimming these leaves will improve the appearance and potency of the buds.
Step 3: Trim the sugar leaves by using scissors or shears to carefully cut them away from the buds. Be sure to leave enough leaf material to protect the buds, but remove any excess that doesn’t have enough resin glands to make it worth keeping.
It’s important to take your time and be meticulous during this step, as it can greatly impact the quality of your final product. You want to remove as much of the excess leaf material as possible without damaging the buds themselves.
Pro-tip: Some growers prefer to use specialized trimming scissors, which have small blades that can navigate the contours of the buds more easily. This can result in a more even and precise trim job.
As you continue to trim, periodically examine the buds for any remaining leaves or stems. Be sure to remove these as well, as they can negatively impact the taste and burn of the buds.
Note: It is important to be patient and maintain focus during this stage of trimming your cannabis plants. Trimming can be time-consuming, but the final product will be well worth the effort.
Step 4: Hang the Buds to Dry
After trimming your cannabis buds, the next step is to hang them to dry. This is a critical step in the process because it ensures that the buds are properly dried, which is essential for their quality and potency. Here are the steps to follow when hanging your buds to dry:
| Step | Description |
|---|---|
| Step 1 | Prepare a clean, dry and dark room, with temperatures between 60-70F (15-21C) and humidity levels around 50-60%. These conditions will allow the buds to dry slowly and evenly, preserving their taste and aroma. |
| Step 2 | Use a piece of string or wire to attach the buds to a clothing hanger, or any elevated surface where they can hang freely. Avoid overcrowding them, as this can prevent proper airflow and cause mold. |
| Step 3 | Hang the buds upside down, with their stems facing up. This will allow the moisture from the buds to flow downwards and escape through the stems, drying them out more efficiently. |
| Step 4 | Leave the buds to dry for 7-10 days, depending on their size and density. Check them regularly by gently touching them to see if they feel dry to the touch. If they still feel wet or squishy, give them more time to dry out. |
| Step 5 | Once the buds are dry, remove them from the hangers and trim off any remaining stems or leaves. You can also use a trimming machine to speed up this process. |
It is important to note that drying time can vary depending on the humidity levels in your location, as well as the size and density of your buds. You may need to adjust the drying time accordingly, and it is always better to err on the side of caution and dry them for longer, rather than rush the process.
By following these steps for hanging your buds to dry, you will ensure that they are properly dried and ready for the next stage of the curing process. Proper drying and curing are crucial for preserving the quality, taste, and potency of your cannabis, so take the time to do it right.
Post-Trimming Care for Your Cannabis Plants
After you’ve finished trimming your cannabis plants, there are a few important steps you need to take to properly care for them. These steps will help ensure that your buds are potent, flavorful, and long-lasting.
Curing Your Buds
The first step after trimming your cannabis plants is to cure your buds. Curing involves storing your buds in a cool, dry place in order to remove excess moisture and improve flavor, aroma, and potency. To cure your buds, you’ll need to place them in an airtight container, such as a mason jar. Be sure to fill the jar to about 75% capacity, leaving some room for air to circulate. Store the jar in a cool, dark place, such as a closet or pantry, and open it once a day to allow air to circulate.
Storing Your Cannabis Properly
Once your buds are cured, it’s important to store them properly in order to maintain their freshness and potency. The best way to store your cannabis is in an airtight container, such as a mason jar, in a cool, dark place, such as a closet or pantry. Be sure to keep your buds away from heat and light, which can degrade their quality over time.
Another important factor to consider when storing your cannabis is humidity. Ideally, you want to keep your buds at a humidity level of around 60-65%. If your buds are too moist, they can develop mold or mildew, while if they’re too dry, they can become brittle and lose potency. To maintain the proper humidity level, you may want to invest in a hygrometer, which measures humidity levels.
In addition to using an airtight container and monitoring humidity levels, you may also want to consider adding a humidity pack to your storage container. These packs are designed to help maintain the proper humidity level and prevent mold and mildew growth.
In conclusion, post-trimming care is just as important as the trimming process itself when it comes to producing high-quality cannabis buds. By properly curing and storing your buds, you can help ensure that they maintain their potency, flavor, and aroma for months to come.
Curing Your Buds
Once you’ve finished trimming your cannabis plants, the next step is to properly cure your buds. This crucial process will preserve the quality, aroma, and potency of your cannabis. Curing is essentially the process of drying your buds slowly and allowing the remaining moisture to slowly evaporate. This can be a delicate process that requires attention to detail, patience, and some specialized equipment. In this section, we’ll cover everything you need to know about curing your buds to achieve the best possible results. So, let’s dive in and discover the ins and outs of proper bud curing.
Storing Your Cannabis Properly
Proper storage is crucial to maintain the quality and potency of your cannabis buds. After trimming, you need to follow a few steps to store your cannabis properly. Here is a step-by-step guide to storing your cannabis:
- Choose the Right Container: Find an airtight container that will keep your cannabis buds fresh for a long time. Mason jars, glass containers with rubber seals or plastic containers with lids are ideal. Avoid using sandwich bags or foil, as they do not provide airtight protection, and can dry out the buds.
- Store in a Cool, Dark Place: Store your cannabis buds in a cool, dark place away from direct sunlight. Exposure to light and heat can break down the cannabinoids, affecting the potency of your cannabis. The ideal temperature for storage is between 60-70°F (15-21°C).
- Control the Humidity: Maintaining the correct humidity level is essential for the quality of your cannabis buds. If the humidity is too high, it can cause mold growth, and if the humidity is too low, the buds will dry out and lose potency. Use a humidity control pack, such as Boveda, to keep the humidity level between 58%-62%.
- Avoid Strong Odors: Cannabis can easily absorb odors from its surroundings. Keep your cannabis buds away from strong-smelling items, such as perfumes, spices, or cleaning products.
- Check Regularly: Check your cannabis buds regularly for any signs of mold, mildew, or damage. Remove any buds that show these signs to prevent further contamination.
By following these simple steps, you can ensure proper storage and preserve the quality and potency of your cannabis buds.
Conclusion
In conclusion, trimming your cannabis plants may seem like a daunting task, but it is an essential part of the cultivation process that can greatly improve the quality and quantity of your harvest. Proper trimming techniques can redirect nutrients to the buds, improve airflow and prevent mold, and enhance the appearance and potency of your cannabis plants.
Knowing when to trim your plants is crucial, and having the right tools on hand, such as scissors, shears, trimmers, clippers, gloves, and cleaning supplies, can make the process much easier. Following the proper steps, including harvesting your plants, removing fan leaves and small buds, and trimming sugar leaves, can result in a successful harvest.
After trimming, it is important to properly care for your cannabis plants through curing and storing them correctly. Curing your buds allows them to develop an optimal flavor and aroma, while proper storage reduces the risk of mold or loss of potency.
Overall, by taking the time to trim your cannabis plants correctly, you can greatly enhance the quality and potency of your harvest, resulting in a more enjoyable and effective experience for both medicinal and recreational users. Happy trimming!
Frequently Asked Questions
How long should I wait before trimming my cannabis plants?
Wait until your cannabis plants have finished flowering and the buds are ready for harvest. This typically takes 6-8 weeks for indoor plants and 8-12 weeks for outdoor plants.
What tools do I need for trimming my cannabis plants?
You will need sharp scissors or shears, trimmers or clippers, gloves, eye protection, and alcohol for cleaning your tools.
Why should I remove fan leaves and small buds?
Removing fan leaves and small buds will redirect nutrients to the larger, more potent buds, and improve airflow to avoid mold.
What are sugar leaves?
Sugar leaves are the small, trichome-covered leaves that surround the buds. They can be trimmed for a cleaner look and to improve potency.
Should I trim my cannabis plants before or after drying?
You should trim your cannabis plants after harvesting and before drying. This makes the trimming process easier and prevents the leaves from sticking to the buds during drying.
How do I hang my buds for drying?
Hang your buds in a cool, dry, and dark space with good airflow. Use string or wire to hang the stems upside down, making sure they don’t touch each other.
What is curing and why is it important?
Curing is the process of drying and aging harvested cannabis buds to improve their flavor, aroma, and potency. It is important for a smoother smoke and better overall experience.
How long does curing take?
Curing can take anywhere from 1-3 weeks, depending on the humidity level and temperature of the curing environment.
How should I store my cured cannabis?
Store your cured cannabis in an airtight container, such as a mason jar, in a cool, dark, and dry place. Avoid exposure to light, heat, and humidity.
Can I reuse the trimmings from my cannabis plants?
Yes, you can use trimmings for making edibles, concentrates, or topicals. However, keep in mind that trimmings have a lower potency than the buds and may require more material for desired effects.

